
Setup guide


Dedicated Micros ©2006
42
DS2 Network Guide
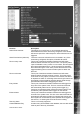
Change Standard Record Rate This will change the record rate of the cameras that have been
identied in the Standard Record Rate page (refer to Camera Set-
up for information on how to congure standard record rate). The
cameras will switch to the alarm record rate specied.
Note: Changing the zone cameras has no effect on which cameras have their standard record
rate changed.
Change Prole Record Rate This changes the record rate of the cameras that are selected
in the alarm zone to the prole record rate previously specied
(refer to How to Congure Prole Recording in this section of the
manual). Each of the cameras must have an alarm record rate
specied.
Connect/Dial on Alarm The unit will automatically connect to the remote alarm monitoring
station dened.
Note: You need to enable the dial on alarm system feature for this function to work.
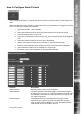
Alarm Enabled in Day mode Each alarm can be congured to be active when the unit is in a
specic operation mode, enable this for the alarm to be active in
Day operation mode.
Alarm Enabled in Night mode Each alarm can be congured to be active when the unit is in a
specic operation mode, enable this for the alarm to be active in
Night operation mode.
Alarm Enabled in W/E mode Each alarm can be congured to be active when the unit is in a
specic operation mode, enable this for the alarm to be active in
Weekend operation mode.
24 Hour Alarm This option would be enabled for alarms that do not want to
change at any time and will remain as programmed, i.e. Panic
Alarm. When this is selected the day, night and weekend options
are not available.
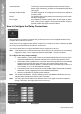
Record still image This will record a still image of the trigger along with the standard
recording. Still images are accessible through the Live page of
the web interface. This will also add the word ‘alarm’ to the title
header.
Protect alarm Images Alarm images can be automatically protected from being
overwritten.
Archive Alarms This will force the unit to automatically download alarm images via
FTP to an FTP server or directly to the local CD writer.
Primary Camera The primary camera is the camera that the unit will take a still
image from for e-mailing on alarm, added to the event database,
and this will be the camera that will be the rst to be displayed on
the Operator monitor.
Goto Preset It is possible to action a camera to be automatically sent to a
preset position when an alarm is triggered, identify the camera
and the preset number.
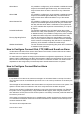
Close Relay Any of the onboard or external relays can be congured to
automatically close on receipt of an alarm, the options are
onboard relays 1 to 6 (if relays 1 to 3 are not pre-dened within
the System-> Relay Setup page) and Module 1 Relays 1 to 16.
E-mail Image When e-mail on alarm is enabled it is possible to attach an image
to the e-mail, the resolution of the image must be dened. It is
important to consider the speed of the link between the unit and
the SMTP Server that the e-mail will be sent to. The resolution
options available are: thumbnail, high resolution, medium
resolution and low resolution. The resolution setting is a system
setting and will have an affect on all options that include e-mail
attachments.