
Setup guide


Dedicated Micros ©2006
38
DS2 Network Guide
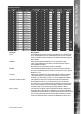
Nuisance Count This is a repetitive detector value. When an alarm is received on
the unit it will store the alarm time and will monitor the number
of times the same detector is triggered within an hour period. If
the detector is triggered the number of times that has been set
for the nuisance count then the unit will de-activate this detector
from triggering an alarm on the system for an hour. The unit will
continue to monitor the detector and check how many times it is
triggered during this hour, if it is triggered the same number at the
nuisance counter it will remain de-activated for another hour, this
will continue until the trigger value goes below the nuisance count
setting.
Stuck Time If any of the alarms/detectors are active for a period longer than
specied then these will automatically be omitted. This time period
is set in minutes
Pulse extension The pulse extension extends the trigger to avoid double triggers
from occurring, i.e. if a second alarm is received, after the rst
alarm is nished but still within this time period, the unit will not
create a new event.
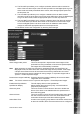
Actions can be allocated to each alarm zone; This menu allows a single alarm trigger to carry out
any action such as increase record cameras 1-4, send notication via FTP, etc.
It is possible to allocate up to 32 alarm zones to carry out a combination of actions.
Note: There are some pre-dened alarm zones; Zone 30 Disk Low, Zone 31 Disk Full, Zone 32
Panic Alarm.
This section is separated into:
Enabling and conguring the alarm zone
Allocating alarm actions
To enable and congure the alarm zone:
1. Select Alarms/VMD -> Alarm Zone.
2. Alarm recordings can be protected from being overwritten for a set period of time or
indenitely. Enter the time period in days that the alarms are to be protected or place a
tick in the box alongside indenitely.
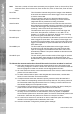
3. Set the alarm entry timer in seconds, this is part of the advanced alarm feature and are
displayed when this feature is enabled.
4. Set the alarm exit timer in seconds, this is part of the advanced alarm feature and are
displayed when this feature is enabled.
5. Select the alarm zone to be congured from the drop down option (Zone 1 to Zone 32).
6. Enter an appropriate title to the alarm zone, this will be stored in the database (if
enabled), it is also possible to use the camera title for identication.
7. Enter the time period prior to the alarm that you wish to save along with the incident for
review with the incident, this time is in seconds.
8. Enter alarm duration in seconds; this is the time period where associated video will be
protected from being overwritten.
9. The zone alarm input can be an of the external alarms (direct or 485), any of the
congured VMD zones or any of the preset settings, select the appropriate alarm input
from the drop down list.