
Setup guide


Dedicated Micros ©2006
28
DS2 Network Guide
This can then trigger a number of operations such as FTP alarm notication and increase camera
recording rate for the corresponding video input.
Note: It is recommended that you utilise the Walk test function to ensure the settings are correct
for each input enabled, if the settings are too low this will mean VMD will not be identied to
high and false alarms will occur.
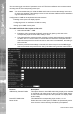
Conguration of VMD will be separated into three sections:
Enabling video inputs and display options
Conguring action on notication of VMD or activity
Setting up the VMD / Activity area
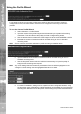
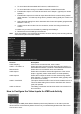
To enable individual video inputs on the unit:
1. Select Alarms/VMD -> VMD.
2. Enable the video inputs that will identify movement by placing a tick next to the
corresponding input for either VMD, Activity or both.
3. The pulse extension ensures that the unit does not have double triggers by extending
the alarm time. If a second alarm is received after the rst alarm is complete but still
within this time period the unit will not enter a new event in the database, this setting is
set in seconds.
4. Enter the pre-alarm time settings in seconds, this is the time prior to the VMD trigger
that is to be saved and protected from being overwritten along with the actual incident.
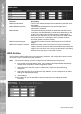
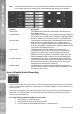
Function Description
VMD/Activity Camera Enable This option allows for both VMD and Activity display to be enabled
on individual or all video inputs on the unit. Tick the VMD, Activity
of both boxes that correspond to the input that is to display VMD
and/or Activity.
Dome/PTZ VMD Inhibit This identies the corresponding input number, 1 to 16
Never Inhibit Enable the never inhibit option for VMD to be permanently active
even when the camera is being controlled by the Operator