
Setup guide


Dedicated Micros ©2006
11
DS2 Network Guide
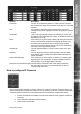
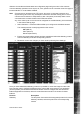
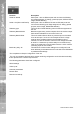
Function Description
Connected The unit can automatically detect if a camera source is present,
the corresponding input will be enabled in this menu for connected
cameras.
Title It is possible to allocate an ASCII camera title to each of the
cameras, which will be displayed onscreen along with the camera
number.
Terminated As the unit supports loop through it is necessary to remove the
termination of any inputs that are ‘looped’, by default all inputs are
terminated at 75 ohms.
Mono If the video input on the unit has a black and white (monochrome)
source connected then enable the corresponding camera. The
unit will try and compress the colour contents of the image if
this box is not enabled, ticking this box will remove unnecessary
overhead on the compression process.
Spot Monitor This will toggle the ability to view this camera input on the spot
monitor
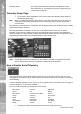
Telemetry The unit supports numerous coaxial telemetry protocols. Refer
to the section ’How to Select and Enable Coaxial Telemetry’ for
further information.
Camera Fail Reporting If the video input on the unit does not identify a 1V peak-to-peak
signal then the unit can transmit an alarm notication e-mail for
camera failure on the corresponding video input.
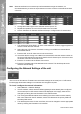
Click here to see thumbnail images
This will display a thumbnail view of the video connected to
the unit. Place the cursor in the camera title box to view the
corresponding video input.
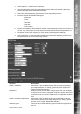
How to congure IP Cameras
The unit supports the capability to connect directly to IP Cameras (Cameras connected directly to a
network, broadcasting a digital video stream from an IP address). It can also connect to other NetVu
Connected DVR’s and treat one of the network feeds from that DVR as a digital video stream.
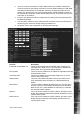
1. Ensure IP Cameras are enabled in the Advanced Features menu (System->Advanced
Features)
2. Select Cameras->Camera and Record Setup
3. Select a free camera input.