
Operating Instructions and Installation Instructions


AD Holdings ©2011
176
TransVu Express
Atmel AVR Microcontroller
1) Connect the programming pod to a USB port on the PC
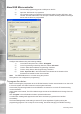
2) Open the “AVR Studio 4” programme.
3) If the system is being congured for the rst time select ‘Program AVR’ then ‘Auto
connect’ from the Tools menu; This will open a window showing details of the target
device and the le to be programmed.
Congure the software using the following settings;
1) In the Device drop down box, select ‘ATmega48’.
2) In the Programming mode drop down box, select ‘ISP mode’.
3) Tick the ‘Erase Device Before Programming’ checkbox.
4) Tick the ‘Verify Device After Programming’ checkbox.
5) Select ‘Inputhexle’ in the Flash section and browse to the location of the
rmware to be loaded into the microcontroller.
Note: The EEPROM section is not used during this process.
The system is now congured for programming.
To program the device:
Before connecting the programmer to the C1TP/C5C boards, t a link across header J3 on the C1TP
to force the system into reset. Remove once the system has reset.
Connect the programming header from the AVRISP to connector P2 on the C1TP board ensuring
correct orientation.
Apply power to the boards; The LED visible through the side of the AVRISP should change from red
to green.
Click ‘Program’ in the AVR Studio window to upload the rmware.
A conrmation message will appear when the device has been programmed and veried
successfully.
The Power Management mode setting is reset to FF (boot regardless of ignition) during the
programming progress. This is okay for AVI recording, but needs changing for PAR le recording.