
Installation guide

105
NV1
Installation Guide
105
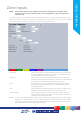
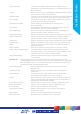
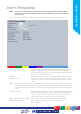
Alarm Reporting This must be enabled to allow the unit to send an alarm
notication to an external destination i.e. an RVRC reporting via
NetVu ObserVer.
Archive Select to ensure the unit automatically downloads alarm images
via an FTP connection to an FTP server.
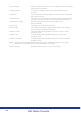
Add Still Image This will record a still image of the trigger along with the standard
recording. This can then be sent on to an external destination.
E-mail Image If this option is selected, a JPEG will be added to the reporting
e-mail (if E-mail Reporting is selected).
Protect alarm Images Alarm images can automatically be protected from
being overwritten.
Goto Preset It is possible to action a camera to automatically be sent to a
preset position when an alarm is triggered.
E-mail Reporting The unit can send an e-mail when an alarm is detected. For
further information refer to ‘Network->E-mail’.
Alarm Rate Change Select to change to the alarm mode recording rate on zone action.
VMD/Activity Inhibit Select to inhibit (ignore) the VMD/Activity detection feature. for
further information refer to ‘Alarm Settings->Activity Setup’.
System Set Select to change to the ‘Set’ mode recording rate on zone action.
Enable Buzzer Select to activate the unit’s internal buzzer upon alarm receipt.
Relay Select an onboard or external relay to automatically close on
receipt of an alarm.
Relay Duration Enter (in seconds) how long the relay is to remain closed.
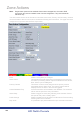
Alarm Image Snapshot Delay This gure allows a delay to be introduced before an alarm
snapshot is taken. This is used when the alarm relates to a PTZ
camera which has to travel to a preset position.
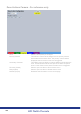
Play Audio Message Following a Zone alarm trigger, a specic audio message
can be played.
IMPORTANT: Audio messages must be uploaded to the unit in mono 8k wav format only.
The following naming convention must be used: messageXX.wav i.e. message00.
wav, message01.wav etc. An FTP client should be used to place the wav les in
the following folder: \mdd0\messages folder.
Switch Main Monitor Select to display the alarm zone Primary camera on the
Main Monitor.
System Override Select to change to the ‘Override’ mode recording rate on
zone action.
Preset Camera The preset camera is the camera which will be sent to a
designated preset position upon alarm activation.
Preset Enter the preset position number for the selected camera here,
refer to ‘Unit Operation-PTZ Program’ for more information on
establishing camera preset positions.
Cam Options (Yellow) Select to open the Zone Action Camera Conguration menu.
Rem Report (Red) Select to open the Network->Remote Reporting menu
E-mail (Green) Select to open the Network->E-mail menu
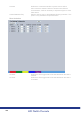
Cam Options (Yellow) Select to open the Alarm->Zone Actions->Zone Action
Conguration menu
Relays (Blue) Select to open the Alarm->Global Actions menu
Refresh (Purple) Refreshes the information on the current page