
Setup guide


27
Appendix 1
Configuring for tape archive
To configure the Digital Sprite 2 for tape archive:
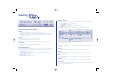
1. Enter the Tape Menu
Press and hold
II
(pause) on the Digital Sprite 2 to display the tape menu:
Note: When Eject Tape and Tape Status options are 'greyed out', no tape is insert e d .
2. Select the Tape length
The correct tape length needs to be set to allow Digital Sprite 2 to calculate the
amount of images on a tape. To select the tape length:
1. Use the cursor keys to move the cursor to Tape Length.
2. Press the cursor key to highlight the tape capacity.
3. Use the cursor keys to adjust the tape capacity* in Gigabytes (GB)
* Ensure the uncompressed capacity of the tape is entered, not the compressed
capacity, e.g. some DDS-3 tapes are labelled as 24GB, but the actual
uncompressed capacity is 12GB.
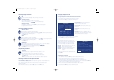
3. Configure an Eject Schedule (optional)
If no Eject Schedule is configured, then by default, Digital Sprite 2 will eject each
tape when it is full. An Eject Schedule will eject the tape at a specific time of the
day whether it is full or not. This is useful if the tape needs to be changed at a set
time each day, or if more than one tape is to be used in a day.
To configure an Eject Schedule:
1. Move the cursor to Eject Schedule using the keys.
2. Press the cursor key to display the eject schedule in a new window.
3. Use the keys to move to the required day, and the keys to highlight
the required field.
4. Use the keys to change the eject time in each field, up to 4 eject times
can be set for each day.
5. Press mode/menu to exit the Eject Schedule page.
Tape Menu
> Eject Tape
> Tape Length 12 GB
> Eject Schedule
> Tape Status
> Write Overwrite
>
7211 DigitalManual Update 10/4/02 5:12 pm Page 27