
Setup guide


Copying images to CD
To copy images to the external CD writer (if connected):
1. Insert a blank CDR or pre-formatted CD-RW into the CD writer.
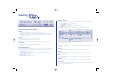
2. Press and hold the copy key to display the following screen.
Copy Images
Copy destination CD0: SCSI Yamaha
Copy from time 12:01:00 01/12/2001
Copy to time 12:02:00 01/12/2001
Copy Selected cameras
1 2 3 4 5 6 7 8
■ ■ ■ ■ ❏ ❏ ❏ ❏
9 10 11 12 13 14 15 16
❏❏ ❏❏ ❏❏❏❏
CDR Archive
CD Type – 656MB CD
CD Use [--+---------------] 4% Full
From To Cameras
12:00 01/12/01 12:01 01/12/01 123456789
Next 12:01 01/12/01 to 12:02 01/12/01
Add next Clear list Create CD Verify CD
Copy destination This is the name and type of
CD drive connected to the SCSI port.
Copy from time Select the time you wish to copy
images from.
Copy to time Select the time you wish to copy
images to.
Copy Select ‘All cameras’ or individual cameras to
copy using the camera keys (filled boxes are selected
cameras, unfilled boxes are not selected).
3. Use the cursor keys to change the time to copy ‘to and from’.
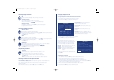
4. Tap the menu key to display the following menu:
This menu displays the archive list of images to be
copied to the CD, the ‘CD Use’ bar indicates the how
much space is available on the CD, once it reaches
100% no more images can be added to the archive.
Add next Add the selected times to the archive list.
Clear list Removes all entries from the list.
Create CD Creates a CD with the images in the list.
Verify CD Verify that the CD has been written
correctly.
To select any of the above options, highlight the option
and tap menu.
To add images to the CD:
1. Select ‘Add next’ and press the menu key to add the displayed time to the list.
2. You may wish to add more images to the CDR archive if the CD is not yet full.
To select more images to add to the list press
to return to the ‘Copy images’ screen.
3. Once all the required images are added to the archive list, select ‘Create CD’ and press the menu key
to create the CD. The CD will eject once the CD has been created.
4. The CD can be reinserted and verified if required using the ‘Verify CD’ option.
5. Press and hold the menu key to exit the CDR Archive option.
Viewing cameras on the Spot monitor
Press the mode key or spot key on the remote keyboard to toggle ‘spot’ mode, indicated on the
main monitor and the front panel LED.
Press a camera key to display that camera on the spot monitor or tap the sequence key to
sequence the cameras.
Press and hold the sequence key to edit the spot sequence. Press menu to exit.
Selected cameras
Add next
Viewing single cameras
Full
Pressing a camera key will display a full screen image of that camera.
Zooming an image
Press the same camera key to toggle zoom on and off.
When zoom is enabled, use to scroll around the image.
Freezing an image
Double tap the camera key or press the Hold key on the remote keyboard
to toggle freeze frame on or off.
Viewing multiple cameras
Picture in Picture
Press the PIP key to toggle the main and PIP image.
Press and hold the PIP key to edit the display, use to select the segment, press the
required camera key to fill that segment.
Press menu to exit.
Quad
Press the QUAD key to switch to quad display.
Press and hold the QUAD key to edit the display, use to select the segment, press
the required camera key to fill that segment.
Press menu to exit.
Multi-screen
Press the multi-screen key to toggle between 9-way, 8+2, 12+1*, and 16-way* displays.
Press and hold the Multiscreen key to edit the display, use
to select the segment, press the required camera key to fill that segment.
Press menu to exit.
*16 channel version only.
Sequencing cameras
Sequence
Press the sequence key to toggle the main monitor sequence on or off.
Press and hold the sequence key to edit the full screen sequence.
Use the camera keys to include or remove cameras from the sequence.
Press menu to exit.
Note: The spot monitor sequence can only be activated or edited in spot mode.
7211 Digital Sprite 2 10/4/02 5:14 pm Page 2