
Instruction manual


5
Step 3: Tighten all SCREWS.
CAUTION: The Electric Fireplace Heater should not be positioned in an area that is
exposed to direct sunlight.
WALL ANCHOR SAFETY CABLE
The use of WALL ANCHOR SAFETY CABLE is highly recommended in order to reduce
the risk of the fireplace being tipped over accidentally. WARNING: This CABLE may
reduce possible risk of injury if the fireplace is improperly handled, but is not a
substitute for proper adult supervision. Children should not be left unattended near
any heater.
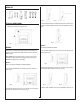
1. Drill a 5/16” (8mm) hole in the wall. Insert the PLASTIC WALL ANCHOR into the
hole and gently tap until the flange on the anchor is against the wall surface.
2. Position the back edge of the mantle close to the wall.
3. Attach the SAFETY CABLE to the mantle using the SCREW FOR MANTLE. See fig. 13
4. Use the SCREW FOR WALL to attach the other end of SAFETY CABLE to the wall.
5. Make sure all screws are tight.
Fig. 13
After reading complete instructions, confirm all controls on fireplace are in the OFF
position. Plug the fireplace into a 15AMP/120Volt outlet. If the cord does not reach, you
may use an extension cord rated for a minimum of 1875 WATTS. Once the fireplace in-
sert has been properly connected to a grounded electrical outlet, it is ready to operate.
OPERATION BY THE CONTROL PANEL
The controls are located behind the grill below the front glass and can be accessed by
pulling the grill from the top, forward and down.
May not be as exactly as shown
O/I: Press this button for main power and flame effect. The indicator light will turn on.
See below for other control switches.
750W: For low heat function - Press this switch while the O/I switch is in the on posi-
tion for low heat. The indicator light will turn on.
1500W: For high heat function - Press this switch while the O/I switch and the 750W
switch are in the on position for high heat. The indicator light will turn on.
Temperature Control: To adjust the temperature to your individual requirements,
turn the temperature control dial to the right (clockwise) to increase the desired
temperature and to the left for lower temperature. This temperature control dial can
only be used while the O/I switch and 750W & 1500W switches are in the ON position.
When the heater reaches the desired temperature, the heater and the 750W/1500W
indicator light will turn OFF but the fan will continue to operate. Adjust this knob to
restart the heater.
Dimmer Control Knob: Turn the dimmer dial clockwise or counter clockwise to get
the desired flame intensity. The dimmer switch can only be used when the O/I switch
is in the on position.
NOTE: When the O/I switch is turned off, all other heater functions will stop even
though the switches may be in the on position.
NOTE: In order to shut down the heater safely, it is recommended to turn the
Temperature Control knob to lowest setting and allow the heater to cool down before
press the O/I switch to off position.
MAINTENANCE WARNING:
Disconnect power and unplug the power cord before attempting any maintenance or
cleaning to reduce the risk of fire, electric shock or damage to persons. The bulbs in
your unit can become extremely hot. Allow at least 10 minutes between turning off the
unit and removing the light bulbs to avoid the accidental burning of the skin.
RISK OF FIRE: DO NOT EXCEED THE RECOMMENDED BULB WATTAGE.
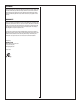
REPLACING THE LIGHT BULBS
Step 1: Remove 14 screws on the back of fireplace and open the rear cover.
There are 2 larger screws and 12 smaller screws.
Step 2: You will find 1 X 40W Type B-10 bulb under log-set bed.
Step 3: Loosen and remove the burnt out bulb and replace with new bulb.
Step 4: Close the rear cover. Secure the 2 larger screws into the top left corner hole
and bottom right corner holes as shown in the diagram. Secure the 12
smaller screws into the remaining holes. Make sure the screws are in the
correct holes and have been tightened.
Step 5: Plug in the unit