
Specification Sheet

© DECO LAV, INC. 2016
2
PLEASE CONTACT 1-866-DECOLAV (332-6528) FOR FURTHER ASSISTANCE
DECOLAV.COM
ASSEMBLY INSTRUCTIONS
BEFORE YOU BEGIN
NOTE: Use DECOLAV
®
drain item #’s 9290-CP/SN/PN,
9296-CP/SN/PN, or 9298-CP/SN/PN for lavatories without
overow. DECOLAV
®
cannot guarantee against leakage with
other manufacturer drains.
NOTE: Use DECOLAV
®
drain item #’s 9295-CP/SN/PN,
or 9297-CP/SN/PN for lavatories with overow. DECOLAV
®
cannot
guarantee against leakage with other manufacturer drains.
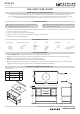
Figure 1
Figure 2
5233-48
Item # 5233-48
• Prior to installation, unpack your new DECOLAV
®
product and inspect it.
Keep the product in its original package until you are ready to install it
• The wall must be square, plumb and level
• Shut the water supply off when replacing an existing xture
• Observe all local plumbing and building codes
• It is recommended that this installation be done by a professional contractor
with a minimum of two people. Do not install this xture alone
• Drawer pulls are attached on inside of drawers to ensure
safety during shipping
• Remove screws and attach drawer pulls to outside of drawers
• Measure the desired location of vanity and mark mounting hole
guidelines on wall and inside of top horizontal back rail of vanity base
• NOTE: TO PREVENT MOVEMENT AND PROTECT AGAINST POSSIBLE
LEAKAGE, IT IS RECOMMENDED THAT AT LEAST ONE WALL STUD IS
LOCATED IN THE AREA WHERE VANITY BODY IS TO BE INSTALLED
• Check alignment of mounting hole guidelines against vanity base to
ensure product is level (Adjust leg levelers if necessary, leg levelers are
located on the bottom of each leg)
• Drill mounting holes in nished wall
• Drill holes through vanity top horizontal back rail that match
the placement of the mounting holes in the nished wall.
• Attach anchors to mounting holes in nished wall (anchors not provided)
• Attach vanity base to nished wall using screws (screws not provided)
• Secure undermount lavatory to countertop as per manufacturer
installation instructions
• Apply sealant to top edge of vanity base
• Gently place countertop over vanity base
• Wipe away any excess sealant
• Apply sealant along rear edge of the countertop (close to nished wall)
• Gently lower backsplash in place ensuring that edges of backsplash
meet the edges of the countertop with no overhang
• Allow sealant to set before proceeding to install faucet, drain, and waste system
(not included), ensure that supply lines are secured tightly
• NOTE: DO NOT OVER TIGHTEN DRAIN. MAY RESULT IN DAMAGE
• Turn on water supply to faucet and check for leaks
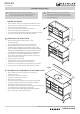
INSTALLING THE VANITY BASE
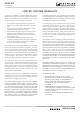
SECURING THE COUNTERTOP TO THE VANITY BASE
1
2
Top
horizontal
back rail
Apply
sealant
here