
Use and Care Manual

SOLAR GUTTER / FACIA /
WALL LIGHT
Use and Care
Guide
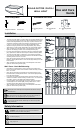
TOOLS REQUIRED
HARDWARE INCLUDED
Phillips Screwdriver
Electric Drill
AA - Mounting Screw
x 2
BB - Wall Anchor
x 2
CC – Mounting Bracket
x 2
Installation
Gutter / Facia Mounting
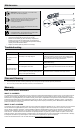
□ To mount the solar light to a gutter, place one mounting bracket (CC)
to the edge of the gutter and secure it with the butterfly screw. Place
another mounting bracket (CC) to the edge of gutter, measure and
adjust this mounting bracket at the location of both hanging screws
5 1/2 in. on-center, and then secure it with the butterfly screw.
□ Adjust the hanging screws of the mounting bracket (CC), leaving
about 3/16 in. of the screws (AA) sticking out of the bracket surface.
□ Align and place the mounting holes on the back plate of the solar
light over the hanging screws of the mounting brackets (CC).
□ To mount the solar light to a hard facia, using the mounting brackets
(CC) upside down, follow the same steps as Gutter Mounting above.
□ To mount the solar light to a wood facia, as an optional mounting
way, measure and mark on the wood surface at the locations of both
mounting screws 5 1/2 in. on-center.
□ Insert the mounting screws (AA) into the wood facia at the marked
locations, leaving about 3/16 in. of the screws (AA) sticking out of the
wood surface.
□ Align and place the mounting holes on the back plate of the solar
light over the mounting screws (AA).
Wall / Fence / Deck Rail Mounting
□ If mounting to a wood surface of fence or deck rail, measure and
mark on the wood surface at the locations of both mounting screws 5
1/2 in. on-center.
□ Insert the two mounting screws (AA) into the wood surface at the
marked locations, leaving about 3/16 in. of the screws (AA) sticking
out of the wood surface.
□ If mounting to a wall broad or brick walls, measure and mark on the
wall at the locations of both mounting screws 5 1/2 in. on-center. Drill
two 7/32 in. holes on the wall at the marked locations.
□ Insert the plastic anchors (BB) into the holes. Insert the mounting
screws (AA) into the anchors (BB), leaving about 3/16 in. of the
mounting screws (AA) sticking out of the wall surface.
□ Align and place the mounting holes on the back plate of the solar
light over the mounting screws (AA).
IMPORTANT: Prior to use, set the ON/OFF switch located on the
bottom plate of the solar light to the ON position and allow it to charge
a full sunny day.
IMPORTANT: Ensure the mounting location for your solar light allows
the solar panel to receive direct sunlight. Do not locate the product in
shaded areas as this will significantly reduce performance.
NOTE: The solar light is equipped with a photosensor that turns the
unit on at dusk and off at dawn. Ambient light can affect the operation
of the photosensor.
Safety Information
WARNING: Your solar light may not function in temperatures
below -4ºF (-20ºC) or above 140ºF (60ºC).
CAUTION: Use a rechargeable battery only. Recycle or dispose
of batteries properly.
CAUTION: Do not open, short circuit, or mutilate batteries as
injury may occur.
5 1/2"
BB
AA
A
B