EN Control panel MIT-II/E - MIT-II/H MIT/EP - MIT/HP QUADROPAC DUP 500 User Guide 300015090-001-L
Contents 1 Used symbols . . . . . . . . . . . . . . . . . . . . . . . . . . . . . . . . . . . . . . . . . . . . . . . . . . . . . . . . . . . . . . . . . . . . . . . . . . .3 2 Important recommendations . . . . . . . . . . . . . . . . . . . . . . . . . . . . . . . . . . . . . . . . . . . . . . . . . . . . . . . . . . . . . . .3 3 Control panel . . . . . . . . . . . . . . . . . . . . . . . . . . . . . . . . . . . . . . . . . . . . . . . . . . . . . . . . . . . . . . . . . . . . . . . . . . . .4 3.1 3.
Congratulations on choosing a De Dietrich product, a product of quality. We strongly recommend that you read the following instructions in order to guarantee the optimal operation of your appliance. We are sure that you will not be disappointed and that it will satisfy all of your expectations. 1 Used symbols Caution danger Refer to another manual or other pages in this instruction Risk Zmanual of injury and damage to equipment.
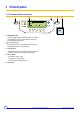
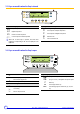
3 Control panel 3.1 Electromechanical components 1 2* 0 2 3 4 6 8 10 12 14 16 18 20 22 4 2* 24 SUNDAY bar A 2 1 0 3 bar 4 C000142_00-04 1. Main ON/OFF switch To take advantage of the pump cleaning function, do not switch off the appliance in summer. Use the Summer mode for the desired heating shutdown period. See: Operating mode. Z If a remote control CDI 2 is connected, it will have no display when the general switch is in the off position . 2.
3.2 Display 3 2 1 0 2 4 4 6 8 10 5 12 14 6 16 7 8 9 22 24 8 ABC 11 10 3 4 5 6 20 SUNDAY bar 1 2 18 7 Text and numerical display Graphic bar displaying the programme on circuit A or B (in zone 9) Light area: Nighttime period Dark area: Daytime period Flashing cursor showing the current time Number display (current time, adjusted values, parameters, etc.
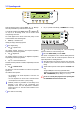
3.3 Keys accessible when the flap is closed 0 2 4 6 8 10 12 14 16 18 20 22 24 SUNDAY A C000142_02-04 Operating mode selection keys Temperature setting keys 2% Daytime temperature 2$ Nighttime temperature 2 Domestic hot water temperature / AUTO Heating according to the time programme % Forced operation at Daytime temperature $ Forced operation at Nighttime temperature .
3.5 Operating mode 0 2 4 6 8 10 12 14 16 18 20 22 24 SUNDAY A C000142_02-04 Select the operating modes using the AUTO - % - $ - . keys. These keys simultaneously control all circuits connected. To modify the operating mode (AUTO, Daytime % or Nighttime $) for only one of the heating circuits, use the remote control corresponding to this circuit.
Brief touch Several brief touches 1 long touch (5 seconds) AUTO key Depending on the situation: - Cancellation of the Daytime or Nighttime mode - Confirmation of the antifreeze setting (or after 2 minutes) _ Cancels the message SHOW REM. CTRL which signals the presence of an override on a remote control. The AUTO mode is forced on all existing heating circuits. Key %/$ Temporary activation (Until midnight) The arrow above the key flashes. _ Permanent activation The arrow above the key is steady.
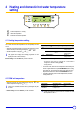
4 Heating and domestic hot water temperature setting 0 2 4 6 8 10 12 14 16 18 20 22 24 SUNDAY A C000142_02-04 2% 2$ 2 Comfort temperature - Cooling Reduced temperature Domestic hot water temperature 4.1 Heating temperature setting The comfort and reduced temperatures are set separately for each circuit: Temperature 2 % - Select the comfort temperature or the reduced temperature for the desired circuit by successively pressing key 2% or 2$. - Set the temperature using keys and .
5 Programming 5.1 Selecting a programme The DIEMATIC 3 control unit includes 4 heating programmes: Allocation of a programme to a circuit: - 1 fixed programme P1, activated in the factory. - 3 custom programmes P2, P3, P4 to adapt to the lifestyle of the occupants. - Select the circuit using key A.B. - Select the programme using the PROG key. - The programme selected is active in automatic mode.
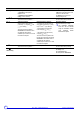
6 "User" settings 0 2 4 6 8 10 12 14 16 18 20 22 24 SUNDAY A STANDARD C000142_03-04 Key for access to setting and measurements J I H Page scrolling Line scrolling Back to the title or the previous line Programming keys %O Input (per 1/2 hour) of the Daytime Temperature period (Dark area) $P Input (per 1/2 hour) of the Nighttime Temperature period (Light area) S Return key When the flap is open, the keys are used to display measurements, programme modifications and the settings of th
6.1 Table of "User" setting The different adjustable parameters are listed in their order of appearance. Display #MEASURES TEMP.MIT At the end of the intervention, the data is memorised after 2 minutes or by pressing the AUTO key. ROE-II ROE-H ROE+ ROE+TH SOLO, ROI+ NAPO Parameter set Allows the values below to be read Water temperature in the MIT-II module or heating zone in the Quadro HP FLOW TEMP. x x x Water temperature at the PAC outlet SOURCE TEMP.
Display #PROG. CIRC.A * ROE-II ROE-H ROE+ ROE+TH SOLO, ROI+ Parameter set NAPO x x x x x x Heating programme for circuit A if used See also: ZCustomising the programmes.
Display #SETTING ROE-II ROE-H ROE+ ROE+TH SOLO, ROI+ Parameter set NAPO x x x x x x The parameters are set using keys or . See also: Miscellaneous settings. Z Adjusting the display contrast Factory setting - Adjustme nt range - ON ON, ECO or OFF 22 °C 15 to 30 °C OFF -5.0 to +5.0 K -5.0 to +5.0 K -5.0 to +5.0 K -5.0 to +5.0 K 0.5 to 20 °C -5.0 to +5.0 K 0.5 to 20 °C - CONTRAST DISP.
6.2 Customising the programmes Write the customized programmes in the tables below, then save them as follows: 1. Open the cover to access to the setting and programme keys. 2. Press key J to select the paragraph (#PROG. CIRC.A #PROG. CIRC.B - #PROG. AUXIL - #PROG. DHW) 3. Select successive lines using key I. #PROG. CIRC.
6.3 Miscellaneous settings 1. Use the J key to select the paragraph #SETTING. Setting the minimum room temperature which is maintained in the antifreeze mode for each circuit. This temperature is only checked if a room sensor is connected. Without a room sensor, this parameter is not displayed and the set temperature is 6 °C (not adjustable). 2. Display the desired parameter using key I. 3. Set the value of the parameter by pressing buttons ` and : SUM/WIN: Automatic heating shutdown instruction.
8 Maintenance The installation and maintenance of the appliance must be carried out by a qualified professional in compliance with the statutory texts of the codes of conduct in force. Before working on the appliance, ensure that it is switched off and safe. Check the discharge on the compressor condenser for single phase voltages. Before working on the cooling circuit, switch off the appliance and wait a few minutes.
9 Diagnosing breakdowns Display ROE-II ROE+ ROE-H ROE+TH SOLO NAPO ROI+ No display x x x HP COM.FAIL x x x Installation malfunction/HP or PAC Meaning / Cause (listed in order of likelihood) - Check the electricity supply - Check that the fuses are in good working condition Communication error with the PAC. ROE+: When the appliance is switched on, the end-of-defrosting pressure switch must be open. NAPO: The primary flow switch must be closed when the appliance is switched on.
Display ROE-II ROE+ ROE-H ROE+TH SOLO NAPO H.PRES. FAIL. x HOT GAS FAIL.
Display FAIL. PAC V4V ROE-II ROE+ ROE-H ROE+TH SOLO NAPO x ROI+ Installation malfunction/HP or PAC Meaning / Cause (listed in order of likelihood) - 4-way valve fault x PAC malfunction Fault level: temporary Permanent 4-way valve blocked open or closed Reversal of the heating flow and return Lack of refrigerant Regulator faulty FAIL. PAC PUMP x Fault level: temporary FAIL.EXT.S.
Display ROE-II ROE+ ROE-H ROE+TH SOLO NAPO NO CONFIG. ROI+ x Installation malfunction/HP or PAC The PAC is not recognised Meaning / Cause (listed in order of likelihood) - Check that the coding resistor is fitted When a fault is displayed followed by AUTO, this disappears automatically after a few minutes. When the fault displayed is followed by MANU, it is necessary to reset the HP using the reset button (See section 3.1).
Warranty You have just purchased one of our appliances and we thank you for the trust you have placed in our products. Please note that your appliance will provide good service for a longer period of time if it is regularly checked and maintained. Your fitter and our customer support network are at your disposal at all times. Warranty terms Starting from the purchase date shown on the original fitter's invoice, your appliance has a contractual guarantee against any manufacturing defect.
14/04/2010 - 300015090-001-L MIT-II - MIT/P - QUADROPAC DUP 500 23
DE DIETRICH THERMIQUE S.A.S. www.dedietrich-thermique.fr FR Direction des Ventes France 57, rue de la Gare F- 67580 MERTZWILLER +33 (0)3 88 80 27 00 +33 (0)3 88 80 27 99 NEUBERG S.A. www.dedietrich-heating.com DE DIETRICH REMEHA GmbH www.dedietrich-remeha.de DE Rheiner Strasse 151 D- 48282 EMSDETTEN +49 (0)25 72 / 23-5 +49 (0)25 72 / 23-102 info@dedietrich.de LU DE DIETRICH www.dedietrich-otoplenie.ru VAN MARCKE www.vanmarcke.