
Operation Manual


50
GT 530A DDR_G30A/AE _IO_V4.0 09/2013
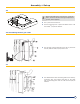
Boiler Model
Side Insulation (in/mm)
Front Rear
GT 530A-15 47
1/4
/1200 15
3/4
/400 15
3/4
/400
GT 530A-16 47
1/4
/1200 15
3/4
/400 23
5/8
/600
GT 530A-17 47
1/4
/1200 15
3/4
/400 23
5/8
/600
GT 530A-18 47
1/4
/1200 47
1/4
/1,200
GT 530A-19 47
1/4
/1200 47
1/4
/1,200
GT 530A-20 47
1/4
/1200 15
3/4
/400 15
3/4
/400 23
5/8
/600
GT 530A-21 47
1/4
/1200 15
3/4
/400 47
1/4
/1,200
GT 530A-22 47
1/4
/1200 15
3/4
/400 47
1/4
/1,200
GT 530A-23 47
1/4
/1200 23
5/8
/600 47
1/4
/1,200
GT 530A-24 47
1/4
/1200 23
5/8
/600 47
1/4
/1,200
GT 530A-25 47
1/4
/1200 15
3/4
/400 15
3/4
/400
Cut
to
Fit
Blank Roll
Supplied
47
1/4
/1,200
GT 530AE-26 47
1/4
/1200 15
3/4
/400 15
3/4
/400 47
1/4
/1,200
GT 530AE-27 47
1/4
/1200 15
3/4
/400 15
3/4
/400 47
1/4
/1,200
GT 530AE-28 47
1/4
/1200 15
3/4
/400 15
3/4
/400 47
1/4
/1,200
GT 530AE-29 47
1/4
/1200 15
3/4
/400 15
3/4
/400 47
1/4
/1,200
GT 530AE-30 47
1/4
/1200 15
3/4
/400 15
3/4
/400 47
1/4
/1,200
GT 530AE-31 47
1/4
/1200 15
3/4
/400 15
3/4
/400 47
1/4
/1,200
GT 530AE-32 47
1/4
/1200 15
3/4
/400 15
3/4
/400 47
1/4
/1,200
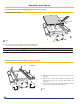
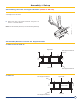
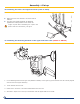
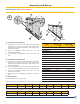
43. Installing the insulation
1. Place the side insulating material against the positioning
bracketand cut it so that it is ush with the upper lug
on which the rail fastening bracket is xed, along a
8
1/2”
/220mm length.
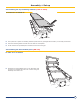
2. Push the insulating material in behind the lug and the
rail fastening bracket.
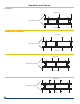
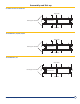
3. Distribute the insulating material evenly so that you
have the same side insulating material on either side of
the boiler.
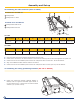
Cut the insulation similary along the fastening brackets.
1
2
3
3
1/2/
90mm
8
1/4
/220mm
Front
Assembly + Set up