FT-1Y/FLYGHT TIME DIGITAL DELAY Firmware Update Procedures
Overview of Update Steps 1. Prepare a PC (Windows) or Mac (Macintosh) computer and setup your MIDI interface for data transmission. 2. Download MIDI software (for Mac: SysEx Librarian, for Windows: SendSx) from the specified website and install it on your computer. 3. Download the latest firmware from the Free The Toneʼs website. 4. Connect the FLIGHT TIME to the MIDI interface and send the firmware to the FLIGHT TIME by using the installed MIDI software. 5.
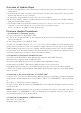
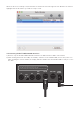
For Mac Computer 1. Preparation of MIDI Software 1) Download the freeware “SysEx Librarian” from http://snoize.com/SysExLibrarian/ and save it in any folder. 2) Unzip the downloaded ZIP file and install it. 3) Start SysEx Librarian. The following screen will appear: 2. Configuration of SysEx Librarian Select the MIDI interface to be used from the main windowʼs pull-down menu. (e.g. : When using the YAMAHA UX16 interface, "Port 1" is displayed as shown in the figure.
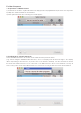
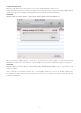
When you select the interface to be used, the screen changes to the following one: 3. Selection of Update File 1) Click the “+” (or “Add...” on some versions) button located near the left bottom corner of the main window. 2) Select the latest FLIGHT TIME firmware file youʼve downloaded. After selecting the file, the following message appears. Click the “OK” button.
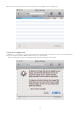
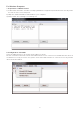
When the file is successfully read, its file name is listed as shown in the figure below. Click the file name to highlight. Now the file data in your Mac is ready to send. 4. Connecting FLIGHT TIME and MIDI Interface 1) Connect only the FLIGHT TIMEʼs MIDI IN terminal to the MIDI interfacesʼ MIDI OUT terminal. 2) While holding down both the “INC/+” and “DEC/‒” switches on the FLIGHT TIME, turn on the power to it. After showing the version number, the display indicates “0000”.
5. Data Transmission Click the “Play” button near the left top corner of the SysEx Librarianʼs main screen. Data transmission starts as shown in the figure below. After about 5 seconds, the FLIGHT TIMEʼs display starts counting up from “0000”. Data transmission will complete in about 10 minutes. CAUTION! NEVER TURN OFF THE POWER TO THE FLIGHT TIME DURING DATA TRANSMISSION. When the FLIGHT TIMEʼs display counts up to “0100” and then shows “INST”, the unit automatically initializes itself.
For Windows Computer 1. Preparation of MIDI Software 1) Download the shareware “SendSx” from http://www.bome.com/products/sendsx and save it in any folder. You can use it free for a trial period. 2) Unzip the downloaded ZIP file and install it to your computer. 3) Start SendSx. The following screen will appear: 2. Configuration of SendSx Select the MIDI interface to be used from the “MIDI Out” menu.
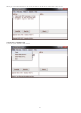
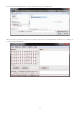
When you select the interface to be used, its name is shown in the lower half of the screen: 3. Selection of Update File 1) Select “Open” from the “File” menu.
2) In the file selection window, select the firmware file youʼve downloaded. When the file is read successfully, a screen that looks like the following will appear. Now your computer is ready for data transmission.
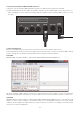
4. Connecting FLIGHT TIME and MIDI Interface 1) Connect only the FLIGHT TIMEʼs MIDI IN terminal to the MID interfaceʼs MIDI OUT terminal. 2) While holding down both the “INC/+” and “DEC/‒” switches on the FLIGHT TIME, turn on the power to it. After showing the version number, the display indicates “0000”. Now the FLIGHT TIME is ready to receive the data.