
User's Manual


Single Transmitter, Single Repeater Installation Page 3
SI N G L ETR A N S M I T T E R, SI N G L ERE P E A T E RIN S T A L L A T IO N
If you have just one DavisTalk™ transmitter and just one repeater, simply
follow the instructions below to install your system. If you have a more
complex setup that involves multiple repeaters or multiple transmitters within
1500' (450 m) of each other, see “Advanced Installations” on page 10.
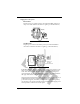
Setting up the Repeater
The repeater is pre-set by the factory to listen for a transmitter whose ID code is
also set to the factory default (ID #1). If you have not reset your transmitter’s ID
code from the factory default, then your repeater should pick up your trans-
mitter’s signal automatically and you can skip to “Choosing a Location” on
page 4.
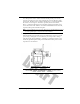
If you changed the Transmitter ID code to one of the 7 other optional dip-
switch settings, you need to set the repeater to listen for that ID code. To do so,
first find your current transmitter settings. For stations that do not use dip-
switch settings, refer to the station installation manual. For other transmitters,
you can find the current transmitter settings by looking at the position of the
first three dip-switches.
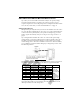
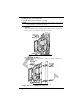
TRANSMITTER DIP-SWITCHES
Next match the ON/OFF settings to the Transmitter ID code in your transmit-
ter’s table. Here’s the transmitter ID code table for a typical transmitter.
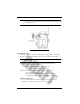
Finally, set your repeater to listen for that transmitter signal by flipping the
appropriate dip-switch on your repeater to the ON position. Make sure all
other dip-switches are in the OFF position.
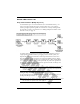
TRANSMITTER
ID CODE
DIP-SWITCH 1 DIP -SWITCH 2 DIP -SWITCH 3 DIP -SWITCH 4
#1 (default) off off off
The position
of this dip-
switch is not
part of the ID
code.
#2 off off ON
#3 off ON off
#4 off ON ON
#5 ON off off
#6 ON off ON
#7 ON ON off
#8 ON ON ON