
User's Manual


Advanced Installations Page 11
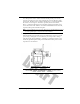
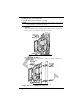
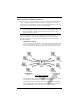
So, for example, the second (B) repeater’s dip-switches will be set to OFF, OFF,
ON, while the third (C) will be set to OFF, ON, OFF, as shown below.
DIP-SWITCHES ON REPEATERS A, B, AND C
Setting the Transmitter ID Codes on the Repeater
Once you have set the Repeater ID codes, determine whether you need to set
Transmitter ID codes. If you have only one transmitter and its dip-switches are set to
the default ID code (#1), then you do not need to set any transmitter ID codes on the
repeater closest to the transmitter. All other repeaters must have all transmitter ID dip-
switches turned off.
If the transmitter’s dip-switches are set to some code other than the default
(#1), then the closest repeater to a transmitter is the only repeater that should
have its transmitter dip-switch set to that transmitter’s ID Code (see “Setting
up the Repeater” on page 3 for details). All other repeaters in the chain should
have their transmitter dip-switches set to OFF because there is only one trans-
mitter in this chain and its signal is already being picked up.
If you have more than one transmitter, see “Network Installation (Multiple
Transmitters)” on page 12. Otherwise, simply continue with the installation
where you left off (see “Choosing a Location” on page 4).
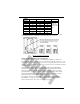
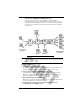
REPEATER
ID CODE
DIP -SWITCH 1 DIP -SWITCH 2 DIP -SWITCH 3 DIP -SWITCH 4
A (default)
off off off The position
of this dip-
switch is not
part of the ID
code.
B
off off ON
C
off ON off
D
off ON ON
E
ON off off
F
ON off ON
G
ON ON off
H
ON ON ON