
User's Manual
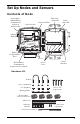
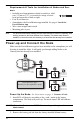


Table Of Contents
- The steps for setting up your EnviroMonitor system:
- Planning Your System
- Set Up Nodes and Sensors

10
Requirements & Tools for Installation of Nodes and Sen-
sors
• Included precision/miniature slotted screwdriver; ideal
size: 2.5 mm or 3/32”; see actual size image of screw
head and screwdriver blade at right.
• Four D-cell batteries
• Smartphone with EnviroMonitor app installed. See page 6:
Install the
EnviroMonitor App
.
• Wire cutter/stripper and wrench
• Mounting pole or post
Note: You should install Nodes starting with the Node that will be closest to Gateway, then
working outward to the Node furthest from Gateway. This allows each Node to
establish a connection with the Gateway or a Node that has already been installed.
Power-up and Connect the Node
Make sure the EnviroMonitor app has been installed on the smartphone you will
be using to install the Node. It will guide you through adding Nodes to the
Gateway that has already been installed.
Power Up the Node: See illustration on page 9: Contents of Node.
1. Install 4 D-cell batteries according to the + and - marks in the battery
compartment. The Node will power up. The mesh status LED will indicate
connection.
IMPORTANT: Install the D-cell batteries FIRST. Make sure they are firmly installed and not
tilted outward.
2. Remove the battery pull tab from the factory-installed lithium battery.
EnviroMonitor App:
Guides you through these steps
Add Gateway
Add Sensor 1
Add Sensor 2
Add Sensor 3
Add Sensor 4
A
A
A
A
Add Node 1
Add Node 2
Add Sensor 1
Add Sensor 2
Add Sensor 3
Add Sensor 4
Open the App to create your
account on WeatherLink.com
t
he App to create