
User's Manual


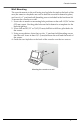
Table Of Contents
- Welcome to Vantage VueTM
- Installing the Console
- Using Your Weather Station
- Console Modes
- Setup Mode
- Setup Mode Commands
- Screen 1: Time & Date
- Screen 2: Time Zone
- Screen 3: Daylight Saving Settings
- Screen 4: Daylight Saving Status
- Screen 5: Active Transmitters
- Screen 6: Configuring Transmitter IDs
- Screen 7: Retransmit
- Screens 8 and 9: Latitude and Longitude
- Screen 10: Elevation
- Screen 11: Barometric Reduction Setting
- Screen 12: Wind Cup Type (Optional)
- Screen 13: Rain Collector
- Screen 14: Rain Season
- Screens 15 and 16: Cooling and Heating Degree Day Base
- Screens 17 and 18: Commentary and Key Beep
- Screen 19: Baud Rate (Optional)
- Exiting Setup Mode
- Clear All Command
- Current Weather Mode
- Displaying Weather Variables

3
Chapter 2
Installing the Console
The Vantage Vue console is designed to give extremely accurate readings. As with
any precision instrument, use care in its assembly and handling. Although installing
the console is relatively simple, following the steps outlined in this chapter and
assembling the Vantage Vue correctly from the start will help ensure that you enjoy
all of its features with a minimum of time and effort.
Powering the Console
The Vantage Vue console does not require the use of an AC adapter. You may use the
included adapter if you wish, but three C-cell batteries should power a wireless
console for up to nine months. You can use either of these or both together, with the
batteries providing backup power for the adapter.
Note: When using an AC power adapter, be sure to use the power adapter supplied with your Vantage
Vue console. Your console may be damaged by connecting the wrong power adapter. You must
use AC power when also using WeatherLinkIP.
Installing Batteries
1. Remove the battery cover located on the back of the console by pressing down on
the two latches at the top of the cover.
Installing batteries into the Vantage Vue
2. Insert three C batteries into the battery channels as shown.
3. Place the battery cover back onto the console and click it closed.
4. Check to make sure the console runs through a brief self-test procedure
successfully.
On power up, the console displays all the LCD segments and beeps two times. A
message displays at the bottom of the console, followed by the first screen of Setup
Mode. Press DONE to skip the message and enter into Setup Mode. Setup Mode
guides you through steps required to configure the station. See “Setup Mode” on
page 6 for more information.
Note: The console does not recharge the batteries. Because of this, and because NiCad batteries do
not power the console as long as alkaline batteries, we do not recommend using NiCad
batteries.