FCC Part 15 Class B Registration Warning This equipment has been tested and found to comply with the limits for a Class B digital device, pursuant to Part 15 of the FCC Rules. These limits are designed to provide reasonable protection against harmful interference in a residential installation. This equipment generates, uses, and can radiate radio frequency energy and, if not installed and used in accordance with the instructions, may cause harmful interference to radio communications.
Table of Contents Welcome to Vantage Vue1 Console Features: Keyboard & Display ................................................................ 1 In This Manual ..................................................................................................... 2 Installing the Console ................................................................................................... 3 Powering the Console..............................................................................................
Heat Index .......................................................................................................... 23 Rain...................................................................................................................... 23 Evapotranspiration (ET) (Optional)................................................................ 25 Weather Center .................................................................................................. 25 Light ........................................
Chapter 1 Welcome to Vantage VueTM Your new Vantage Vue™ wireless weather station’s console displays and records your station’s weather data, provides graph and alarm functions, and interfaces to a computer using our optional WeatherLink® software. Your Vantage Vue station also includes an outdoor Integrated Sensor Suite (ISS) that transmits outside sensor data to the console via a low-power radio. The console displays all the information coming from the ISS in an easy-to-use format.
Console Features: Keyboard & Display and weather information for up to 8 different weather variables at a time. It also displays additional information pertinent to a selected variable in the Weather Center in the bottom right section of the console screen.
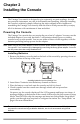
Chapter 2 Installing the Console The Vantage Vue console is designed to give extremely accurate readings. As with any precision instrument, use care in its assembly and handling. Although installing the console is relatively simple, following the steps outlined in this chapter and assembling the Vantage Vue correctly from the start will help ensure that you enjoy all of its features with a minimum of time and effort. Powering the Console The Vantage Vue console does not require the use of an AC adapter.
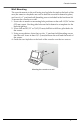
Console Location Installing the AC Power Adapter (Optional) Plugging in the AC adapter 1.Find the power jack located on the left side of the console case. 2.Insert the power adapter plug into the console power jack, then plug the other end of the adapter into an appropriate power outlet. 3.Check to make sure the console runs through a brief self-test procedure successfully. See “Installing Batteries” on page 3 for information on the self-test procedure.
Console Location Wall Mounting The console mounts to the wall using two keyholes located on the back of the case (the same two keyholes are used to hold the console kickstand in place) and two #6 x 1'' pan head self-threading screws included in the hardware kit. To mount the console on a wall: 1. Use a ruler to mark two mounting hole positions on the wall 4 15/16'' inches (125 mm) apart. Use the guide holes on the kickstand as a template for the keyhole spacing. 2. Use a drill and a 3/32” or 7/64''(2.
Chapter 3 Using Your Weather Station The console LCD screen and keyboard provide easy access to your weather information. The LCD display shows current and past weather conditions as well as a forecast of future conditions. The keyboard controls console functions for viewing current and historical weather information, setting and clearing alarms, viewing and/ or changing station settings, setting up and viewing graphs, and more.
Setup Mode • Press the < and > keys to move to the different segments and options in the Setup Mode screens. • Press the + and - keys to scroll through the different options available. • Press 2ND and Units to change units of measure when 2ND TIME applicable. UNITS • Exit Setup Mode by pressing and holding DONE until the Current Weather screen displays. See “Current Weather Mode” on page 15 for more information.
Setup Mode 1. Press the + and - keys to cycle through time zones. 2. If your time zone is not shown, press 2ND then press the + and - keys to set your UTC offset (UTC offset uses 15 minute increments). 3. Press DONE to select the time zone or UTC offset shown on the screen and move to the next screen. Screen 3: Daylight Saving Settings In most of the United States and Canada (except Saskatchewan, Arizona, Hawaii) and Europe you should use the AUTO Daylight Saving setting.
Setup Mode Note: A Vantage Vue or Vantage Pro2 ISS; or a Vantage Pro2 Anemometer Transmitter Kit must be powered for the console to recognize it. Refer to the Integrated Sensor Suite Installation Manual or other station manual for more information. It may take several minutes for the console to acquire and display a Transmitter ID after power is applied to both units. 1. Make a note of the station number(s) listed on the screen. 2. Press DONE to move to the next screen.
Setup Mode Screen 7: Retransmit The console can take data it receives from all three station types and retransmit it to other Vantage Vue or Vantage Pro2 consoles using the retransmit feature. By toggling the feature on, the console becomes another transmitter that requires its own unique ID to transmit the data received from the ISS. 1. Press the + or - key to turn the retransmit function on and off.
Setup Mode 4. Press DONE to move to the Longitude screen. 1. Press the < and > keys to move between fields. 2. Press the + and - keys to change the settings up or down. 3. To select the eastern or western hemisphere, press 2ND, then UNITS. 4. Press DONE to move to the next screen. Screen 10: Elevation Your station’s elevation is used in determining your barometric pressure.
Setup Mode To change the barometric reduction setting: 1. Press + or - to change the barometer reduction setting type, which include: • NOAA (Default Setting) — The barometer is reduced to sea level using a technique that factors in the humidity and temperature of the column of air. • ALT SETTING (Altimeter Setting) — The barometer is reduced to sea level using a “standard” column of air, often referred to as a “standard atmosphere.
Setup Mode Screen 14: Rain Season Because rainy seasons begin and end at different times in different parts of the world, you must specify the month you wish your yearly rain data to begin. January 1st is the default. The date the rain season begins affects yearly rain rate highs and lows as well as the yearly rain totals. 1. Press the + and - keys to select the month for the start of the rainy season. 2. Press DONE to move to the next screen.
Setup Mode The Cooling and Heating Degree Day Bases are used to determine the Cooling Degree Day Daily Total and Heating Degree Day Daily Total, which display as part of the Weather Center when the outside temperature variable is selected. See “Inside and Outside Temperature” on page 18 for more information. A base setting for both the Cooling and Heating Degree Day temperature is not set at the factory, allowing you to choose. A base of 65°F (15°C) is suitable for most applications.
Current Weather Mode Note: The baud rate setting on your console must match the baud rate setting in the software on your computer. If you are using WeatherLink for Vantage Vue, refer to WeatherLink Help for instructions on setting the serial port baud rate on your computer. 1. Press the + and - keys to select the baud rate. Your Vantage Vue console supports baud rates of 1200, 2400, 4800, 9600, 14400, and 19200. 2. Press Done to save the baud rate settings.
Displaying Weather Variables Current Weather Mode Commands Select a weather variable to display its data on the screen if it isn’t already visible, or to graph the data available for that variable. Weather variables are selected via the console command keys: • If the variable is printed on a key, press the key to select the variable. WIND HUM TEMP BAR RAIN • The same field can display multiple values for each variable.
Displaying Weather Variables Time and Date, Sunrise and Sunset Time, Moon Phase, Forecast Icons The time and date display in the upper left hand corner of the console screen, above the compass rose. • Press TIME to display the sunrise and sunset time for the curTIME rent day. Press TIME again to redisplay the time and date. The phase of the moon is described in the Weather Center section of the N console when the sunrise and sunset W E times are displayed.
Displaying Weather Variables A solid arrow within the compass rose indicates the current wind direction. Open arrows indicate up to six different 10minute dominant wind directions to provide a history of the dominant wind directions for the past hour. 2. Press WIND a second time to display the wind direction in degrees instead of the wind speed. The graph will show the last 25 hours of readings.
Displaying Weather Variables information on changing the unit measure or displaying the temperature in tenths of a degree. If the unit of measure is changed for Inside or Outside Temperature, the unit of measure also changes for all temperature related weather variables, such as Wind Chill, Dew Point and Heat Index. Note: The unit of measure also affects the Cooling Degree Day and Heating Degree Day Bases and the value entered in both screens is automatically converted to the unit of measure selected.
Displaying Weather Variables Humidity Inside and Outside Humidity are displayed in the top right portion on the console screen, below the temperature variables. The inside humidity is located below the word INSIDE and the outside humidity is located below the word OUTSIDE. am C N C INSIDE NW OUTSIDE NE W E MPH mb CHILL SW RAIN RATE SE WIND C S in/hr Inside and outside humidity with information displayed in the Weather Center 1. Press HUM to select outside humidity.
Displaying Weather Variables 1. Press BAR to select barometric pressure. Barometric pressure may be displayed in inches (in), millimeters (mm), BAR millibars (mb) or hectoPascals (hPa). See “Selecting Units of Measure” on page 26 for more information on changing the unit measure. 2. Press WxCEN to display the information available for the barometric pressure trend in the Weather Center. 3.
Displaying Weather Variables Pressure Trend The pressure trend arrow indicates the current barometric trend, measured over the last three hours. The pressure trend is updated every 15 minutes. The pressure trend requires three hours of data in order to be calculated so it won’t display right away on a new station. The pressure trend is indicated on the console screen, as long as the required data is available.