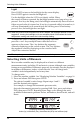
Displaying Weather Variables Pressure Trend The pressure trend arrow indicates the current barometric trend, measured over the last three hours. The pressure trend is updated every 15 minutes. The pressure trend requires three hours of data in order to be calculated so it won’t display right away on a new station. The pressure trend is indicated on the console screen, as long as the required data is available.
Displaying Weather Variables DEW 1. Press 2ND then press DEW to select Dew Point. Dew Point is displayed in either Fahrenheit (°F) or Celsius 2ND HUM (°C) in whole degrees. See “Selecting Units of Measure” on page 26 for more information on changing the unit of measure. If the unit of measure for any temperature-related weather variable is changed, the unit of measure also changes for all temperature-related variables. See “Inside and Outside Temperature” on page 18 for more information. 2.
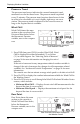
Displaying Weather Variables The rain values include RAIN RATE, RAIN DAY (current day’s rain total), RAIN MO (monthly rain total), and RAIN YEAR (yearly rain total). MPH SW WIND HEAT SE S RAIN DAY F in Daily Rain Total with information displayed in the Weather Center 1. Press RAIN to display the current rain rate. 2. 3. 4. 5. 6. 24 RAIN Rain Rate will display a number other than zero and the umbrella icon appears when two tips of the rain spoon have occurred within a 15-minute period.
Displaying Weather Variables Evapotranspiration (ET) (Optional) All the Evapotranspiration values share the same section on the console as Rain values, below the Barometric Pressure variable, on the right side.
Selecting Units of Measure Light Press LIGHT to turn on the backlight for the screen display. Press LIGHT again to turn the backlight off. Use the backlight when the LCD is not clearly visible. When the console is battery operated, the backlight remains on as long as keys are pressed. If no keys are being used, the backlight automatically turns off about fifteen seconds after it is turned on. If any key is pressed while it is turned on, it will stay illuminated for 60 seconds from the last key press.
Calibrating, Setting, and Clearing Variables Calibrating, Setting, and Clearing Variables To fine-tune your station, you can calibrate most of the weather variables. For example, if your outside temperature seems consistently too high or too low, you can enter an offset to correct the deviation. Calibrating Temperature And Humidity You can calibrate inside and outside temperature; inside and outside humidity on your Vantage Vue. 1. Press TEMP to select the temperature variable to be calibrated.
Calibrating, Setting, and Clearing Variables Calibrating Barometric Pressure Before calibrating the barometric pressure, be sure the station is set to the correct elevation. See “Screen 10: Elevation” on page 11 for more information. Find the nearest source of barometric pressure, such as a local airport, to get a current barometric pressure. 1. Press BAR to select barometric pressure. 2. Press and release 2ND, then press and hold SET. The barometric pressure variable blinks. 3.
Calibrating, Setting, and Clearing Variables To set a weather variable’s value: 1. Select the variable you wish to change (either RAIN or ET). 2. Press and release 2ND, then press and hold SET. The variable blinks. 3. Keep holding SET until all digits are lit and stop flashing. Release SET; only one digit is now blinking. 4. Press the < or > keys to select digits in the value. 5. Press the + and - keys to add to or subtract from the selected digit. 6. When you are finished, press DONE to exit.
Highs and Lows Mode Highs and Lows Mode The Vantage Vue records highs and lows for many weather conditions over three different periods: days, months, and years. Except for yearly rainfall, all high and low registers are cleared automatically at the end of each period. For example, daily highs are cleared at midnight, monthly highs are cleared at month–end midnight, yearly highs are cleared at year–end midnight. You may enter the month that you would like the Yearly Rainfall accumulation to clear.
Alarm Mode 2. Press the + and - keys to scroll through Day Highs, Day Lows, Month Highs, Month Lows, Year Highs and Year Lows. The information provided in the Weather Center displays the day of the week, month or year being viewed as well as indicates if the screen currently being viewed is displaying Highs or Lows. The reading’s time and date, where applicable, appear in the time and date fields. 3.
Alarm Mode Vantage Vue Alarms Variable Alarms Barometric Pressure Trend Storm Warning - uses trend value rising rate Storm Clearing - uses trend value falling rate Evapotranspiration* ET Alarm - uses total ET for the day Humidity, Inside High and Low Humidity, Outside High and Low Dew Point High and Low Rain Flash Flood Alarm - uses current 15 minute rainfall total 24 Hour Rain Alarm - uses current 24 hour rainfall total Storm Storm Alarm - uses current storm rainfall total Rain Rate High
Graph Mode 2. 3. 4. 5. 6. 7. 8. alarm thresholds. The Alarm icon displays and “HIGH ALARMS” displays in the Weather Center. Press the < and >keys to select one of the variables displayed on the screen or use the console keys to select any weather variable. Also, press HI/LOW to display then toggle between the high and low alarm threshold settings. Press 2ND then press SET to activate the currently selected weather variable. Press the < and > keys to select digits in the threshold value.
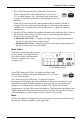
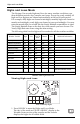
Graph Mode Viewing Graphs Although the graphs available may vary for each weather variable, all are displayed in the same way. am N NW NE W E MPH SW WIND SE S GRAPH Graph Mode for the wind variable 1. Select a variable to graph. 2. Press GRAPH to enter Graph Mode. Only the time, date, graph, graph icon, selected variable and information GRAPH pertaining to the selected variable are visible. The rest of the screen is blank.
Graph Mode View graphs of all other variables the same way. 1. Select the variable you want to view. 2. Press GRAPH. 3. Use the < and > keys to select different values. 4. Press the + key to shorten the time range. 5. Press the - key to lengthen the time range. 6. Press HI/LOW to shift between highs and lows. 7. Press DONE to exit.
Chapter 4 Troubleshooting and Maintenance Vantage Vue Troubleshooting Guide While your Vantage Vue weather station is designed to provide years of trouble-free operation, occasional problems may arise. If you are having a problem with your station, please consult this troubleshooting guide before calling Davis technical support. You may be able to quickly solve the problem yourself. Please see “Contacting Davis Technical Support” on page 52.
Vantage Vue Troubleshooting Guide TABLE 4-1: TROUBLESHOOTING GUIDE Check calibration number and adjust if necessary. The ISS may need to be relocated away from radiant heat sources. See the ISS Installation manual. Inside temperature sensor reading seems too high Move the console out of direct sunlight. Make sure the console or sensor is not in contact with an exterior wall that heats up in sunlight or when outside temperature rises.
Console Diagnostic Mode while it tries to re-establish a connection with the ISS. Enter and exit Setup Mode to re-display the antenna icon and manually force the console to re-establish a connection with the ISS. Check Console Reception Enter Setup Mode by pressing and releasing 2ND and pressing SETUP. Keep pressing DONE until the Receiving From screen displays. (See “Screen 5: Active Transmitters” on page 8 for more information.
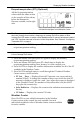
Console Diagnostic Mode Screen 1: Statistical Diagnostic Screen The Statistical Diagnostic Screen displays information about how well data is being received from the weather station to the console. The information that is displayed in this screen includes: 4 1 5 am 6 2 7 3 8 9 10 11 12 13 7 15 Note: 14 Several of these values, with a *, are used by Davis engineers. 1. Time of day or number of times the anemometer reed switch was seen closed*.
Console Diagnostic Mode 11.Station Number 12.Transmitter Domain 13.Repeater ID currently communicating with the console. If a repeater or group of repeaters is used to relay station information to the console, the Repeater ID displayed is the repeater that the console is set to receive. If the console is not listening to repeaters, this section remains blank. 14.Total number of good packets received. 15.Longest streak of consecutive good packets.
Console Maintenance dBm. The more negative the number is, the lower the background noise is. (Typically, this number should be about 15 lower than signal strength.) 9. Current console battery voltage. Ignore this value if using only an AC adapter to power the console. The value is dashed out (--) if no batteries are installed. Console Maintenance Changing Batteries Use this procedure to change console batteries without losing any stored weather data or console configuration settings. 1.
Time Appendix A Weather Data Refer to this appendix to learn more about the weather variables that are measured, displayed, and logged by your Vantage Vue station. The following variables are arranged below in the order they are viewed on the console screen: left to right, top to bottom, starting with time. Time A built-in clock and calendar track the time and date.
Forecast Forecast The forecast icons show what weather conditions may occur within the next 12 hours. The console generates a weather forecast based on the barometric reading and trend; wind speed and direction; rainfall; temperature; humidity; latitude and longitude; and time of year. The forecast is updated once an hour, on the hour and requires three hours of data. Predictions are made for cloud cover and the likelihood of precipitation.
Temperature Beaufort Scale The Beaufort Scale is an empirical measure for describing wind speed which ranks wind speeds in classes. The Beaufort Scale classification for the current wind condition is listed in the Weather Center when WIND is pressed and WxCEN is pressed several times. See “Wind Speed and Direction” on page 17 for more information. Wind Speed Beaufort Number Description 0 -1 mph; (0 -1.6 kph) 0 Calm 1-3 mph; (1.6 - 4.8 kph) 1 Light Air 3 - 7 mph; (4.8 - 11.
Wind Chill Wind Chill Wind chill takes into account how the speed of the wind affects our perception of the air temperature. Our bodies warm the surrounding air molecules by transferring heat from the skin. If there’s no air movement, this insulating layer of warm air molecules stays next to the body and offers some protection from cooler air molecules. However, wind sweeps that warm air surrounding the body away. The faster the wind blows, the faster heat is carried away and the colder you feel.
Barometric Pressure Barometric Pressure The weight of the air that makes up our atmosphere exerts a pressure on the surface of the earth known as atmospheric pressure. Generally, the more air above an area, the higher the atmospheric pressure. This means that atmospheric pressure changes with altitude. For example, atmospheric pressure is greater at sea level than on a mountaintop.
Appendix B Specifications See complete specifications for your Vantage Vue Station at our website: www.davisnet.com. Console Specifications Console Operating Temperature . . . . . . . . . . . 0° to +140°F (-18° to +60°C) Display Temperature . . . . . . . . . . . . . . . . . . . . +32° to +140°F (0° to +60°C) Non-Operating Temperature. . . . . . . . . . . . . . . below +14° or above +158°F (-10° or +70°C) Console Current Draw . . . . . . . . . . . . . . . . . . . 0.
Console Data Display Specifications Console Data Display Specifications Historical Data . . . . . . . . . . . . . . . . . . . . . . . . . Includes the past 25 values plus the current value unless otherwise noted; all can be cleared and all totals reset. Daily Data . . . . . . . . . . . . . . . . . . . . . . . . . . . . Includes the earliest time of occurrence of highs and lows; period begins/ends at 12:00 am. Monthly Data . . . . . . . . . . . . . . . . . . . . . . . . . .
Weather Data Specifications Weather Data Specifications Note: The following weather data specifications are listed as they are displayed on the console. Weather Data Specifications Variable Nominal Accuracy (+/-) Resolution Range 1 0 to 360 3 22.5 16 compass pts. 0.13 compass pt. 1 mph; 1 kt; 0.1 m/s; 1 km/h 2 to 150 mph; 2 to 130 kts 3 to 241 km/h, 1 to 67 m/s greater of 2 mph/kts; 1 m/s; 3 km/h or 5% Inside Temperature 0.1F; 0.1C +32 to +140F; 0 to +60C 1F; 0.
Weather Data Specifications Weather Data Specifications Resolution Range Nominal Accuracy (+/-) Rainfall 0.01''; 0.2 mm (1mm at totals over 2000 mm) to 199.99''; 6553 mm greater of 3% or 1 tip Rain Rate 0.01”; 0.1 mm to 40''/hr.; 1016 mm/hr. 5% when rate is under 5”/hr.; 127 mm/hr. 0.01''; 0.2 mm Daily to 99.99”; 999.9 mm Monthly & Yearly to 199.99”; 1999.9mm greater of 5% or 0.01''; 0.
Appendix C Wireless Repeater Configuration Vantage Pro2 Wireless Repeaters (#7626, #7627) or Long-Range Wireless Repeaters (#7653, #7654) can be added to increase transmission distances or improve transmission quality between a station and a console. A repeater receives information transmitted from a Vantage Vue or Vantage Pro2 station and retransmits it to a console. Depending on transmission distance, one repeater or several repeaters can be used to collect and retransmit weather data.
Vantage Vue Console Icons Console icons indicate weather conditions and special functions. Forecast Mostly Clear Partly Cloudy Mostly Cloudy Rain Snow Forecast icons show what weather conditions may occur for the next 12 hours. Moon Phase New Moon Waxing Crescent First Quarter Waxing Gibbous Full Moon Waning Gibbous Last Quarter Waning Crescent New Moon Shows the current moon phase. Sequence shown for Northern Hemisphere. The sequence of the icons is reversed in the Southern Hemisphere.