
User's Manual

2
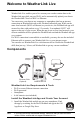
2. In the app, create your account on WeatherLink.com.
3. Make sure your smartphone’s “Bluetooth” function is on. With your phone
near your WeatherLink Live, tap the Account icon: in the upper right
corner of the app’s home screen.
4. Scroll down to WeatherLink Live,
and tap the Add button.
Note: You will use the user name and password you have set up to access your page on
WeatherLink.com from your computer as well. You will only have to enter your name
and password the first time you open the app unless you log out.
The WeatherLink app will walk you through powering up and connecting your
device as shown in the steps below.
Power Up and Connect Your WeatherLink Live
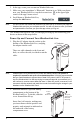
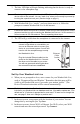
1. Plug the AC adapter into the socket on the
bottom of the WeatherLink Live, and plug
the adapter into the wall.
There are cable channels to the front and
back, as well as the side, in which to run the
cable.
Note: WeatherLink Live is powered by AC power with battery backup. AC power is
required; it cannot be set up or run on batteries alone. It is highly recommended
that you install batteries to prevent loss of data if AC power is lost. If AC power is
lost, the WeatherLink Live will stop trying to communicate with your network, but it
will continue to receive sensor data and store it. When AC power is resumed, it will
reconnect with the network and send the records it stored during the outage to your
database on the WeatherLink Cloud.
2. Install the batteries. Open the battery
compartment on the bottom of the
WeatherLink Live. To do this, slide the
cover forward then lift up.
Insert four AA batteries, making sure
you insert them with the positive and
negative ends oriented as indicated on
the underside of the battery
compartment cover.
AC Adapter
Socket
Cable
Channels
Insert
4 AA
Batteries
To open,
slide cover
forward
then up.