DriveRight ® Fleet Management Software Getting Star ted Guide CarChip ® DriveRight ® Drivers Vehicles Product # 8186
Product Number: 8186 Davis Instruments Part Number: 7395.313 Rev. H (10/26/07) DriveRight Fleet Management Software Getting Started Guide © Davis Instruments Corp. 2007. All rights reserved. This product complies with the essential protection requirements of the EC EMC Directive 89/336/EC. DriveRight is a registered trademark of Davis Instruments Corp. Windows is a trademark of Microsoft Corporation. 3465 Diablo Avenue, Hayward, CA 94545-2778 U.S.A. 510-732-9229 • Fax: 510-732-9188 E-mail: info@davisnet.
Table of Contents DriveRight FMS Features. . . . . . . . . . . . . . . . . . . . . . . . . . . . . . . . . . . . . . . 1 Package Contents . . . . . . . . . . . . . . . . . . . . . . . . . . . . . . . . . . . . . . . . . . . . . 2 System Requirements . . . . . . . . . . . . . . . . . . . . . . . . . . . . . . . . . . . . . . . . . . 2 Optional Requirements . . . . . . . . . . . . . . . . . . . . . . . . . . . . . . . . . . . . . . . . . 2 Additional DriveRight FMS Documentation . . . . . . . . . . . . . . .
ii
Introduction The DriveRight Fleet Management Software (FMS) package allows you to store, view and manipulate DriveRight data on your PC. More specifically, FMS provides tools for sorting, tracking, analyzing and printing data, and viewing and printing reports for a number of individual DriveRight and CarChip devices. This guide is intended to get you up and running with DriveRight FMS in the shortest time possible.
Package Contents Before installing the software on your PC, make sure your package includes the following items: • DriveRight download cable — A black interface cable to connect a DriveRight device to your PC. • DB9 connector — A 9-pin connector with modular “telephone” plugs to connect to a serial port in your PC. • CarChip download cable — A USB cable for CarChip Fleet Pro.
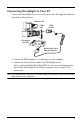
Connecting DriveRight to Your PC Connect the DriveRight device to a serial port on your PC using the hardware and cable as shown below. Windows PC COM Port DB9 (9-Pin) DriveRight Console Molded One-Piece Download Cable 1. Connect the DB9 connector to a serial port on your computer. 2. Connect the free end of the cable to the DriveRight device. After you have installed DriveRight FMS, be sure to test communications between the DriveRight device and the computer. Refer to page 22 for instructions.
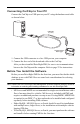
Connecting CarChip to Your PC Connect the CarChip to a USB port on your PC using the hardware and cable as shown below. USB Cable 4' (1.2 m) USB Port CarChip Fleet Pro Data Logger 1. Connect the USB connector to a free USB port on your computer. 2. Connect the free end of the download cable to the CarChip. After you have installed DriveRight FMS, be sure to test communications between the CarChip and the computer. Refer to page 22 for instructions.
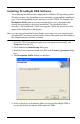
Installing DriveRight FMS Software The following installation was completed in a Windows XP operating system. The process may vary depending on your operating system and the installation type. If you are upgrading from a previous version of FMS, for example, the Destination Folder dialog box may not display because a destination has already been created in a previous installation. The installation below describes a full installation.
The USB Drivers for ACS SmartCard Reader dialog box displays. 6. If using a SmartCard Desktop Reader in conjunction with FMS, keep the ACS SmartCard Reader Driver checked and click Next. The SmartCard Desktop Reader needs to be available in order to install the corresponding USB driver. Only plug in the SmartCard Reader when prompted by the installation. If you do not have the SmartCard Desktop Reader at this time or have installed the driver before, deselect the driver and click Next.
Follow the dialog boxes for installing the SmartCard Desktop Reader driver. See “Manually Installing SmartCard Desktop Reader Drivers” below for manually installing the drivers. See “Removing PC/SC Drivers for SmartCard Desktop Reader” on page 9, if the PC/SC driver was previously installed. 8. FMS installation has completed. Click Finish to exit the DriveRight Setup.
If the dialog box does not display, check the connection between the hardware and your computer, or see your operating system’s documentation for more information. If the dialog box still does not display, contact Davis Technical Support for help with this problem. 6. Click the No, not this time field and click Next.
The second dialog box displays. 7. Click Install the software Automatically and click Next. The new drivers install automatically. 8. Click Finish once the installation is complete. See “Removing PC/SC Drivers for SmartCard Desktop Reader” below if the PC/SC driver was previously installed. Removing PC/SC Drivers for SmartCard Desktop Reader There are two sets of ACS SmartCard Desktop Reader drivers available for use with the SmartCard Desktop Reader: The PC/SC Driver and the ACS Proprietary Driver.
To verify if the PC/SC SmartCard Driver was installed: 1. In Windows XP, open the Control Panel. 2. Double-click System. The System Properties dialog box displays. 3. Click the Hardware tab and then click Device Manager. The Device Manager dialog box displays. If the PC/SC driver has been installed, the ACR38 SmartCard Reader driver is displayed under the Smart card readers list. This driver will not appear anywhere in DriveRight FMS if it has been installed.
1. In Windows Explorer or similar browser window, navigate to the DriveRight directory or the DriveRight FMS installation CD and the folder SmartCard USB Drivers. 2. Double-click ACS Setup.exe to run the ACS Driver setup program. The Information dialog box displays if the driver was previously installed.
3. Click OK. The ACR38 Proprietary Driver Installation Wizard dialog box displays. 4. Click Uninstall to remove the driver. When the program finishes removing the driver, the Confirm dialog box displays. Note: If you are uninstalling the PC/SC driver as part of the DriveRight FMS installation process, do not restart your computer at this time. The FMS installation process must finish before the computer can be restarted. Once the FMS installation process has completed, you should restart your computer.
If you are removing the PC/SC driver manually, unplug the SmartCard Reader from the computer and click Yes. After your computer restarts, install the SmartCard Proprietary Driver. See “Manually Installing SmartCard Desktop Reader Drivers” on page 7 for more information. Once the installation is complete, ACR38 USB Smart Card Reader (Proprietary Mode) should display in the Device Manager under the Universal Serial Bus Controllers list.
Base Station and Configuration Cable to properly communicate with DriveRight FMS. Note: The following installation was completed on a Windows XP operating system. The process may vary depending on operating system. The only way to find the correct drivers for the Wireless Download System is to install or upgrade to FMS 3.8 first. The necessary driver files are kept in the FTDI Drivers folder in the DriveRight Directory after the software is installed. 1.
The second dialog box displays. 3. Click Install from a list or specific location and click Next. The Please choose your search and installation options dialog box displays.
4. Click Search for the best driver in these locations and select the Include this location in the search check box. 5. Click Browse. 6. Navigate to the DriveRight directory. A list of subfolders displays. When DriveRight FMS is installed, the drivers for the wireless devices are stored under the DriveRight directory so that they can be installed any time a Base Station or On-Board Module is added. The wireless device driver is located in the FTDI Drivers subfolder. 7.
Before You Run the Software There are software concepts you should become familiar with, and some initial planning considerations to think about. Key Concepts: DriveRights, CarChips, Vehicles & Drivers Your database is a collection of related tables (relational database) that contain information about your fleet (drivers, vehicles, DriveRights, CarChips, addresses, etc.). For example, information about a driver in your fleet will be stored in a single row in the Drivers table.
Planning for Initial Software Use The software allows for several layers of classification, and for different degrees of detail in accounting for driver and vehicle information. We recommend thinking about the following items so that you can tailor FMS to your needs. • Define Location (Required) — Define multiple locations, keeping in mind that you can only manage data one location at a time. All operations like database browsing and reporting are displayed with respect to the current location.
2. Refer to the DriveRight Fleet Management Software Database Selection Guide for additional program configuration instructions. Software Setup After you have finished the initial program configuration, you will want to check the program preferences and enter the default DriveRight device settings, and test the DriveRight device communications. Note: Please refer to the DriveRight FMS Online Help System for more information. Use the following steps to set DriveRight FMS preferences: 1.
• • 20 Use DriveRight ID Code as Trip Address ID or Driver ID (DriveRight 500, 600 and 600E) — You may specify a Driver ID using the code on the DriveRight. If only one driver uses a vehicle, the code may be used as a Trip Address ID. To specify an ID for each trip address, select Database->Trip Addresses. At the beginning of each trip, specify the Trip Address ID in the DriveRight device. When downloading a DriveRight device, DriveRight FMS interprets each ID as the destination of a trip.
Default DriveRight Settings Wizard Select Setup->Default DriveRight Settings->Setup Wizard to edit the default DriveRight settings. You can edit defaults for the following DriveRight settings: • • • • • Unit Settings — Select the date, time and unit modes. Safety Settings — Enter the speed, acceleration and deceleration limits. Timer Settings — Enter the trip stop time and driver log out time. Alarm Settings — Select the alarm mode and options.
Testing the Communications Port Select Setup->Communications Port to select the COM port used to connect to a DriveRight or CarChip. 1. Select Communications Port - DriveRight to select and test the communications port for a DriveRight device or select Communications Port - Carchip to select and test the communications port for a CarChip. The software supports USB and multiple COM ports. Communication Port Settings for CarChip Communication Port Settings for DriveRight 2.
Building Your Database To build up your DriveRight FMS database, we recommend adding drivers first, then adding vehicles, and finally adding DriveRights and/or CarChips. Note: Refer to the DriveRight FMS Online Help for more information about building your database. If you are importing data from an earlier version of DriveRight software, please see “Importing Data from DriveRight 2.x” on page 25. 1.
Downloading Data You will be ready to download data into DriveRight FMS once the software has been configured, the data connection to the computer has been established, and the CarChip or DriveRight has been added to the database. To download data: 1. Connect the CarChip or DriveRight to the computer. Note: The DriveRight device must be active (LCD screen display on) to download data. Press MODE on the device if the LCD is blank. 2.
Additional Software Topics Once you begin collecting data, you can use DriveRight FMS to record, report, filter, export and import DriveRight data. The following topics provide a brief overview of some FMS features. Be sure to review the documentation listed on page 2 for a complete description of FMS features and commands. Backup and Restore Use File->Backup to create backups of your DriveRight FMS data.
4. Go to Startup->Programs->DriveRight and run OldToNew. 5. To import data, select the location from the drop down list. 6. Click Browse to select the old Borland tables directory. By default it is C:\Program Files\DriveRight Software\tables. 7. Click Convert to start the conversion. After the data is converted you will see a success message. At this point all of your 2.x data has been converted into the new DriveRight FMS database format.
Contacting Davis Technical Support If you have questions about the software, or encounter problems installing or using the software, please contact Davis Technical Support. Most questions can be answered on the phone. Note: Sorry, we are unable to accept collect calls. (510) 732-7814 – Monday through Friday, 7:00 a.m. to 5:30 p.m. Pacific Time. (510) 670-0589 – Fax to Technical Support. support@davisnet.com – E-mail to Technical Support. info@davisnet.com – E-mail to Davis Instruments. www.davisnet.
Notes: 28