CONTROLLERS Installation & Operating Instructions Please pass on to the owner of this equipment… 1
CONTROLLERS Index: Your Davey ClevaLink Controller……………………….. Packing Lists…………………………………………….... Product Overview…………………………………………. Features……………………………………………………. Technical Data…………………………………………….. Dimensions……………………………………………….... Installing the MCU….......................……………………... Programming the MCU................................................... Setting the Clock............................................................. Setting up the Remote....................................................
Your Davey ClevaLink Controller: Congratulations on the purchase of your Davey ClevaLink Controller. You have made an excellent choice for the convenient and automated control of your swimming pool, spa and other appliances around the home, farm or workplace. The Davey ClevaLink Controller system includes a Master Control Unit (MCU) and a Link Control Unit (LCU) and a Clevalink Remote Control (CLR) which can be operated together or individually to suit your personal needs.
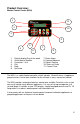
Product Overview: Master Control Centre (MCU) 1 . 11 0. 2 . 10 0. 3 . 9 . 4 . 1. 2. 3. 4. 5. 6. 5 . 6 . Default display Day of the week Outlet Name/ Number Favourites 1 to 4 Exit Back Up Arrow 7 . 8 . 7. Down Arrow 8. Forward Advance 9. Select /Confirm 10. Status of Outlet 11. Current Time The MCU is a sophisticated controller, which includes 16 inbuilt timers, 8 appliance group functions, and macro functions for the ultimate in easy, convenient control.
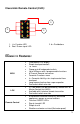
CleverLink Remote Control (CLR): 3 . 1 . 2 . 1. 8 x Function LED 3. Red / Green signal LED 2.
Technical Data: Model Power (V) Power Outlets Outlet rating (A) Power Lead length (m) Electrical Approval IP MCU / LCU 220-240 2 10A Total 1.9 NSW23093 53 Dimensions: (mm) Height Width Depth Mounting Holes (Horiz) MCU LCU 208 124 119 88 99 99 Mounting Holes (Vert) 188 104 Mounting Holes Diam 5 Installing the Master Control Unit (MCU): 1. When installing your MCU it is easier to program the network prior to mounting.
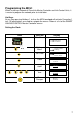
Programming the MCU: When installing a network of ClevaLink Master Controller and Link Control Units, it is easier to program the network prior to installation. Hot Keys At any time pressing Hotkeys 1 to 4 on the MCU touchpad will activate Favourites 1 to 4. All other buttons are used to navigate the menus. Below is a list of the SMART LINKING CONTROL Master Controller menus.
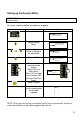
Setting up the Remote (MCU): WARNING: Do not drop or submerge the remote control in water. It is only resistant to wet hands. Set up the remote to control an appliance or group Press Selected Main Menu Display Equipment Set Timers Setup Remote Menu OR Select Outlet, Group or Macro to be controlled Transmit I.D. Press and hold selected remote button Signal LED will flash Green When I.D. has been sent Function LED will flash Red Then Green.
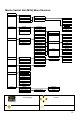
Master Control Unit (MCU) Menu Structure: Main Menu Equipment Set Timers Equipment Access Units Add Equipment Rename Outlet Remove Equipment Select Unit Type 2 x 10A Outlets 15A Outlets Timers Timer 1 : Set Timers Timer x: on/off Act: Function Timer 16 Setup Macros Setup Groups Macros Macro 1 : Macro 8 2 x 10A Outlets Unit 1 : Unit 16 15A Outlets Unit 1 : Unit 16 Turn: on/off Select Unit Type 2 Time: hr:min Day: 2 Channel Units 2 x 10A Outlets Unit 1 : Unit 16 15A Units 15A Outlets Unit 1 :
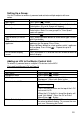
Setting Up a Group: Use this Function to wirelessly connect and activate multiple outputs with one action. Select Press / Use Main Menu Press Menu ( ) Button Setup Groups Press Arrow Up/Down to find “Setup Groups”. Select with Enter button. A list of 8 Groups will appear. Select Group Press Arrow Up/Down to find new group. Select with Enter button. Note: For new groups 8 x “Free Space” spots will appear. Free Space Press Enter ( ) . Type of outlet (2x10A or Press Arrow Up/Down button to select outlet type.
Setting the Timers: Select Press / Use Main Menu Set Timers The timer which you want to use “ACT” Type of outlet. 10A or 15A The appliance to be controlled “On Time” Menu ( ) Button Arrow Up/Down to locate. Select with Enter ( Arrow Up/Down to locate. Select with Enter ( “Day” “Off Time” “Day” Exit to Default display screen ) button. ) button. Arrow down to locate. Select with Enter ( ) button Arrow Up/Down to locate. Select with Enter ( ) button. Arrow Up/Down to locate.
Renaming an Outlet: Select Main Menu Equipment Menu Rename Outlet Type of outlet to be renamed (2x10A or 15A). Appliance to be renamed New Name Exit to Default display screen Press / Use Press Menu ( ) Button Press Menu ( ) Button Press Arrow Up/Down to find “Rename outlet”. Select with Enter button Press Arrow Up/Down button to select outlet to be renamed. Select with Enter button. A list of appliances / outlets will appear. Press Arrow Up/Down to find name to change. Select with Enter button.
Resetting the Factory Settings: The Settings menu provides access to the Factory Reset sub-menu. When Factory Reset is selected by pressing the ENTER or OK buttons a confirmation screen is displayed. If the OK button is then pressed the unit will delete all programmed data and return to the original state. Select Main Menu Settings Factory Reset Press / Use Press Menu ( ) Button Press Arrow Up/Down to “Settings”. Select with Menu button Press Arrow Up/Down to “Settings”.
Installing an LCU: 1. When installing your LCU it is easier to program the network prior to mounting. Simply plug in to any power outlet to activate the unit and begin programming. Refer to the section titled “Operating the LCU”. 2. Mount the LCU in a location that is greater than 3.5 meters from the pool zone and less than 1.5 meters from a power supply socket. 3. Plug the appliances to be controlled, into the outlets in the base of the LCU.
DAVEY WATER PRODUCTS GUARANTEE FOR AUSTRALIA & NEW ZEALAND This Davey product is guaranteed to be free of material or manufacturing defects for one year………. TERMS AND CONDITIONS 1. This guarantee applies to all states and territories of Australia and New Zealand only and is subject to the provisions of the Trade Practices Act (Aust.), the Goods and Consumer Protection Legislation of the various Australian states and the Consumers Guarantee Act 1993 (NZ) as applicable. 2.
Privacy Act 1988 (Cth) and the Privacy Policy of Davey Water Products Pty Ltd which is available at davey.com.au. ® Davey and ClevaLink are registered trademarks of Davey Water Products Pty Ltd. © Davey Water Products Pty Ltd 2011.