TETRA PlugSE™ Editor SoundTower PlugSE™ for DSI TETRA Synthesizer VST (PC/Mac) AudioUnits (Mac) SoundEditor, PlugSE™, and iPad Products Reach Inside... © SoundTower Inc. 2012 www.soundtower.
Special Thanks to… Kris Gorzelnik Mark Lanoszka Laurent Thompson Chancey A. Truman Soundtower Tetra PlugSE V1.
Table of Contents Installation................................................................................... 2 VST/Audio Units............................................................................ 2 Mac OSX Users.............................................................................. 2 Authorization............................................................................... 2 Older versions of Cubase............................................................... 2 Configure MIDI.........
Welcome! Thanks for purchasing the SoundTower Tetra PlugSE™ for the Tetra synth from Dave Smith Instruments. This proprietary plug-in is installed in your audio software as a Virtual Instrument (VST Instrument or AudioUnits) and will control all of the functions found on the Tetra. Stunning graphics, intuitive functions and easy-to-use menus make tweaking the Tetra hardware fun and easy.
Installation VST/Audio Units Download the version of the Tetra PlugSE™ Editor required for your computer platform (PC/MAC) and audio workstation (VST/AU). Downloads are available from: http://www.soundtower.com/PlugSE The Tetra Editor plug-in will run free of charge in demo mode. Once you download and decompress the .zip file, you will have a .dll file for PC VST. Various DAWs have different requirements for the installation of plug-ins.
Configure MIDI It isn’t practical to provide specific instruction in this document to cover all the possible MIDI interfaces or configurations that are available. We will show an example of a typical MIDI configuration using a MIDISPORT 2x2 MIDI interface. NOTE: If you create a new MIDI track, the Tetra should appear as a possible input and output for MIDI communication. Click the MIDI button at the top of the Editor window. Select the MIDI interface and port that the Tetra is connected to.
Record/Playback Automation Data Test the writing and reading automation data as you would any other VI in your software. Enable the track to ‘Write’, start playback and tweak some controls on the PlugSE™ Editor or twist some data controls on the Tetra. Rewind, put the automation track into ‘Read’ and start playback and confirm that automation data is communicating with the Tetra.
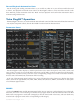
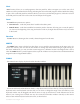
Click the A , B or C buttons to select the desired bank, and then use the scroll bar on the right to scroll through the list (you can also scroll through the list using the wheel on your mouse, if so equipped). Simply select a bank you wish to explore and click on a Program name you wish to recall. The selected program will appear in the Parameter Panel window.
MIDI Although the main function of the MIDI button was covered above in the MIDI Configuration section, there are more features that can be adjusted in the MIDI Configuration panel. When enabled, the Clock ON/OFF button synchronizes the EDITOR with the host MIDI clock. LATENCY and DELAY Many hosts send MIDI data to Plugin Instruments ahead of time in order for plugins to prepare the Audio to play.
Host Host function allows you to send programs to the VST patch list. Select a Program you wish to save. Click HOST. You will be presented with a dialog indicating the current host VST program selected. While this dialog is open, click on the VST patch list and select the slot you wish to save the Tetra program to. Click OK. Go back to the VST patch list and click on the same slot and the patch will appear.
Additional features of the Parameter Panel LCD Screen The LCD screen on the Interface Panel has two ‘hot spots’ to assist in selecting a desired program. Clicking anywhere in the Program number field (“A:114” at the top) produces a listing of all of the programs in the current bank from which to make a selection. You can also change the bank and select from any program within that new bank.
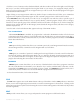
PROGRAM, COMBO and MULTI modes In PROGRAM Mode as shown above, each PROGRAM has two layers. You can select the active layer by clicking on Layer A or Layer B buttons. In COMBO Mode the screen changes as above. Click on Voice 1, Voice 2, Voice 3 or Voice 4 button to assign one the four available Voices and edit them. In MULTI Mode you will see the screen as shown above. Click on Chan. 1, Chan. 2, Chan. 3 or Chan. 4 button to assign one of the four available MIDI Channels.
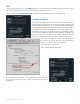
This view of the Sequencer shows the four sequencers available with the topmost set showing master functions on the right that apply to all four sets of programmable steps. Let’s take a look at the three sections of the top Sequencer. This area shows the Tetra parameter that will be affected by the sequenced steps, selected in the drop down list accessed by clicking the down arrow. The Edit button will be explained later. The middle section shows the 16 steps and the values of each step.
This area to the right is the master section for all four sequencers. Click on the red LED to turn the sequencer on and off, adjust Tempo, select Sequencer Trigger source and choose the Clock Divide option to determine the gate time of each step relative to the tempo. Additionally, by clicking on the Draw Mode button, you have the options for Sliders, Pen or Quantize. Choosing Sliders allows the individual steps of the sequencer to be raised and lowered to specific values.
Depending on mode selected in the Draw Mode menu, slide the handle of each step or drag across the panel to set the levels of each step. The values in the step handle will depend upon the Seq x Destination. That values will be either numeric or indicate midi note names and numbers. Please note that the level can also be adjusted with a scroll wheel of a mouse. At the top of each step column is a button that will display either RST (ReSeT), or OFF.