Tetra 4 Voice SoundEditor User Guide Mac/PC Edition 1590 Sylvaner Avenue St.
Table of Contents 1. 1. Introduction 5 1.1 Support 5 1.2 About this Manual 6 1.3 Installation/Requirements 6 1.4 Before You Begin 7 1.5 Overview 7 2. Starting Up 8 2.1 Getting Connected 8 2.3 Midi Setup 9 3. SoundEditor Menus 10 3.1.1 TetraPro/TeraLE Menu 10 3.1.2 FILE Menu: 11 3.1.3 Edit Menu: 11 3.1.4 MIDI Menu: 12 3.1.5 Global Settings 12 3.1.6 Options Menu: 13 3.1.7 Snap Shots Menu: 13 3.1.8 Help Menu: 14 3.1.9 Program and Combo Menus: 14 4.
6. Program and Combo Modes 28 6.1 Program Menu 29 6.2 Combo Menu 31 7. Bank Manager/Librarian 32 7.1 Bank Manager Toolbar 33 7.2 ʻRadioʼ Buttons and Checkboxes 34 7.3 User Bank 35 7.4 The Librarian Panel 36 7.5 Librarian Toolbar 37 7.6 Adding Program to the Library 38 7.7 Moving Programs between Categories 39 7.8 Copying Programs to the User Bank 40 8. Program Genetics 41 8.1 Selecting 45 8.2 Creating New Sounds 45 8.3 Selecting Top Offspring 46 9.
16.
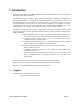
1. Introduction Welcome to SoundEditor, a full-featured Editor and Sound Development tool for the Dave Smith Instruments (DSI) Tetra synthesizer. SoundEditor provides the ultimate editing and sound development experience by displaying all Tetra Program parameters in a single, intuitive graphical interface. The interface allows you to view the complete details of any Program at a glance and edit any parameter using the mouse or computer keyboard.
1.2 About this Manual Throughout the manual, screen shots of the SoundEditor application are shown for i l l u s t r a t i v e purposes. These views are based on SoundEditor for the Macintosh, although similar views will be observed if you are using SoundEditor on a PC. When any significant variation in the appearance or operation of SoundEditor occurs between the Mac and PC platforms, the differences will be described.
1.4 Before You Begin To get the most out of this program you should be familiar with the operation of the DSI Tetra. The Tetra is complex musical instrument with an amazing array of programmable features. The Tetra Operation Manual is the essential source for descriptions of the instrument and its operation, and is recommended reading for all users.
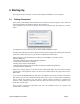
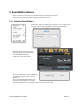
2. Starting Up This chapter describes the steps to connect and configure SoundEditor on you computer. 2.1 Getting Connected Once you have downloaded and installed Tetra LE or Tetra Pro software, open the Tetra folder and launch the application by double clicking on the program icon. Upon opening the Pro version for the first time, will be presented with the dialog box as shown below. . The registration screen offers two options: Demo Mode and Register Online.
2.3 Midi Setup In order for the Tetra SoundEditor software to communicate with the Tetra hardware, the hardware must be connected to both the MIDI In and MIDI Out connections of your computer's MIDI interface or through the USB port. If these connections are not already in place, shut down the computer (always a good idea before connecting/disconnecting anything!) and connect the interface, the MIDI In and MIDI Out cables or the USB cable to the hardware.
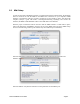
3. SoundEditor Menus Here’s a quick tour of the menus in the Main window: (PC menus are similar) Please note that some items will not appear on Tetra LE as noted 3.1.1 TetraPro/TeraLE Menu Preferences offers this dialog box that allows you to adjust Scroll wheel and Knob value adjustments with the dropdown menus. Selecting About reveals this image, showing various specifics about the Tetra SoundEditor Software. Click OK to close this window Tetra OS Update will reveal this dialog box.
3.1.2 FILE Menu: This menu will contain different items depending on whether the Tetra is in Program or Combo mode and between Editor or Program/Combo list windows. Depending upon the mode, the File Menu contains various commands to Load and Save single Program or Combo files to and from the computer, Load and Save all Tetra data to and from the computer, opening Program and Combo bank windows, accessing Bank Manager and Librarian functions, Phantom banks and to load Factory Presets.
3.1.4 MIDI Menu: The MIDI menu provides access to the MIDI Setup and Global Settings windows, as well a s transfer commands of Tetra data (transmit/receive) and will have different options depending upon the mode that module is in. Program Mode Combo Mode Program/Combo Bank Mode All three MIDI menus contain Global Settings and Midi Setup. 3.1.5 Global Settings Clicking on Global Settings in the Midi menu will bring up this image. Refer to your Tetra owner’s manual for details on these functions.
3.1.6 Options Menu: The Options menu is available in all modes, however Program Genetics and Morpher are available in Tetra Pro. These items will be described in a later chapter. o n l y Selecting V-Piano brings up the following image: This keyboard image provides a playing surface if you don’t have a midi keyboard c o n n e c t e d t o the computer and you wish to work on your Tetra. Clicking on a key will send that note to the Tetra.
3.1.8 Help Menu: The Help menu is available in all modes The Help menu allows you to connect to the Soundtower web site to get help, download updates etc. Of course, your computer will require an active connection to the internet for this feature to work for you. Just click on Help On Line. 3.1.9 Program and Combo Menus: When either the Program or Combo list windows appear, an additional menu item will appear. These menu items will be described in later chapters.
4. Main Editor When you start up the TetraPro or Tetra LE program, you will be presented with this overview of the Tetra controls. There are only a few concepts required to be able to navigate through this feature rich page. Please remember to review the Tetra Owner’s Manual to gain a better understanding of the operation of the synth. We will touch upon a few of the features, but this guide is not intended to replace the Owner’s Manual.
4.1 Editing Parameters Let’s use the Oscillators block as an example This image shows a collection of knobs, clickable “lights” and a dropdown box. Click and drag on the knobs in a circular or vertical (depending on the setting in the Preferences, shown in a previous chapter). Click on the red boxes to activate the function and turn on the “light”.
To the right hand side of the editor is the this block. When you click on the Assign Params button, you will see this image: This block presents a window that allows you to set the Tetra parameters that the 4 assignable parameter knobs on the front panel of the module controls. Clicking on the Push It! button with flip the block back to the image shown above. In the center section, the Layer B switch brings the second layer to allow modification of the sound. Sync Adj.
When in the Combo mode, the center block will appear like this: You can select one of the 4 voices to show the editor settings by clicking on the buttons bellow the name screen. Additionally, you may select any combination of the Sync Adj. lights to allow common adjustment of parameters of those voices who’s lights are lit. 4.2 Toolbar The Toolbar is provided as a convenient way to access many of the Menu items. Program - Selects Program mode and brings the directory of Program Banks to the front.
Combo Mode - Copy Combo Copies current Combo to the clipboard Copy Voice Copies currently selected voice of a selected Combo to the clipboard Import Voice Pastes the current voice on the clipboard to the selected voice of the selected Combo Paste Combo (Appears when a Combo has been copied) Pastes Combo on clipboard to selected Combo Rename Combo Opens a dialog to allow the name of the selected Combo to be renamed.
Midi Button The Midi button allows you to select Midi Setup and Global Settings as previously described. Genetics Button The Genetics button opens the Program Genetics window. This button duplicates the action of selecting ‘Program Genetics’ in the Options menu. Program Genetics is covered in section 9. Morpher Button The Morpher button opens the Morpher window. This button duplicates the action of selecting ʻMorpherʼ in the Options menu. Morpher functions are covered in section 10.
4.3 Assigning Program Catagories There are several ways to assign a category to a Program. This can be done from the Program Name Display, from the Program Naming window, or by right-clicking in the ‘Category’ column of the User Bank (part of the Bank Manager/Librarian). To assign a category from the Program Name Display, click in the Category section of the display (the upper right part of the Name Display window).
5. The Sequencer Window The Tetra module contains a sequencer that can be programed in the SoundEditor. Basic controls are found in the upper right block of the editor window. To initiate the preprogrammed sequencer pattern associated with the Program or Combo you have selected, click the Sequencer light in the top left hand corner of this block. If you wish to show greater detail and to program specific sequencer patterns, click the Sequencer button or by selecting “Sequencer” from the Edit menu.
The Sequencer window allows you to program/adjust the four Tetra sequences, select the modulation destination of each sequence, and set the overall tempo and clock divide parameters.
5.2 The Function Button In the Sequencer Function panel, the Seq buttons that appear on the far left (Seq1 thru Seq4) are used to select the specific sequence that will be affected by the panel functions. The ‘From Step’ and ‘To Step’ sliders allow you to specify the range of steps that will be affected within the selected sequence. Clicking the Function button will reveal this window: In the figure above, for example, Sequence 4 has been selected with a step range of 5 - 10.
The Functions list provides commands to copy, paste and modify the selected sequence. Commands include: Copy: Copies the selected sequence. Paste: Pastes to any selected sequence. Reverse: Reverses the sequence order within the specified step range. Invert: Inverts all values within the specified step range. Zero values become Resets and vice versa. Randomize: Randomizes all values within the specified step range. Repeated selecting of the Randomize function creates a new series of random sequence values.
Sequence Templates provide a way to copy and paste sequences from other Programs into the current Program, and load/save sequence files on your computer. The operation of the Sequence Template function is managed with the three buttons at the top of the Sequence Template window: The Add button adds the sequence from the current Program to the list. The Load From... button produces a drop-down menu that allows you to load sequences from banks A, B or C, or from a File saved to your hard drive..
The sequencer has some additional considerations, depending whether in Program or Combo mode. Program Mode Combo Mode As can be seen, you have the option in Program mode to flip between Layers when adjusting sequencer parameters with the ability to Sync the changes you make to both layers. In Combo mode, you can select which voice you are setting the sequence for and also Sync any combination of voices to adjust simultaneously.
6. Program and Combo Modes We have made mention of Program and Combo Modes, but have focused primarily on the Program Mode. Simply stated, Program Mode plays single sound or a layered sound made up of two sounds that are Stacked (Played at the same time through the keyboard range) or Split (Layer A plays in one area of the keyboard, Layer B plays on the remaining keys. This Split point is easily set and is described above). Combo mode plays 4 voices at once. These voices can be edited individually.
6.1 Program Menu In addition to bringing up this screen, when you are in Program mode, and additional Menu item called Program also appears in the menu bar. This menu contains the following commands: Edit Program This command will just assure that the Editor has the correct program loaded Write Program Whatever program is currently selected, stock or edited, can be saved back on top of itself or to a different location.
Transmit Bank The hierarchal menu drops down to give you the choice of Bank, A, B. C. D or all all Banks. This transfers all the Banks from the software to the Tetra . Load Program Bank to The hierarchal menu drops down to give you the choice of Bank, A, B. C. or D. Once you select a bank, you well be presented with a dialog that allows you to load a previously saved Bank from your computer. Save Program Bank The hierarchal menu drops down to give you the choice of Bank, A, B. C. or D.
6.2 Combo Menu When you click Combo on the Editor window, you will be presented with this screen: This window shows a single bank of 128 Combos. Additionally, a Combo item will appear in the menu bar and the following options w i l l available: be All of these commands function in a similar manner to the Program functions listed above but for Combo settings. Very Important!! When in Program or Combo mode, an additional item, Load Factory Presets, appears in the File menu.
7. Bank Manager/Librarian The Bank Manager/Librarian is accessed by selecting the ‘Bank Manager/Librarian’ option in the File menu. The Bank Manager/Librarian lets you organize and store an unlimited number of Tetra Programs. You can also have as many Library files on your computer as you wish. The Librarian provides 24 sound categories to organize your Tetra sounds and have them available for immediate use.
7.1 Bank Manager Toolbar The Bank Manager Toolbar (shown below) provides convenient access to frequently- used Bank Management commands and functions. Descriptions of each Toolbar button follows. The Load button allows you to load a bank of Programs into the User Bank. Selecting Load produces a ‘Load Tetra Program Bank’ window that allows you to locate and select Tetra Program Bank files to load. Only those files having an ‘.
7.2 ʻRadioʼ Buttons and Checkboxes ‘Radio’ buttons and checkboxes are used to select operational modes in the Bank Manager window. These controls appear just below the Toolbar in the upper left corner of the Bank Manager window: Here’s how the buttons and checkboxes function: The Use Bank Data checkbox is part of the User Program Bank functions. When Use Bank Data is unchecked (disabled), selecting a preset from the User Program Bank switches the Tetra to the corresponding preset.
7.3 User Bank The User Bank (and associated Bank Manager controls) allow you to you load, save, transmit, receive, and edit banks of Tetra Programs. Program banks are loaded into the User Bank either from the Tetra, from a stored bank, or from one of the three factory banks built into SoundEditor. The User Bank has three banks, labeled A-D, corresponding to the three Program banks in the DSI Tetra.
7.4 The Librarian Panel The Librarian lets you store an unlimited number of Tetra Programs, and allows you organize them in any fashion. You can also have as many library files on your computer as you wish. The Librarian provides 24 sound categories to organize your Tetra sounds and have them available for immediate use. The categories are pre-defined, but any category can be renamed should you need to. A view of the Librarian panel is shown below.
7.5 Librarian Toolbar The Librarian Toolbar (below) provides convenient access to frequently-used Librarian commands and functions. Descriptions of each Toolbar button follows. The Add Current Program button adds the current Program from the User Bank to the active sound category. Note that new entries are always added to the end of the list, so if you have a lot of Programs in a particular category, you may have to scroll down to see the new entry. The New button allows you to create a new Library.
7.6 Adding Program to the Library While the Add Current Program button is one way to add an entry into the Library, it only adds a single Program at a time to the currently selected Category. To copy groups of Programs from the User Bank into the Library, use the right-facing Copy button: In the screen shot above, Programs A010 through A015 were selected from the User Bank. Clicking on the right facing Copy button added those six programs to the selected Library category (“Res Lead”).
7.7 Moving Programs between Categories Tetra Programs can be moved between Categories using several transfer methods. The first method is to set the red Transfer Arrow (click in the Transfer Arrow column to set the arrow to point to the desired Category), select the desired Program and then click on the Arrow. The Program will transfer from the current Category to the new Category.
7.8 Copying Programs to the User Bank Copying Programs from the Library to the User Bank basically involves the same methods as copying Programs into the Library from the User Bank: you can either use the large Copy button, or you can simply drag the Program (or group of Programs) into the User Bank. Note, however, that either method requires that you first specify a location in the User Bank to copy the Program(s) to. The screen shots below will illustrate the process.
8. Program Genetics The Program Genetics function allows you to quickly build new sounds from two existing ones in a similar fashion to breeding. The Genetics function is available in both Program and Combo modes. Parameters of each of the two sources (“Parents”) are combined using four different functions to generate a new bank of presets (“Kids”). Sources can be taken from Programs and individual voices of Combos and applied to either Programs or Combos.
In this example, Mommy Voice 2 of Analog Dance Kit from the Combo banks, Daddy is Layer A from Tom Sawer and again clicking on the list will allow you to audition these sounds on the Tetra as they are applied to Layer A. Here’s what the four button functions do: Mix: The parameters of each Child program are randomly chosen using parameters from either the Mother or Father. For example, if the Mother’s cutoff frequency was 10 and the Father’s was 88, the child’s value would either be 10 or 88.
Random: A random value from within the min/max parameter range produces the value of each parameter for the Child. The four Program Genetics functions are selected by using the buttons at the top of the window. Experimentation using vastly different parents or similar parents creates the most interesting results. You can also ‘interbreed’ the child patches too. In addition, you can set filters to excluded parameters that will not take a part in the generation of new offspring.
Combo Mode Combo mode is very similar to Program mode with a few differences. In this example, while in Combo Mode, Mommy is Layer A of Wagerian, Daddy is Layer A of Tom Sawyer and the Kids that are generated will be sent to Voice 3 of the current Combo as indicated by the selection made in Work on Voice. The following sections of relative to the Genetics feature of the Tetra SoundEditor will be shown in Program mode, but Combo mode is similar.
8.1 Selecting Both Parent banks use Programs from the ‘A’ bank by default, but any bank can be loaded into either parent by clicking on the list box masthead and selecting Bank A, B, C, D or Combo Bank: Either Layer A or Layer B of any voice from any Program Bank or Voice 1-4 from any Combo may be selected for either parent. 8.2 Creating New Sounds To create a bank of sounds you must first select a pair of ‘seed’ Programs, one each from the Mommy bank and Daddy bank.
8.3 Selecting Top Offspring As you audition Programs from the Kids bank, you will probably identify one or more Programs you wish to save or edit further. The Top Offspring bank provides a convenient place to ‘park’ these Programs.
9.4 Program Genetics Menus Since most of the control needed for Program Genetics operations are contained within the PG window, only a few additional menus commands are required. These are shown below. File: The File menu allows you to quickly switch to the Bank Manager/Librarian function or to Phantom Program Banks. Selecting ‘Close’ closes the Program Genetics window and returns you to the Controls Window. Edit: The Edit menu allow you to clear the Programs in the Top Offspring bank.
9. Morpher The Morpher function allows you to blend or ‘morph’ any two Tetra Programs together to create a hybrid sound having the characteristics of both Programs. Functionally, Morpher is a subset of Program Genetics, but Morpher offers much more control over the morphing process. The Morpher function is accessed by selecting ‘Morpher’ in the Options menu, or by clicking on the Morpher button in the main window. There are two different Morpher windows depending on if you are in Program or Combo mode.
When the Live Scroll option is checked, SoundEditor’s Control Window is continuously updated to show the parameter values as they change. You should also be aware that the Morphing process affects the Program name, so you’ll see scrambled or rearranged names in the Program Name display and also on the Tetra hardware. This is normal. Clicking on the Add to Lib button adds the currently morphed Program to the Librarian in the active Library Category.
10. Snapshots The Snapshots function allows you to quickly capture “Snapshots” of edited programs, providing multiple ‘undo’ points and allowing you to check your editing at various stages. It is a simple utility with a minimum of features, but it is invaluable in support of the editing/sound development process. Snapshots is accessed by selecting the ‘View Snapshots’ option in the Snapshots menu. A view of the Snapshots window is shown at left.
11. Phantom Program/Combo Banks i The Phantom Program Banks function allows you to add virtual banks of Programs and Combos (called “Phantoms”) to your Tetra. Phantom Program and Combo Banks allows you to load up to 16 banks of Tetra Programs or Combos into SoundEditor, and have any Program in any bank mmediately available for auditioning. This means you can have as many as 2048 Programs (16 x 128) at your disposal (or 2432 Programs when you include the three Tetra Program banks).
21.1 Window Operations Other ‘hidden’ controls in the PPB window allow you to sort Program Banks in various ways. Program Banks can be sorted numerically, alphabetically or by category by clicking on ‘No.’, ‘Program’ or ‘Category’ headers. Finally, individual Programs can be sent to the Tetra hardware by selecting a Program and clicking on the Send arrow that appears in the far right column.
12.2 Phantom Program/Combo Banks Menu PPB menus allow you to load Tetra Programs from within other SoundEditor functions, elect file storage options, execute editing commands, and transfer Program banks. A description of the PPB menus appears below. File: The File menu allows you to load Tetra Programs from multiple sources (Library files, User Bank files and Program Genetics Offspring), and save PPB Bank Library files.
12. Additional Controls SoundEditor offers additional remote controllers functions for the Tetra: a Virtual Piano (V-Piano), and the ability to play the Tetra from the computer keyboard. These functions allow you to remotely play the Tetra from within SoundEditor (handy if the Tetra is located more than an arm’s reach away from the computer). These functions are located in the Options menu: 12.1 V-Piano The V-Piano provides a way to play the Tetra remotely using the mouse.
13.2 Playing the Mopho from the Computer Keyboard can alsofrom play notes on the MophoKeyboard using the computer keyboard. The middle 12.2You Playing the Computer and bottom rows of computer keys act as a single octave of keys mapped like a You can also play notes on the Tetra using the computer keyboard. The middle and bottom rows piano keyboard. You can use these keys to remotely play notes on the Mopho. The of computer keys act as a single octave of keys mapped like a piano keyboard.
13. Appendix A File Extensions SoundEditor uses the following file extensions to specify Tetra data: “Single Tetra Combo = ".t4_c" "Tetra Combo Bank" = ".t4cb" "Single Tetra Program" = ".t4cb" "Tetra Program Bank" = ".t4b " "Program Library" = ".t4l" "Combo Library" = ".t4cl" "Sequence Templates" = ".t4s" "Tetra Data"= ".
DSI Mopho SoundEditor - Sequencer Chord Structure 14. Appendix B Appendix B Sequencer Chord Structure Sequencer Chord Structure The Sequencer Function Panel in SoundEditor contains a number of preset ‘chords’ which are as arpeggiated of notes. These arpeggiated note‘chords’ patterns are shown below, Theprogrammed Sequencer Function Panel in patterns SoundEditor contains a number of preset which are programmed grouped to show how the pattern repeats over the 16 sequence steps.
DSI Mopho SoundEditor - Sequencer Step Values Appendix C C 15. Appendix Sequencer Step Values Sequencer Step Values The following chart of step values is provided to assist in identifying and adjusting The following chart ofpitches step values is providedStep to assist in are identifying andthe adjusting sequence sequence in SoundEditor. values paired with equivalent pitches in SoundEditor. Step values are paired with the equivalent MIDI note. MIDI note.
16. Appendix D Midi Setup Options The MIDI Setup menu provides tabs for configuring the MIDI Port Connections and MIDI In Keyboard Controller options. MIDI Port Configurations are covered in the MIDI Setup section. This Appendix provides details on configuring and using the MIDI IN Keyboard Controller and Virtual MIDI Port functions (the Virtual MIDI Ports only appears in the Macintosh version of SoundEditor). Midi In Keyboard Controller 4.
Virtual Midi Ports The Macintosh version of SoundEditor includes a Virtual MIDI Interface that allows you to connect the SoundEditor application between your MIDI Sequencer (Logic, ProTools, Cubase, etc.) and the DSI Tetra. In the MIDI Setup window, you’ll notice MIDI In Port and MIDI Out Ports labeled ‘Tetra V– Output Port’ and ‘Tetra V– Input Port’ respectively.