
Service manual


BODY
3
Pull
forward
and
remove
bumper
together
with
bumper
stays
4
Remove
four
installation
bolts
and
separate
bumper
stays
from
bumper
Installation
Install
front
bumper
in
reverse
sequence
of
removal
When
installing
align
position
carefully
and
correctly
so
that
bumper
height
and
clearance
between
bumper
and
front
apron
are
uniform
RADIATOR
GRIt
L
E
GRILLE
SURROUNDINGS
AND
HEADLAMP
RIM
@
1
Upper
radiator
grille
surrounding
2
Radiator
grille
3
Headlamp
rim
4
Side
radiator
grille
mrroundings
5
Lower
radiator
grille
surrounding
Fig
BF
2
J
Radiator
grille
grille
surroundings
and
headlamp
im
Removal
I
Unscrew
upper
four
and
front
two
installation
screws
and
remove
radiator
grille
toward
front
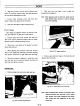
Fig
BF
22
Removing
radiator
griu
2
First
detach
lower
radiator
grille
surroundings
and
next
remove
both
side
radiator
grille
surroundings
Note
Both
ends
of
lower
surroundings
are
overlapped
on
side
surroundings
and
therefore
the
above
de
scribed
removing
sequence
must
be
regarded
Out
of
five
lower
surrounding
installation
screws
two
screw
s in
both
ends
are
used
to
secure
both
side
surrounding
bottoms
also
In
other
words
out
of
three
side
left
or
rightl
radiator
grille
surrounding
installation
screws
one
in
the
bottom
is
used
to
secure
either
left
or
right
end
of
lower
sur
roundings
also
3
Unscrew
three
self
tapping
screws two
on
top
and
one
in
front
and
detach
head
lamp
rim
BF
10