
Service manual


I
i
BODY
Loosen
installation
bolts
and
align
the
center
correctly
Adjusting
hood
lock
control
lever
operating
force
When
the
hood
Jock
control
lever
cannot
be
operated
lightly
loosen
dove
tail
bolt
retaining
nut
increase
dove
tail
bolt
installation
length
and
reduce
securing
force
of
spring
Adjusting
hood
tightness
When
the
hood
is
closed
and
is
slack
cannot
be
closed
tightly
reduce
installation
length
of
the
dove
tail
bolt
and
increase
securing
force
of
the
spring
Note
When
inspecting
the
hood
lock
note
the
following
matters
a
Safety
catdllever
Check
caulked
portion
of
the
safety
catch
lever
for
wear
and
the
spring
for
weakness
and
breakdown
If
the
spring
is
broken the
hood
may
be
unlocked
and
rapidly
open
during
driving
b
Female
lever
Check
the
female
lever
for
smooth
and
correct
operation
and
the
spring
for
weakness
and
break
down
If
the
female
lever
does
not
move
smoothly
engaging
stroke
with
the
dove
tail
bolt
will
be
reduced
and
it
may
disengage
REMOVAL
AND
INSTALLATION
Removal
I
Open
hood
and
prop
it
in
the
open
position
2
Disconnect
windshield
washer
hose
at
nozzle
3
Cover
cowl
area
with
cloth
or
other
proper
material
to
protect
them
from
dama
ng
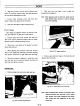
Fig
BF
17
Coveringcowlarea
4
Remove
hinge
bolts
and
detach
it
from
hinges
with
aid
of
a
helper
upward
Installation
Position
hood
to
hood
hinges
and
install
attaching
screws
2
Adjust
hood
position
and
tighten
attaching
screws
3
Install hood
latch
striker
on
hood
and
adjust
hood
latch
Q
FRONT
END
AND
FRONT
FENDER
CONTENTS
BUMPER
BF
9
Removal
BF
9
Installation
BF
10
RADIATDA
GRILLE
GRILLE
SURROUNDINGS
AND
HEADLAMP
RIM
BF
10
Removal
BF
10
FRONT
APRON
Removal
FRONT
FENDEAS
BF
11
BF
11
BF
11
BF
11
BF
12
Removal
Installation
Ri
A