
Technical data


26 Chapter 3 Hardware installation
NN40170-308
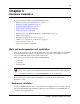
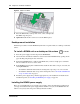
Figure 6 Slide in the WFC
4 Press the WFC firmly at the top-left corner, center, and right tabs.
The WFC snaps into place.
5 Optional: Install the three screws to secure the WFC in place.
Desktop-mount installation
Follow this procedure to install a BCM unit (main unit or expansion unit) on a desktop or other flat
surface.
To install a BCM50 unit on a desktop or flat surface
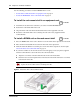
1 Insert the power-supply retention clip into the BCM50 unit.
2 Attach the four self-adhesive rubber feet to the bottom of the BCM50 unit by peeling off the
paper backing and placing the feet on the unit.
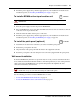
3 Position the BCM50 unit on a table or shelf. Make sure you leave enough space around the
unit for ventilation and access to the cables.
4 If the BCM50 system requires additional units, install the other units on top of, or beside, the
existing BCM50 unit.
• To install the additional units beside the existing unit, repeat steps 1 to 3 for each unit.
• To install the additional units on top of the existing unit, refer to To install a BCM50 unit
on top of another unit on page 23.
5 Install the power supply using a method appropriate for your installation. For details about
installation options, see Installing the BCM50 power supply on page 26.
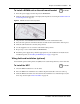
Installing the BCM50 power supply
There are several different ways to install a power supply. Select the method that works best for
your type of installation. The power supply must be within 1.5 m (5 ft) of the BCM50 unit and
within 1.5 m (5 feet) of the AC power outlet (wall outlet or UPS).
4 minutes