
Technical data


Chapter 3 Hardware installation 25
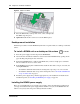
Installation Checklist and Quick Start Guide
To install a BCM50 unit on the wall-mount bracket
1 Insert the power-supply retention clip into the BCM50 unit.
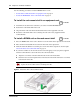
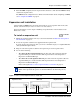
2 Slide the wall-mount lock fully to the right (unlock position). See the figure Wall-mount lock
in unlock position on page 25.
Figure 5 Wall-mount lock in unlock position
3 Align the feet on the BCM50 unit with the four holes in the wall-mount bracket.
4 Press the unit against the wall-mount bracket and slide the unit down until it clicks in place.
5 Slide the wall-mount lock to the left (lock position).
6 Use the supplied screw to secure the wall-mount lock in position.
7 Repeat steps 1 to 6 to install additional BCM50 units.
8 Install the power supply using a method appropriate for your installation. For details about
installation options, see Installing the BCM50 power supply on page 26.
Wiring-field card installation (optional)
You install the optional wiring-field card (WFC) in the cable-management tray of the main unit.
To install the WFC
1 Clear the WFC installation area of all cables.
2 Place the WFC in the installation area with the 50-pin header/cable connector at the top.
3 Slide the WFC down until it is at the bottom of the installation area and held in place by the
three clips. See the figure Slide in the WFC on page 26.
6 minutes
2 minutes