The Commercial CD Media Presenter CP-100 PRO CO MP AT IB LE INSTRUCTION MANUAL http://www.datavideo-tek.
The Important Notice of Safety Instruction and Radio & TV Interference 1. 2. 3. Read all of these instructions and save them for later reference. Follow all warnings and instructions marked on the products. Unplug this product from the wall outlet before cleaning. Do not use liquid or aerosol cleaners. Use a damp cloth for cleaning. 4. Do not use this product near water. 5. Do not place this product on an unstable cart, stand or table. The product may fall, causing serious damage to the product. 6.
E. F. If the product has been dropped or the cabinet has been damaged. If the product exhibits a distinct change in performance, indicating a need for service. Service, Support and Warranty It is our goal to make your products ownership a satisfying experience. Our supporting staff is available to assist you in setting up and operating your system. Please refer to our web site www.datavideo-tek.com for answers to common questions, support requests or contact your local office below.
RADIO & TELEVISION INTERFERENCE UNITED STATES The equipment described in this guide generates and uses radio frequency energy. If it is not installed and used in accordance with the instructions in this guide, it may cause interference with radio and television reception. This equipment has been tested and found to comply with the limits for a Class B digital device, pursuant to Part 15 of the FCC Rules.
CONTENTS RADIO & TELEVISION INTERFERENCE 3 INTRODUCTION 5 ACCESSORIES SUPPLIED 6 ADDITIONAL ACCESSORIES FOR REMOTE CONTROL ADAPTOR 7 REAR PANEL 8 FRONT PANEL 9 INFRARED REMOTE CONTROL HANDSET 10 SYSTEM SETUP 14 OPERATION 21 CONNECTING TO A TV MONITOR 22 CONNECTING TO A VIDEO PROJECTOR OR TV/ MONITOR WITH COMPONENT VIDEO 23 WHAT CAN YOU DO WITH THE GREEN GARD? 24 INSTALLING THE GREEN CARD 25 SPECIFICATIONS 27 Q&A 28 4
Introduction Using inexpensive recordable CD’s (CD-R’s) you may play up to 99 tracks of a video CD or you may present up to nineteen tracks of full motion video and a ‘video attract loop’ that plays continuously until another track is selected. The selected track plays only one time, then the system returns to play the attract loop until another switch is pressed. CP-100 PRO replaces existing VHS or laser disc presentation hardware solutions.
Accessories Supplied Infrared Remote Control Handset 2 x “AAA” Batteries for the Handset Power Supply Power Cord 3 Phono (RCA) to 3 Phono (RCA) Audio/Video Cable 6
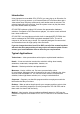
Additional Accessories for Remote control Adaptor With the optional Momentary Contact Switch Card, all you do is connect switches and a 9-pin cable to the Remote Adaptor (RMC-60).
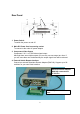
Rear Panel 6 5 7 1 4 3 2 1. Power Switch To switch the power on and off 2. Main DC Power Cord connecting socket To connect to the main AC power adaptor 3. Component Video Output Component Y.U.V. or R.G.B.video signal output. Although there are multiple outputs you can only use one output at a time. If you use more than one simultaneously the output signal level will be reduced. 4. External Switch Remote Interface Connect an external Datavideo Remote Adaptor (RMC-60).
5. Fan For proper cooling allow at least 4 inches /10 cm of clear space behind the exhaust fan of the CP-100 PRO 6. Switch to select Cable or Infrared Remote control Switch to select control mode -. Infrared Mode: Enable the Infrared remote control Handset and disable the cable control of RMC-60 -. Cable mode: Enable the cable control mode to control RMC-60 for Kiosk Keyboard Interface. 7.
Infrared Remote Control Handset 29 27 25 31 1 30 2 3 28 4 26 5 6 24 23 8 22 10 21 12 20 13 19 14 18 15 17 16 7 9 11 1. OSD (On Screen Display) Button On screen display, manually activates the display on/off 2. Eject Button Activates the CD tray to open and close 3. Numerical Keypad Selects specific tracks on a disk 4. UP Arrow Key Navigates “Up” on screen menu items 5. Clear Button Clears entries from the user programmable Play List 6.
7. Right arrow Key Navigates “Right” on screen menu items 8. Next Button Skips forward to the next track during playback or navigates “down” on the screen menu items 9. ENTER Button Confirm the selected function 10. Down arrow Key Navigates Down on screen menu options 11. Slow Button To playback video in slow motion 12. PBC Button (Playback Control) Offers main manual and playback control options for commercially produced VCD’s 13. F.F. Button Picture search forward through a track.
19. STOP Button Stops the disk during playback 20. Repeat Button Offers repeat playback options. Press once to repeat a single track, twice to repeat the entire disk or three times to turn the repeat function off 21. A/B Repeat Button Marks start and stop points within a track for repeat play 22. Zoom Button Zoom and out of video image. Zoom is a great feature on the CP-100 PRO. It allows you to magnify the image by hitting zoom on remote. Hit once for 1X,twice for 2X up to 8X although 8X is not very sharp.
28. Play List Button Calls up a user programmable Play List of up to 12 tracks 29. Setup Button System configuration for “PAL / NTSC, video/audio output format, etc. 30. Power Button To switch the unit from ON to Standby mode or vice versa 31.
System Setup GENERAL SETUP Press on the “Setup” Button of Remote controller. There will pop up system General setup on TV screen, select the General setup to find more system configuration.
OSD LANG Select the “English” mode on screen display SPDIF OFF --- Disable the digital audio output, Output Stereo Audio ON ---- Enable the digital audio output, Disable Stereo Audio out 15
CAPTIONS ON: Enable Close Caption output OFF: Disable Close Caption output SCR SAVER SCREEN SAVER: No Function on this item 16
VIDEO O/P V/S Video: Select S-Video and Composite video output BETACAM: Select component YUV O/P and disable V/S output M-II: Select M-II video O/P and disable V/S output SMPTE: Select SMPTE Video O/P and disable V/S output RGB: Select RGB video O/P and disable V/S output MAIN PAGE Return to the main page of setup screen, Press on the “Setup” button of remote controller to go back to normal operation 17
MODE SETUP Press on the “Setup” Button of Remote controller. There will pop up system setup menu on TV screen, select the MODE Setup to find more system configuration. PLAY MODE DATAVIDEO MODE: Repeat Playback tracks. KIOSK Play track one repeatedly (as manual track) until pushing a button (or GPI) and then play track two. When track two is done, play track one repeatedly until pushing another button and so on.
AUTO RUN ON Disk in tray will auto play after system power on。 OFF Disk in tray will not auto play after system power on。 JUMP TIME JUMP TIME backward playback 1, 3, 5, 7 SEC Note: Under disk playback mode, press on the Left Arrow Key This is the set up function that allows every press on the left arrow key will go back a pre selected time increment.
OSD DISP ON Enable on screen display。 OFF Disable on screen display。 MAIN PAGE Return to the main page of setup screen, Press on the “Setup” button of remote controller to go back to normal operation 20
Operation Switching on Once all cables connected and in place, switch on the TV Monitor and select the correct A/V channel and then turn on the power switch on the rear panel of CP-100 PRO. If it’s already on standby status then press the Power Button on the remote control handset, The CP-100 PRO start up will appear a blue screen on TV. Playing a disk Press the Eject Button on the front of theCP-100 PRO or on the remote control handset and the CD tray will slide open.
To pause a track during playback, press the Pause Button. This will stop the playback and a still image of the frame will be held on the TV Monitor (video disk only). You can move forward one frame at a time by pressing the STP (STEP) Button. To release the pause and return to normal playback press the Play Button. To stop playback press the Stop Button. To mute the sound of a track during playback presses the Mute Button. To cancel the mute function press the Mute Button a second time.
Connecting to a Video Projector or TV / Monitor with Component Video NOTE: Before making any connections please ensure that the CP-100 PRO and all devices that you are connecting to are switched off. The CP-100 PRO should be connected to the component R.G.B. or Y.U.V. video and audio inputs of a Projector or TV / Monitor.
Momentary Contact Switch Card The beauty of the card is that it makes the switch wiring simple if you are building a push button controlled, multi track video kiosk or display. As an exhibit builder your focus is on the message not wiring switches. This card uses convenient screw terminals to connect any kind of SPST contact switches in a simple, logical manner so you can spend your time selecting beautiful switches, engraving buttons or panels and integrating them into the display.
Installing the Momentary Contact Switch Card Mount the card so it is convenient for access. It has no active components. Heat is not a factor. After you have selected your switches and where they will be mounted, run two wires from each switch to the appropriate positions on the green card. You may connect either a 9-pin connector or nine wires. Note: that the MENU position on the card is really for track one (the repeating track – attract loop) on the CD.
Key Matrix: CP-100Pro Control Box D-SUB Pin Definition: Switch 1 2 3 4 5 6 7 8 9 10 1-10 Connect 1&5 1&6 1&7 1&8 1&9 2&5 2&6 2&7 2&8 2&9 D-Sub Pin Switch 11 12 13 14 15 16 17 18 19 20 11 to 20 Connect 3&5 3&6 3&7 3&8 3&9 4&5 4&6 4&7 4&8 4&9 D-Sub Pin FEATURE SUMMARY of the CP100 PRO and the wireless REMOTE Control OSD (On Screen Display on/off) , Eject, Track Select, Up, Down, Clear, Image, Right, Next, Enter, Slow, Fast Forward, Rewind, Play, Volume up/down, Pause, Stop, Repeat, Repeat a segment of one tra
Specifications: Playback Disc A/V Format CDDVD/DVD-Photo/SVCD/ HQ-VCD/VCD/Audio CD Playback Disc Type CD-R, CD-R/W 650MB Video format CCIR601 NTSC and PAL CDDVD NTSC 704x480 at 30fps MPEG-II Format PAL 704x576 at 25fps Bit rate at 4.8Mb/sec DVD-Photo NTSC 704x480 at 30fps MPEG-II Format PAL 704x576 at 25fps Bit rate at 2.4Mb/sec S-VCD video resolution NTSC 480x480 at 30fps MPEG-II Format PAL 480x576 at 25fps Bit rate at 2.
Q&A Q: How do you make CD’s for the CP-100 PRO? A: The simplest way is to use the Datavideo VDR-3000 as a recorder for your already produced video tracks. Just record your tracks one after the other and you’re done. Of course you may use a computer with a CD burner and software that creates Video CD’s. If you don’t own a VDR-3000 they are available for rental or purchase from Datavideo or through many of our dealers.
Q: What happens if we’re watching one track and we push another button? A: The system goes to the track selected by the most recent button push (contact closure). Q: Does the CP-100 PRO remember the set up configuration? A: Yes. It remembers the last setup change as the next boot default. Q: Can I replace the CD drive myself? A: You can replace it with another CD drive and retain the control features through the DB-9 connector.