
User guide


14
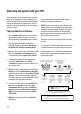
It is possible to change the operation of the security
system to suit your requirements (see transmitter learn
procedure for details on how to enter the software
switches).
Once you have entered the software switch section
1. Press the GREY button on the transmitter to move
forward through the table to Switch 2 (two beeps
will be heard when the switch is located).
2. Press the BLACK button on the remote control to
move backwards through the table to Switch 1
(one beep will be heard when the switch located).
3. If 3 beeps are heard you have located Switch 3
which requires a special engineer’s code to enter.
Exit this area by pressing the GREY button to
locate Switch 1 again and wait for the confirmation
beep.
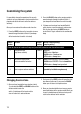
Customising the system
Switch
Number
Function Default
setting
Method of altering setting/
accepting setting
1 Change siren tone
(eight tones available)
Siren 3 Sequential
GREY button = Next tone
BLACK button = Previous tone
BOTH buttons = Accept tone
2 Full passive arming alarm/
passive immobiliser selection
Off GREY button/LED ON = Full passive alarm
BLACK button/LED OFF = Passive immobiliser
BOTH buttons = Accept arming method
3 Select engineer software switches
Operable by installation engineer only
Listen for the correct number of beeps and press both buttons to enter the software switch
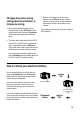
Changing the siren tone
1. Once you have located the tone selection (switch
1), press both the GREY and BLACK buttons of the
remote control to enter the
switch. A triple beep will be heard and the
siren will sound at a reduced volume.
2. Each press of the GREY button will move the siren
tone forward to the next. If you press the BLACK
button you will return to the previous tone.
3. Once you have decided the siren tone you require
press both buttons of the remote control. When you
accept it a double beep will be heard and you will
return to the software switch selection.