
Operator`s manual


A-Class 89
5.3 Printhead Replacement
If the printhead becomes damaged, use the procedure below to replace the component.
CAUTION
(1) Use extreme care when handling the printhead; wear a wrist strap, and follow standard ESD
prevention procedures.
(2) If a voltage problem is suspected in the printhead failure (see “24V OUT OF TOLERANCE,”
Section 6.2) contact a qualified technician or Datamax
Technical Support before proceeding.
Replace the printhead as follows:
1. Turn ‘Off’ and unplug the printer. Raise the Access Cover.
2. Touch a bare metal part of the printer’s frame to discharge any static electricity that may be present
on your body.
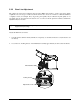
3. With the Printhead Assembly in the down position, loosen the Captive Screw(s) until the screw(s)
“pop(s) up”. Remove the Pivot Screw and Washers that secure the Printhead Assembly. The
following drawings highlight the location of these components according to the model of the printer:
Four-inch printer
models:
Printhead Assembly
Captive
Screw
Access Cover
Pivot Screw
(and Washers)
Ground Cable
Screw