7A300020-2 Rev.
Contents General Precautions ...................................................................................................... 1 Safety ........................................................................................................................... 1 1 Getting Started .................................................................................................... 2 1.1 Unpacking the Printer.......................................................................................... 2 1.
5 Specifications........................................................................................................ 20 5.1 Printer Specifications......................................................................................... 20 5.2 Supply Specifications ........................................................................................ 20 5.3 Regulatory Notes .............................................................................................. 21 5.3.1 FCC Part 15 Class B .....
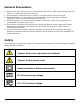
General Precautions Before using this product be sure to read through this manual. After reading please keep the manual in a safe place for future reference. The information contained herein is subject to change without notice of any type. Datamax-O’Neil is not responsible for any operational results regardless of missing information, errors or any misprinting in this manual.
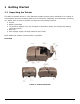
1 Getting Started 1.1 Unpacking the Printer The APEX 3 portable printer is a full featured portable receipt printer designed for a number of environments and uses including field service, field sales, hospitality and restaurants, ticketing, etc. where point of service receipts are required.
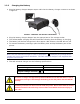
1.2 Installing and Charging the Battery Cartridge Note: One battery cartridge is included with the printer. Similar to a cordless phone battery, the printer’s battery must be charged before use. Datamax-O’Neil batteries must be cycled several times to achieve maximum capacity. To cycle a battery, fully charge it and then allow a full discharge through normal use. 1.2.1 Installing the Battery Note: Refer to Figure 2 below to install the battery pack in the printer.
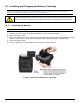
1.2.2 Charging the Battery Plug the battery charger adapter output cable into the battery charger connector as shown in Figure 3. FIGURE 3: CHARGING THE BATTERY CARTRIDGE Plug the battery charger adapter into the appropriate AC line voltage socket. The Yellow/Amber charging LED will illuminate indicating that the battery is charging. The battery will be fast charged and, after approx. 180 minutes, the LED will turn off.
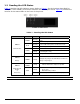
1.3 Reading the LED Status Table 1 explains the LED indicator status. Refer to Figure 1 for the locations described for and push button switches and AC adapter socket. Figure 4 provides the location of the status LEDs on the front of the printer. FIGURE 4: LED STATUS Table 1 - Reading the LED Status LED Status Condition Flashing GREEN Steady LED # 1 Flashing Function Power is ON and the printer is in RS232, USB or IrDA mode. Communicating with host.
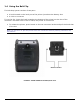
1.4 Using the Belt Clip The belt loop system consists of two parts: A knob located on the back part of the printer just above the battery door A click-on connector To use the clip, insert the knob located at the bottom of the printer into the slot of the connector. Pull down until a click is heard; the printer is now secure To release the printer, press inward on the two connector latches and pull the knob clear of the slot.
2 Loading Supplies 2.1 Adding Paper or Labels The printer can print text, bar codes and graphics on thermal receipt paper. See “Supply Specifications” in Section 5.2 for the width, thickness requirements and approved vendors. Follow these steps to load printer paper. Open the paper supply cover by placing your fingers under the “T” pull lever and pulling upward firmly on the supply cover until the lever ceases to move. See Figure 6 for details.
Note: Pull Paper Roll Leader out of printer. Note direction of paper travel. FIGURE 7: OPERATOR CONTROLS AND PAPER LOADING 2.2 Tearing Paper The printer’s paper door acts as a tear bar. Pull one edge of the paper against the tear bar as indicated, then tear down and across against the tear bar to tear the paper. See Figure 8 for details. The tear bar may have sharp edges! Note: Use of the tear bar is the only way to tear the paper.
3 Using the Printer 3.1 Initial Power-Up and Self-Test Once the Battery is charged and the paper is loaded, an initial power up self-test can be performed. Press the switch once. This turns printer on. LED #1 illuminates in green or blue depending on the mode of communication. o The printer will stay ON until it is manually tuned OFF. o If the printer is set for Bluetooth™ (BT) mode the printer will stay on all the time. Pressing the switch again will turn the printer off.
3.2 Connecting the Printer The APEX 3 printer supports Serial RS232 and Bluetooth® as default configuration. IrDA, USB or 802.11g communication is also available as an optional feature. Serial, USB, IrDA, 802.11g and Bluetooth® communication settings can be changed via DIP switches located on the control card. Printer drivers for WindowsTM 95/98/NT/2000/XP/Vista and Windows7 are available. 3.2.1 Dip Switch Location The DIP switches are located inside the battery compartment.
3.2.3 Dip Switch Functions Table 2 shows the different printer setting available through the Dip Switches. Table 2 – DIP Switch Setting Switch # Communication Interface SW 1 SW 2 RS232 OFF OFF ON OFF Bluetooth or 802.
3.3 Serial Communication The RS232C Interface signals for the APEX 3 Series printers are terminated on a 6 PIN RJ type data connector located on the side of the printer. Six connections are provided from the Serial Interface to the host computer. Table 3 lists the Serial Interface signals and pin outs for the RJ connector. The connector pin locations are shown in Figure 11.
3.5 Bluetooth and 802.11g Communications Bluetooth and 802.11g operation: o Dip Switch #1 must be in the position. o Dip Switch #2 must be in the position. Note: Adjust baud rate settings to match those of the Bluetooth™ or 802.11g module in your computing device. The printer can be powered ON by pressing the power switch. Pressing the power switch again will turn the printer .
3.7 USB Communications The APEX 3 printer comes equipped with a USB 2.0 slave port. To enable USB, you must set the dip switches on the printer as below: SW 1 Any position SW 2 Any position SW 3 Any position SW 4 Any position SW 5 Any position SW 6 OFF SW 7 ON SW 8 Any position Compatible Software The host and printer communicate through a method called the "Virtual Com Port", in which a software intermediary called the "driver" makes the USB connection look like a com port to the end-application.
15
4 Printer Maintenance 4.1 Print Head Cleaning Instructions The print head and platen roller may require cleaning after printing a number of rolls of paper, when new supplies are loaded, or when voids in the printout become apparent. Do not use sharp objects to clean the print head. This may damage the printer and require service. Open the paper door by pulling the “T” bar lever on the top cover as shown in Figure 6. The paper supply door will pop up. Remove the paper roll.
4.2.2 Optional external battery chargers are available for Datamax-O’Neil batteries. Refer to Section 4.7 “Printer Supplies” for detailed information. Important Notes on Replacing Batteries Check for the correct Datamax-O’Neil battery part number and use only that replacement part. Risk of explosion if battery is replaced by an incorrect type. Dispose of used batteries according to instructions in Section 4.5. 4.
4.4 Battery and Safety Information The printer is powered by a 7.4V Li-Ion battery cartridge. Charging time is approximately 3.0 hours. Remove the battery from the printer when storing the printer for long periods of time. The battery storage temperature is 40°F to 104°F (4°C to 40°C). Do not store a fully charged battery at temperatures exceeding 104°F (40°C) for long periods of time – the battery may permanently lose charge capacity.
4.7 Printer Supplies Part Number Description 78828S1-3 78828S1R-3 78828I1-3 78828I1R-3 756985 756998-1 Apex 3 with RS232, Class 2 Bluetooth® Apex 3 with RS232, MCR, Class 2 Bluetooth® Apex 3 with RS232, IrDA, Class 2 Bluetooth® Apex 3 with RS232, MCR, IrDA, Class 2 Bluetooth® Apex 3 with RS232, 802.11b/g Apex 3 with RS232, MCR, 802.11b/g 24V In-Vehicle Charger Multi-Plug Battery Charger Adapter Input 100 ~ 240VAC/ Output 10VDC @ 1.
5 Specifications 5.1 Printer Specifications Height: Width: Length: Weight: w/battery & paper Shipping weight: Power: Operating Temp. Limits: Storage Temp. Limits: Operating Humidity Limits: Storage Humidity Limits: Print head: Printing Method: Print Speed: Supported Fonts: (Bitmap) Supported Bar Codes: Memory: Charging Time: Communications: Print Ratio: 2.25 inches (57mm) 4.25 inches (108mm) 6 inches (152mm) 1 lb 4 oz, (583 g) 3 lbs. (1.4 kg) 7.
5.3 Regulatory Notes 5.3.1 FCC Part 15 Class B This equipment has been tested and found to comply with the limits for a Class B digital device, pursuant to Part 15 of the FCC rules. These limits are designed to provide reasonable protection against harmful interference in a residential installation. This equipment generates, uses and can radiate radio frequency energy and, if not installed and used in accordance with the instructions, may cause harmful interference to radio communications.
6 Customer Support Datamax-O'Neil Americas Orlando, FL USA Monday - Friday 8:00am - 6:00pm EST Tel: 407-523-5540 Fax: 407-523-5542 tech_support@datamax-oneil.com Datamax-O’Neil EMEA Valence France Monday - Friday 0830 - 1700 GMT Tel: + 33 (0) 4 75 75 63 00 Fax: +33 (0) 4 75 82 98 38 eurotech@datamaxcorp.com Datamax-O'Neil Asia-Pacific Singapore Monday - Friday 0830 - 1730 Tel: +65 6505 2250 Fax: +65 6769 8135 tsaspa@datamax-oneil.