
Install Instructions

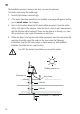

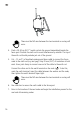
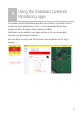
Table Of Contents
- Before you start
- Components of a fence monitoring system
- How does fence monitoring work?
- Overview of the installation process
- Unpacking the box
- Other items you will need
- Datamars Livestock Monitoring web and mobile phone apps
- Datamars Livestock Monitoring web app
- Datamars Livestock mobile app
- Installing the gateway
- Choosing a suitable location
- Mounting and preparing the gateway
- Setting up the gateway using the Datamars Livestock app
- Installing the nodes
- Parts of the node
- Pairing the nodes using the Datamars Livestock app
- Installing the nodes using the Datamars Livestock app and mounting them on the fence
- Using the Datamars Livestock Monitoring apps
- Getting help
- Help articles and videos
- Troubleshooting
- Maintenance and servicing
- Solar panel maintenance
- Servicing
- Europe - Instructions for disposal of product
- Warranty
- Compliance
- FCC ID information
- FCC notice
- FCC warning
- Responsible party in the USA
- ISED Canada ID information
- ISED Canada notice
- ISED Canada warning
- UK declaration of conformity
- EU declaration of conformity

13
Installing the nodes using the Datamars Livestock app and
mounting them on the fence
After all of the nodes have been paired, they can be installed on the fence.
Before you begin the installation process, make sure that you have paired all the
nodes in your system. The installation process requires each of the nodes to be
installed using the Datamars Livestock app, then physically mounted on the fence.
Nodes can be mounted on a wood or steel fence post.
Turn OFF the electric fence before you install the nodes.
To install the nodes, you will need:
All of the paired fence nodes you'll be using in your system.
A mag key to activate the nodes (supplied).
A mobile phone with the Datamars Livestock app installed.
A compass or a compass app on your mobile phone.
A pair of binoculars so that you can establish a clear line-of-sight between the
gateway and the nearest node and between each of the nodes.
An impact driver, pozi drive screw bit and 10 mm (3/8”) hex socket
Wire cutters/strippers
Node mounting kit (1 per node). Supplied
Insulated underground fence cable for a lead-out cable and an earth cable (2-
3 m [6-9’] per node). Not supplied.
10 mm (3/8”) spanner
Joint clamps (2 for each node - one for the earth connection and one for the
fence connection). Not supplied.
20-30 cm (8-11”) earth rods e.g. a 3 mm (1/8”) thick tent peg (1 for each
node). Not supplied.
Cable ties. Not supplied.