INSTALLATION GUIDE This installation guide provides basic instructions for installing and setting up your fence monitoring system. Contents Before you start .................................................... 1 Installing the gateway .......................................... 8 Installing the nodes ............................................ 11 Using the Datamars Livestock Monitoring apps ... 17 Getting help ....................................................... 18 Maintenance and servicing ...........
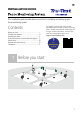
Components of a fence monitoring system A Fence Monitoring System is made up of Gateways and Fence Nodes. A starter kit consists of 1 x gateway and 3 x nodes, but up to 50 nodes may be included in a system. The Gateway provides the internet/cloud interface to the on-farm network. Each Fence Monitoring system requires a gateway to collect information from the nodes and pass it to the cloud. Each Fence Node communicates to the gateway through radio frequency.
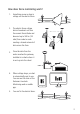
How does fence monitoring work? 1. Something causes a drop in voltage on the electric fence. 2. The electric fence voltage data is broadcast out from the nearest Fence Node and bounced up to 500 m (1/3 mile) from node to node creating a shared network of data across the farm. 3. Once the data from the nodes reaches the gateway installed at a shed or barn it is sent up into the cloud. 4. When voltage drops, an alert is automatically sent to you.
Overview of the installation process To install a fence monitoring system, you will need to perform the following steps in order: 1. Unpack the box and assemble the other items you need. 2. Sign up for an account on the Datamars Livestock Monitoring web app and install the app on your mobile phone. 3. Install the gateway in a location where you have internet access e.g. shed, then set up the gateway using the Datamars Livestock mobile app. 4.
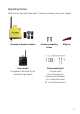
Unpacking the box Check that you have all of these items. If anything is missing, contact your supplier.
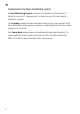
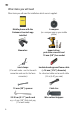
Other items you will need Other items you will need for installation which are not supplied: 6 Mobile phone with the Datamars Livestock app installed A compass (or a compass app on your mobile phone) Binoculars Impact driver, pozi drive screw bit and 10 mm (3/8”) hex socket Joint clamps (2 for each node - one for the earth connection and one for the fence connection) Insulated underground fence cable (>1.
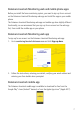
Datamars Livestock Monitoring web and mobile phone apps Before you install the fence monitoring system, you need to sign up for an account on the Datamars Livestock Monitoring web app and install the app on your mobile phone. The Datamars Livestock Monitoring web app and mobile app have slightly different functionality, so we recommend that you sign up for an account on the web app first, then install the mobile app on your phone.
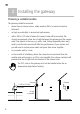
2 Installing the gateway Choosing a suitable location The gateway should be mounted: where there is internet access, either wireless (Wi-Fi) or wired connection (ethernet). as high as practicable, to ensure best performance. within 500 m (1/3 mile) of where the nearest node will be mounted. We strongly recommend a clear line of sight between the gateway and the nearest node. Any objects in the way, e.g.
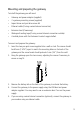
Mounting and preparing the gateway To install the gateway you will need: Gateway and power adaptor (supplied) 2 x gateway mounting screws (supplied) Impact driver and pozi drive screw bit Ethernet cable (if using a wired internet connection) Extension lead (if necessary) Waterproof sealing tape (if using a wired internet connection outside) A mobile phone with the Datamars Livestock app installed. To mount and prepare the gateway: 1.
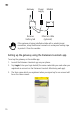
Gateway Power supply Remove battery tab Modem Ethernet cable (optional) If the gateway is being installed outside with a wired internet connection, wrap the ethernet connector in waterproof sealing tape to protect it from the weather. Setting up the gateway using the Datamars Livestock app To set up the gateway on the mobile app: 1. Launch the Datamars Livestock app on your phone. 2. Tap Login.
4. On the Datamars Livestock app, tap , My devices, then Add device. 5. Tap Farm network gateway. 6. Tap Setup. 7. Follow the steps to install the gateway. When prompted, you will need to enter your Wi-Fi connection details if you are using a wireless connection.
The pairing process must take place next to the gateway, before the nodes are installed on the farm. All nodes should be paired at the same time. Make sure that your mobile phone is connected to the internet. To pair the nodes on the mobile app: 1. Position yourself beside the gateway with all the fence nodes in your system, the mag key and your mobile phone. 2. Remove the battery tab on the node to activate the battery. 3. Launch the Datamars Livestock app. 4. Tap , My Devices, then Add device. 5.
Installing the nodes using the Datamars Livestock app and mounting them on the fence After all of the nodes have been paired, they can be installed on the fence. Before you begin the installation process, make sure that you have paired all the nodes in your system. The installation process requires each of the nodes to be installed using the Datamars Livestock app, then physically mounted on the fence. Nodes can be mounted on a wood or steel fence post.
The installation process is done on the farm, not near the gateway. To install a node using the mobile app: 1. Launch the Datamars Livestock app. 2. If the nodes have been paired but not installed, a message will appear inviting you to Install nodes. Tap to begin. 3. Drive to the location where the first node will be mounted. It must be within 500 m (1/3 mile) of the gateway. Note that this is a line-of-sight measurement and the distance will be reduced if there are any objects in the way, e.g.
To mount a node on the fence: See pictures of the node mounting kit on page 5. 1. Attach the mounting rod (a) to a wood or steel post using the hardware provided. The mounting rod should be installed so that the node is as high as possible above the fence post for optimal connectivity. Wire tie Wood post (b) Y post (c) T post 2. Fit the node onto the mounting rod. Ensure that the solar panel faces the midday summer sun.
There must be NO wire between the two terminals or arcing will occur. 4. Push a 20-30 cm (8-11”) earth rod into the ground immediately beside the fence post. Position the earth rod to avoid interference by animals. The top of the earth rod should protrude just out of the ground. 5. Cut ~1.5 m (5’) of insulated underground fence cable to connect the fence node to the earth rod (e.g tent peg). Strip 20 mm (3/4”) of insulation at both ends. Use a joint clamp to connect one end of the cable to the earth rod.
4 Using the Datamars Livestock Monitoring apps The Datamars Livestock Monitoring apps allow you to monitor your electric fence in real time from your mobile phone or a PC. You can see whether electric fence voltages are OK in all locations where nodes are installed. Notifications can be enabled in your phone settings so that you receive alerts whenever your fence requires attention. Alert thresholds and fence node GPS locations can be modified in the PC app, if required.
Getting help Help articles and videos The Datamars Livestock Help Centre provides searchable articles and videos to help you when you need it. The help centre provides instant support for our apps, software and products. Access the help centre via the mobile phone app or go to support.livestock.datamars.com Troubleshooting For personalised troubleshooting and advice, chat with us directly. In the mobile phone app, tap on , then .
Maintenance and servicing Solar panel maintenance Check the solar panel on each node once a month to ensure no bird excreta is caked on and covering the panel (a plastic scraping device should be used to clear any build-up). Clean the solar panel regularly with a soft cloth using glass cleaner or a mild solution of detergent and water. This will ensure that the solar panel functions efficiently. Do not immerse the node in water.
Warranty This product is warranted against faulty material and workmanship for a period from the date of purchase. If a warranted defect occurs, return this product with proof of purchase to the place of purchase. Details of warranty periods and other terms applying are available at the place of purchase or at datamars.
Compliance FCC ID information This product contains Datamars SMT Radio Module FCC ID: NDXDMO1 FCC notice This device complies with part 15 of the FCC Rules. Operation is subject to the following two conditions: (1) This device may not cause harmful interference, and (2) this device must accept any interference received, including interference that may cause undesired operation.
ISED Canada ID information This product contains Datamars SMT Radio Module ISED Canada ID: 4678A-DMO1 ISED Canada notice This device contains licence-exempt transmitter(s)/receiver(s) that comply with Innovation, Science and Economic Development Canada’s licence-exempt RSS(s). Operation is subject to the following two conditions: (1) this device may not cause interference (2) this device must accept any interference, including interference that may cause undesired operation of the device.