
Quick Reference Guide
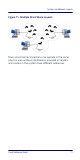

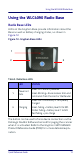
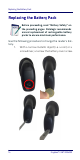
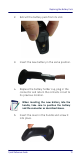

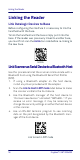
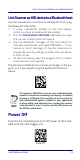
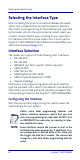
Table Of Contents
- Gryphon™ I GBT/GM4500
- Table of Contents
- END USER SOFTWARE LICENSE AGREEMENT
- About the Scanner
- Setting Up the Reader
- Reader, Cradle and LEDs Description
- Connecting the Base Station
- System and Network Layouts
- Using the GBT/GM4500 Scanner
- Using the WLC4090 Radio Base
- Replacing the Battery Pack
- Using the Gryphon™ I GBT/GM4500
- Linking the Reader
- Link Scanner as Serial Device to a Bluetooth Host
- Link Scanner as HID device to a Bluetooth host
- Power Off
- Selecting the Interface Type
- Programming
- Reading Parameters
- Operating Modes
- Technical Features
- LED and Beeper Indications
- Troubleshooting
- Ergonomic Recommendations
- Cleaning Procedure
- Support Through the Website
- Charging the Batteries
- Datalogic Limited Factory Warranty

Selecting the Interface Type
20 Gryphon™ I GBT/GM4500
Selecting the Interface Type
Upon completing the physical connection between the reader
and its host, proceed directly to Interface Selection below for
information and programming for the interface type supported
by the reader and scan the appropriate bar code to select your
system’s correct interface type, according to your application.
For interfaces other than those listed in this manual, see the
Gryphon™ I GBT/GM4500 Product Reference Guide (PRG), avail-
able online at www.datalogic.com.
Interface Selection
The reader will support all the following host interfaces:
• RS-232 STD
• RS-232 WN
• IBM46XX port 9b (a specific cable's required)
•USB HID POS
• USB Toshiba TEC
• USB (Keyboard, COM, OEM)
• USB Composite (Keyboard + COM)
• Keyboard Wedge
Information and programming options for each interface
type are provided in this section. For defaults and additional
information associated with each interface, proceed to the
corresponding chapter in the Gryphon™ I
GBT/GM4500
PRG.
Configuring the Interface
Scan the appropriate programming bar code to select the
interface type for your system.
NOTE
Unlike some other programming features and
options, interface selections require that you scan
only one programming bar code label. DO NOT scan
an ENTER/EXIT bar code prior to scanning an inter-
face selection bar code.
Some interfaces require the scanner to start in the
disabled state when powered up. If additional scan-
ner configuration is desired while in this state, pull
the trigger and hold for 5 seconds. The scanner will
change to a state that allows programming with bar
codes.