
Instruction manual


MATRIX 200™ REFERENCE MANUAL
1
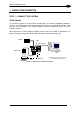
STEP 4 – X-PRESS™ CONFIGURATION
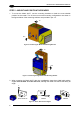
Once Matrix 200™ is positioned with respect to the code (step 3), you can configure it for
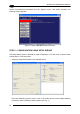
optimal code reading relative to your application. This configuration can be performed either
through the X-PRESS™ Interface or the VisiSet™ configuration program.
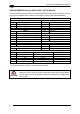
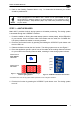
Setup
1. Enter the Setup function by pressing and holding
the X-PRESS™ push button until the Setup LED is
on.
2. Release the button to enter the Setup function.
The Setup LED will blink until the procedure is
completed.
The Setup procedure ends when the Image
Acquisition parameters are successfully saved in
the reader memory, the Setup LED will remain on
continuously and Matrix 200™ emits 3 high pitched
beeps.
If the calibration cannot be reached after a timeout
of about 5 (five) seconds Matrix 200™ will exit
without saving the parameters to memory, the
Setup LED will not
remain on continuously but it will
just stop blinking. In this case Matrix 200™ emits a
long low pitched beep.
3. Exit the Setup function by pressing the X-
PRESS™ push button once.
green
green
yellow
yellow
red
Figure 9 – X-PRESS™ Interface: Setup
Function
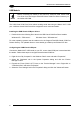
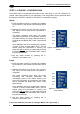
Learn
4. Enter the Learn function by pressing and holding
the X-PRESS™ push button until the Learn LED is
on.
5. Release the button to enter the Learn function.
The Learn LED will blink until the procedure is
completed.
The Learn procedure ends when the Image
Processing and Decoding parameters are
successfully saved in the reader memory, the
Learn LED will remain on continuously, the Green
Spot is activated and Matrix 200™ emits 3 high
pitched beeps.
If the calibration cannot be reached after a timeout
of about 3 (three) minutes Matrix 200™ will exit
without saving the parameters to memory, the
Learn LED will not
remain on continuously but it will
just stop blinking. In this case Matrix 200™ emits a
long low pitched beep.
6. Exit the Setup function by pressing the X-
PRESS™ push button once.
green
green
yellow
yellow
red
Figure 10 – X-PRESS™ Interface:
Learn Function
If you have used this procedure to configure Matrix 200™ go to step 7.
8