Skorpio™/Skorpio-GUNTM www.mobile.datalogic.com World wide Sales Network available from: www.mobile.datalogic.com/contacts Datalogic Mobile S.r.l. Via S. Vitalino, 13 40012 Lippo di Calderara di Reno Bologna - Italy Telephone: (+39) 051-3147011 Fax: (+39) 051-3147561 User’s Manual ©2008 Datalogic Mobile S.r.l. 822000685 (Rev.
Datalogic Mobile S.r.l. Via S. Vitalino 13 40012 - Lippo di Calderara di Reno Bologna - Italy Datalogic Skorpio™ and Skorpio-GUN™ - User's Manual Software Version: 3.00 Ed.: 07/2008 ALL RIGHTS RESERVED Datalogic is a registered trademark of Datalogic S.p.A. in many countries and the Datalogic logo is a trademark of Datalogic S.p.A.. All other brand and product names mentioned herein are for identification purposes only and may be trademarks or registered trademarks of their respective owners.
CONTENTS DATALOGIC END USER LICENSE AGREEMENT..................................... v REFERENCES ........................................................................................... vii Conventions .................................................................................................vii Reference Documentation ...........................................................................vii Services and Support...................................................................................
3 3.1 3.2 3.3 3.3.1 3.4 3.4.1 3.5 3.5.1 3.5.2 3.6 3.6.1 3.6.2 3.7 3.7.1 3.7.2 3.7.3 3.7.4 3.7.5 3.7.6 3.8 3.8.1 3.8.2 3.8.3 3.8.4 3.9 3.10 USE AND FUNCTIONING .......................................................................... 18 Startup ........................................................................................................ 18 Using the Stylus .......................................................................................... 20 Data Capture...................................
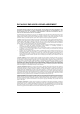
DATALOGIC END USER LICENSE AGREEMENT BY DOWNLOADING OR INSTALLING THE SOFTWARE, OR BY USING DATALOGIC EQUIPMENT THAT INCLUDES THIS SOFTWARE, YOU ARE CONSENTING TO BE BOUND BY THIS AGREEMENT. IF YOU DO NOT AGREE TO ALL OF THE TERMS OF THIS AGREEMENT, THEN DO NOT DOWNLOAD, INSTALL, USE THE SOFTWARE NOR DATALOGIC EQUIPMENT.
. Limited Warranty. If Customer obtained the Software directly from Datalogic, then Datalogic warrants that during the Warranty Period (as defined below): (i) the media on which the Software is furnished will be free of defects in materials and workmanship under normal use; and (ii) the Software will substantially conform to its published specifications.
REFERENCES CONVENTIONS This manual uses the following conventions: If not otherwise specified, the term Datalogic Skorpio™ refers to both Datalogic Skorpio™ and Skorpio-GUN™ mobile computers. “User” refers to anyone using a Datalogic Skorpio™ mobile computer. “Mobile computer” refers to Datalogic Skorpio™ mobile computer. “You” refers to the System Administrator or Technical Support person using this manual to install, configure, operate, maintain or troubleshoot a Datalogic Skorpio™ mobile computer.
SAFETY REGULATIONS NOTE Read this manual carefully before performing any type of connection to the Datalogic Skorpio™ mobile computer. The user is responsible for any damages caused by incorrect use of the equipment or by inobservance of the indication supplied in this manual. GENERAL SAFETY RULES − Use only the components supplied by the manufacturer for the specific Datalogic Skorpio™ being used.
LASER SAFETY The laser light is visible to the human eye and is emitted from the window indicated in the figure. Datalogic Skorpio™ Models Laser output window AVOID EXPOSURE LASER LIGHT IS EMITTED FROM THIS APERTURE This product complies with 21 CFR Subchapter J LASER LIGHT - DO NOT STARE INTO BEAM CLASS 2 LASER PRODUCT MAX. OUTPUT RADIATION 1.
Datalogic Skorpio-GUN™ Models Laser Output Window This product complies with 21 CFR Subchapter J CAUTION-CLASS 2 LASER LIGHT WHEN OPEN – DO NOT STARE INTO BEAM LASER LIGHT - DO NOT STARE INTO BEAM CLASS 2 LASER PRODUCT MAX. OUTPUT RADIATION 1.7 mW EMITTED WAVELENGTH 630~680 nm EN60825-1:2001 AVOID EXPOSURE LASER LIGHT IS EMITTED FROM THIS APERTURE I D F E La luce laser è visibile all'occhio umano e viene emessa dalla finestra indicata nella figura.
ENGLISH The following information is provided to comply with the rules imposed by international authorities and refers to the correct use of your mobile computer. STANDARD LASER SAFETY REGULATIONS This product conforms to the applicable requirements of both CDRH 21 CFR 1040 and EN 60825-1 at the date of manufacture. For installation, use and maintenance, it is not necessary to open the device.
DEUTSCH Die folgenden Informationen stimmen mit den Sicherheitshinweisen überein, die von internationalen Behörden auferlegt wurden, und sie beziehen sich auf den korrekten Gebrauch vom Terminal. NORM FÜR DIE LASERSICHERHEIT Dies Produkt entspricht am Tag der Herstellung den gültigen EN 60825-1 und CDRH 21 CFR 1040 Normen für die Lasersicherheit. Es ist nicht notwendig, das Gerät wegen Betrieb oder Installations-, und WartungsArbeiten zu öffnen.
ESPAÑOL Las informaciones siguientes son presentadas en conformidad con las disposiciones de las autoridades internacionales y se refieren al uso correcto del terminal. NORMATIVAS ESTÁNDAR PARA LA SEGURIDAD LÁSER Este aparato resulta conforme a las normativas vigentes de seguridad láser a la fecha de producción: CDRH 21 CFR 1040 y EN 60825-1. No es necesario abrir el aparato para la instalación, la utilización o la manutención.
Information for the User ENGLISH Contact the competent authority responsible for the management of radio frequency devices of your country to verify any possible restrictions or licenses required. Refer to the web site http://europa.eu.int/comm/enterprise/rtte/spectr.htm for further information. ITALIANO Contatta l'autorità competente per la gestione degli apparati a radio frequenza del tuo paese, per verificare eventuali restrizioni o licenze.
FCC COMPLIANCE Modifications or changes to this equipment without the expressed written approval of Datalogic could void the authority to use the equipment. This device has been tested and found to comply with the limits for a CLASS A digital device, pursuant to Part 15 of the FCC Rules. These limits are designed to provide reasonable protection against harmful interference when the equipment is operated in a commercial environment.
WEEE COMPLIANCE Informazione degli utenti ai sensi della Direttiva Europea 2002/96/EC L’apparecchiatura che riporta il simbolo del bidone barrato deve essere smaltita, alla fine della sua vita utile, separatamente dai rifiuti urbani.
éviter les retombées négatives pour l'environnement et la santé dérivant d'une élimination incorrecte récupérer les matériaux dans le but d'une économie importante en termes d'énergie et de ressources Pour obtenir des informations complémentaires concernant l'élimination, veuillez contacter le fournisseur auprès duquel vous avez acheté le produit ou consulter la section consacrée au site Web www.mobile.datalogic.com.
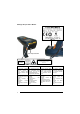
GENERAL VIEW Datalogic Skorpio™ Models B C D H A I J E F G A) B) C) D) Transflective display User programmable LED Speaker Charging status and battery low warning LED E) Scan key K F) G) H) I) J) Keyboard Microphone Laser safety label Product label Adjustable elastic strap with stylus holders K) Battery pack M N L L) Data Capture/Laser Output Window M) Mini USB connector xviii N) RS232/USB Communication /Charger pins
Datalogic Skorpio-GUN™ Models B C D A H E I J F K G A) B) C) D) Transflective display User programmable LED Speaker Charging status and battery low warning LED E) Scan key L L) Mini USB connector F) G) H) I) J) K) Keyboard Microphone Battery pack Laser safety label Data Capture/Laser Output Window Trigger Scan Key M M) RS232/USB Communication /Charger pins xix
xx
INTRODUCTION 1 1 INTRODUCTION 1.1 1.1.1 DATALOGIC SKORPIO™ DESCRIPTION Datalogic Skorpio™ Datalogic Skorpio™ is a rugged mobile computer particularly suitable for mobile commerce solutions in the retail environment, both on store shelves and in the stock room.
DATALOGIC SKORPIO™/ SKORPIO-GUN™ 1 1.1.2 Datalogic Skorpio-GUN™ Datalogic Skorpio-GUN™ is a compact, lightweight and robust pistol grip mobile computer, particularly suitable for warehousing solutions and bar code scanning intensive applications, especially in the retail environment. Datalogic Skorpio-GUN™ does not compromise in reliability and ruggedness. It is designed for use in hostile environments and can resist multiple drops, repeated knocks and accidental bumps.
INTRODUCTION 1.2 1 AVAILABLE MODELS The brand new Datalogic Skorpio™ is available in different models depending on the options it is equipped with. Options are listed below: • communication options: Wi-Fi 802.11b (Datalogic Skorpio™ models only), Wi-Fi 802.11b/g, Bluetooth® • capture options: Miniature Laser Modules, Long Range Modules (Datalogic Skorpio-GUN™ models only) • compute options: O.S.
1 DATALOGIC SKORPIO™/ SKORPIO-GUN™ Other accessories necessary for the Datalogic Skorpio™ connection to the host computer and to the network, must be ordered separately: the cradle, power supply, and one or more connection cables. Remove all the components from their packaging; check their integrity and congruity with the packing documents. Keep the original packaging for use when sending products to the technical assistance center. Damage caused by improper packaging is not covered under the warranty.
INTRODUCTION 1.4 1 INSERTING MINI SD CARD Datalogic Skorpio™ provides the possibility to add a mini storage disk to increase the on-board memory capacity. To access the Mini SD card slot and to insert the card, proceed as follows: 1a. Turn off the Datalogic Skorpio™ and remove the battery pack, by turning its lock screw to the open position (horizontal) and pulling the lock runner up. 1b. Turn off the Datalogic Skorpio-GUN™ and remove the battery pack, by pulling the battery latch down.
DATALOGIC SKORPIO™/ SKORPIO-GUN™ 1 2. Remove the Mini SD card slot’s protective rubber cover. 3. Insert the card with the written part upward (as shown in the figure) and push it in, aided by the stylus, until it clicks into place. To recognize the card simply turn off and turn on the Datalogic Skorpio™. See par. 3.4. To remove the Mini SD card, just push it toward the inside, aided by the stylus, until it clicks; a spring system will return it out.
INTRODUCTION 1.5 1 USING THE BELT CLIP To use the belt clip (in Datalogic Skorpio™ models only), proceed as follows: 1. Remove the elastic strap and unscrew the strap pivot. 2. Screw the belt clip pivot on the terminal by using the fixing screw.
1 DATALOGIC SKORPIO™/ SKORPIO-GUN™ 3. Insert the terminal in the belt clip by sliding the belt clip pivot into the belt clip until it clicks into place. 4. To release the terminal, press the belt clip unlock button.
INTRODUCTION 1.6 1 STYLUS HOLDER The Stylus holder is located in the handle of the Datalogic Skorpio-GUN™ models only: 1.
DATALOGIC SKORPIO™/ SKORPIO-GUN™ 1 1.
CONNECTIONS 2 2.1 2 CONNECTIONS USB CONNECTION You can use a standard mini USB cable to connect the Datalogic Skorpio™ to a host computer to transfer data. A B C Key: A Host computer B Datalogic Skorpio™ C 94A051016 (Standard Mini USB cable) For USB communication using the USB cradle it is necessary to insert the power supply plug into the power jack on the base of the cradle and attach the power supply to a power outlet.
DATALOGIC SKORPIO™/ SKORPIO-GUN™ 2 2.2 CONNECTION TO USB PERIPHERALS You can use a standard A (4 pin female) to mini A (5 pin male) USB cable to connect the Datalogic Skorpio™ to a keyboard or a memory. For all these devices maximum current withdrawal must be below 100mA.
CONNECTIONS 2.3 2 RS232 CONNECTION The Datalogic Skorpio/F-Color Serial cradle (single or multiple) and the Datalogic Skorpio Serial/Modem Cradle can be connected to the Host by cable 94A054000 for 9-pin connections. The RJ45 connector of the desired cable must be connected to the RS232 port of the cradle. Then, it is necessary to insert the power supply plug into the power jack on the base of the cradle and attach the power supply to a power outlet.
DATALOGIC SKORPIO™/ SKORPIO-GUN™ 2 2.4 MODEM CONNECTION The Datalogic Skorpio™ Serial/Modem Cradle has an integrated modem and provides a modem connector, which can be used with an RJ11 connector. It can be connected to a telephone line to transfer data to a Host. B A C Key: A) Phone line to remote Host B) Datalogic Skorpio™ Serial / Modem Cradle C) Power Supply* * Recommended Power Supply: FPS18 AC/DC Power Supply (94ACC4595).
CONNECTIONS 2.6 2 WLAN CONNECTION Datalogic Skorpio™ Wi-Fi 802.11b and Wi-Fi 802.11b/g1 models can communicate with the host using the on-board radio frequency module and an Access Point connected to the host computer. For models using the WiFi7 radio (7xx-xxx-xxx models), you can find information about the applet for radio configuration: http://www.summitdatacom.com/SCU.htm.
2 DATALOGIC SKORPIO™/ SKORPIO-GUN™ Wi-Fi module is on by default, in order to avoid wasting energy, you can switch it off using the Wireless Communications applet. NOTE NOTE NOTE 16 Suspending the terminal powers off the 802.11b/g radio and drops the radio connection. When the terminal resumes, depending on the radio power mode and security protocol selected, it takes approximately from 10 to 30 seconds for the 802.11b/g radio driver to re-associate the radio to the network.
CONNECTIONS 2.7 2 WPAN CONNECTIONS Datalogic Skorpio™ Bluetooth® models can communicate with a Bluetooth® device, ® such as a printer, within a range of 10 m, using the on-board Bluetooth module. A B Key: A) Datalogic Skorpio™ ® B) Bluetooth printer NOTE In order to avoid wasting energy, the Bluetooth® module is off by default. If you need to have Bluetooth® working, the module must be powered on using the Wireless Communications applet (see par. 0), and perform the Discovery procedure (see par. 3.
DATALOGIC SKORPIO™/ SKORPIO-GUN™ 3 3 USE AND FUNCTIONING The use of the Datalogic Skorpio™ depends on the application software loaded. However there are several parameters that can be set and utilities that can be used to perform some basic functions such as data capture, communications, file management, etc. 3.1 STARTUP The Datalogic Skorpio™ turns on when the battery pack or the external supply is inserted.
USE AND FUNCTIONING 3 The mobile computer goes into power-off (low power with display backlight off), when it is no longer used for more than a programmable timeout, which is defined in the POWER applet of the Control Panel. In this mode it can be awakened (resuming operation) by the [ON/OFF] key or SCAN key if enabled (see par. 3.7.1). The mobile computer can also be awakened or turned off by the application program.
DATALOGIC SKORPIO™/ SKORPIO-GUN™ 3 3.2 USING THE STYLUS The stylus selects items and enters information. The stylus functions like a mouse. Double Tap: Touch the screen twice with the stylus to open items and select options. Drag: Hold the stylus on the screen and drag across the screen to select text and images. Drag in a list to select multiple items. Tap-and-hold: Tap and hold the stylus on an item to see a list of actions available for that item.
USE AND FUNCTIONING 3.3 3 DATA CAPTURE To capture data first of all select the barcode icon on the bottom-right side of the display and tap the 'Capture' menu item then proceed with the following directions. To configure and enable data capture parameters refer to par. 3.6. 3.3.1 Laser Data Capture To scan barcodes, point the Datalogic Skorpio™ laser model onto the code from a distance within the reading range while pressing the SCAN key.
3 3.4 DATALOGIC SKORPIO™/ SKORPIO-GUN™ DESCRIPTION OF THE KEYS The Datalogic Skorpio™ provides a 38-key alphanumeric keyboard. The following image shows this keyboard.
USE AND FUNCTIONING 3 Main Keys Function KEY FUNCTION It starts data capture. If enabled, it also wakes up the mobile computer from low-power (see par. 3.7.1). For Datalogic Skorpio-GUN™ models only, the trigger performs the same function as the SCAN key. They let you move forwards, backwards, upwards or downwards within text fields, scroll through a Menu list or browse among folder files.
DATALOGIC SKORPIO™/ SKORPIO-GUN™ 3 Special Function Icons ICON FUNCTION After a blue modifier key press, it opens the Start menu. After a blue modifier key press, it opens the file manager. After a blue modifier key press, it modifies the display backlight intensity (5 levels available through subsequent presses). After a blue modifier key press, it locks and unlocks the keyboard.
USE AND FUNCTIONING 3.4.1 3 Resetting the Skorpio There are several reset methods for the Skorpio. A warm boot terminates an unresponsive application and clears the working RAM, but preserves both the file system and the registry. A cold boot forces all applications to close and clears working RAM and files not resident on the persistent flash memory. Registry is restored from persistent memory if available or returned to factory default.
DATALOGIC SKORPIO™/ SKORPIO-GUN™ 3 3. 4. 5. Within 1 second press and hold down the Esc and 0 keys until the left orange led starts blinking. Release the Esc and 0 keys. Enter 1 to proceed with the Clean Boot sequence. Enter 0 to cancel the Clean Boot and proceed with a Cold Boot.
USE AND FUNCTIONING 3.5 3.5.1 3 STATUS INDICATORS LED Status The Datalogic Skorpio™ provides two different LEDs signaling the mobile computer status. LED STATUS Good Read and General Purpose (left-side) Green It is constant for a configurable time to signal that a successful read has occurred. Green/Red It is also available to the application program. Charging Status and Green constant Battery Low Warning It is constant once the charging process has been completed.
DATALOGIC SKORPIO™/ SKORPIO-GUN™ 3 3.5.2 Taskbar As well as tasks opened in Windows, the Taskbar provides several status icons that report information about the time, the battery level, the keyboard function, and the decoding status. ICONS DESCRIPTION Time and Battery Icons It displays the time. They are representative of five different icons indicating the battery level. The icon is partially green when the power left is >20% and partially red colored when the power left is <20%.
USE AND FUNCTIONING 3.6 3 DATA CAPTURE CONFIGURATION From the Windows CE Taskbar, tap the "Decoding" icon to open a drop–down menu. Decoding can also be accessed from the Control Panel. By selecting the Info item from this drop-down menu you can access information about the Scanner and the Software; the Configure item opens the configuration applet (Data Capture Configuration Window), while Capture accesses the data capture applet (Data Capture Window), which enables code reading.
3 DATALOGIC SKORPIO™/ SKORPIO-GUN™ Data Capture Configuration Window The screen format shows two columns where the left column indicates branches or parameters. Branches have three dots in the right column (...). You can navigate through the tree structure using the stylus or keyboard arrows directly on the item field or from the menu. Parameters have their corresponding current values in the right column.
USE AND FUNCTIONING 3 Alternatively using the stylus, you can tap once directly on the value on the right column; continue tapping until the desired value is reached. To activate a new configuration select the File ->Save Menu to send the new configuration to the barcode decoding software and save the new configuration. This will save the configuration to non-volatile memory preventing loss at the next system reset.
3 DATALOGIC SKORPIO™/ SKORPIO-GUN™ Green Spot Duration: determines the duration (measured in milliseconds) of the green spot feedback, which provides a ”good read” green dot directly on the code, where the operator usually tends to be looking. NotPrintableChar: if set to "Remove", all not printable characters included in the scanned data are deleted and the final barcode will include only printable characters. ScanButton: it activates/deactivates the scanner for bar code reading.
USE AND FUNCTIONING 3 Default Settings The following tables contain the default values for the major barcode setup parameters, according to the type of scan engine mounted on the mobile computer. For a complete list of parameters and of their configuration procedures, please refer to the SDK Help file on the CD. SCAN PARAMETERS ScanTimeout GoodReadSound LedDuration LedPulses ContinuousMode KeyboardEmulation SoftTrigger ScanAlwaysOn GreenSpotDuration NotPrintableChar ScanButton 5000 Beep.
DATALOGIC SKORPIO™/ SKORPIO-GUN™ 3 3.6.2 Capture The Data Capture applet (Capture) enables code reading. Data Capture Window Data Capture can also be enabled through the Configuration applet by selecting File ->Scanner from the main menu, or by enabling the parameter Scan Always On in the Scan Parameters branch.
USE AND FUNCTIONING 3.7 3 CONTROL PANEL From the Windows CE Desktop, double tap on the "My Device" icon and then double tap on the "Control Panel" icon to open the Windows CE control panel main window. The Control Panel can also be launched from Start ->Settings ->Control Panel. APPLET programs are displayed as icons; one icon corresponds to each APPLET. Control Panel 3.7.1 Buttons The BUTTONS Applet allows assigning desired applications to be launched by one of the function keys (F1, F2, F3, F4).
DATALOGIC SKORPIO™/ SKORPIO-GUN™ 3 3.7.2 Registry The REGISTRY ADMIN applet provides management of Windows CE registry. Select the REGISTRY ADMIN applet by double tapping the Registry Admin icon. The Registry Administration Main window appears. Two functions are available: - Save Registry allows permanently saving the Windows configuration (example: custom configuration of screen desktop background color, or network adapter configuration) to non-volatile memory (SAVE button).
USE AND FUNCTIONING 3.7.3 3 Files Admin The FILES ADMIN applet enables control of the permanence of files in the System Folder. Two functions are available on the Files Admin Main window by means of two buttons: Files Admin Main Window Save Session: with this button all files will be permanently saved in the \Windows directory in non-volatile memory.
3 DATALOGIC SKORPIO™/ SKORPIO-GUN™ Two activating procedures are available for Safe Setup: - Select an installation file (for example, a .CAB cabinet file) from the Safe Setup mask. Safe Setup First Mask Then select \Windows or a relevant sub-directory in the path box. Then, Safe Setup will recognize the new files and directories present in the \Windows directory, and will copy them to the \Backup\Windows directory. At the next cold boot, these files will be restored (see par. 3.9).
USE AND FUNCTIONING 3.7.4 3 Wireless Communications The WIRELESS COMMUNICATIONS applet provides management of the Wi-Fi ® Card and of the Bluetooth module. Select the WIRELESS COMMUNICATIONS applet by double tapping the Wireless Communications icon.
DATALOGIC SKORPIO™/ SKORPIO-GUN™ 3 3.7.5 Ethernet Settings Datalogic Skorpio™ can be connected to an Ethernet network by inserting it into the Datalogic Skorpio™ Ethernet Multi Cradle. NOTE Ethernet communication requires Datalogic Skorpio™ SW version 5.41 or later. Verify the software version by tapping on Software – Version in the Datalogic default home page. Otherwise, search for the file version.htm under the Windows folder.
USE AND FUNCTIONING 3 The LAN icon will appear on the Taskbar indicating the LAN connection status. By double tapping on the LAN icon in the Taskbar, the LANNDS1 applet allows visualizing the TCP/IP information. Other information such as the MAC Address is available by tapping the Details... button. If it is necessary to set static TCP/IP parameters, you must open the LANNDS1 applet from the Network and Dial-up Connections applet in the Control Panel.
DATALOGIC SKORPIO™/ SKORPIO-GUN™ 3 3.7.6 Stylus Calibration You might need to recalibrate the touch screen (i.e. when you attempt to select one item with the stylus, another item is erroneously selected). To recalibrate the touch screen, complete the following steps: 1. Select Start > Settings > Control Panel > Stylus to open the Stylus Properties dialog as shown in Figure 1. 2. Adjust Double-Tap sensitivity if needed or desired. 3. Select the Calibration tab to open the Calibration application.
USE AND FUNCTIONING 3 Figure 2 Startup stylus calibration When starting the terminal, a stylus calibration screen comes up if valid calibration settings are not available. This happens in the following circumstances: 1. 2. 3. 4. At the first startup of the terminal. After restoring registry default settings using the applet Registry Admin and performing a warm boot. After a Clean Boot. After a Firmware Update (see par.3.10).
DATALOGIC SKORPIO™/ SKORPIO-GUN™ 3 3.8 WINDOWS CONNECTIONS To connect Datalogic Skorpio™ to another device (i.e. Host PC) from Windows, several programs are available. These programs require specific electrical connections in order to function properly. 3.8.1 Microsoft® ActiveSync® Microsoft® ActiveSync® gives you the possibility to connect your desktop computer to your Datalogic Skorpio™ and synchronize the information on them.
USE AND FUNCTIONING 3 For example: Synchronize Microsoft Word and Microsoft Excel files between the Datalogic Skorpio™ and the desktop computer. The files will automatically be converted to the correct format. NOTE Visit the following Microsoft Web site for the latest in updates, technical information, and samples: http://www.microsoft.com/windowsmobile/resources/downloads ActiveSync® Remote NOTE Microsoft® ActiveSync® Remote is no longer supported in Windows CE.
DATALOGIC SKORPIO™/ SKORPIO-GUN™ 3 3.8.2 Uploading/Downloading Connection Files through an RS232 Files can be uploaded/downloaded through the device cradle connected via an RS232 cable. Before performing this operation, it is first necessary to define the PC and the mobile computer settings and connection. If uploading/downloading files through a serial connection, Microsoft® ® ActiveSync is not used.
USE AND FUNCTIONING 3 connection name, select “Direct Connection” and press “Next”. From the device list select “Serial cable on COM1” and change the communication speed under “Configure” to 115200 baud. Then, press “Security Settings” and select the “Preview user name and password” flag. Press “Finish” to save the configuration and close all windows.
3 3.8.3 DATALOGIC SKORPIO™/ SKORPIO-GUN™ Bluetooth® Manager Device Setup In order to enable a Bluetooth® device for communication with the Datalogic Skorpio™ you must perform the discovery procedure and enable the device as follows: 1. Place the Bluetooth® device within the range of the Datalogic Skorpio™ (10 meters). 2. From the “Control Panel” main window double tap on the “Bluetooth” applet to open the Bluetooth® Manager Device window: 3.
USE AND FUNCTIONING 3 By tapping on the “HW Details” and “SW Details” buttons, information about the ® mobile computer Bluetooth hardware and software will be displayed, while the ® “Enable Encryption” button starts encryption of the Bluetooth communication ® data. If tapping on the “Close” button the Bluetooth Manager Device window will be closed. 4.
3 5. DATALOGIC SKORPIO™/ SKORPIO-GUN™ Once the desired Bluetooth® device has been selected, tap on the “Connection Wizard” button to enter the related window where selecting the connection type ® to be used for communication with the Bluetooth device: ® The “Serial Port” button starts communication through the Bluetooth serial port COM 5. ® The “Printer” button starts communication with a printer through the Bluetooth serial port COM 5.
USE AND FUNCTIONING 3.8.4 3 FTP Server Setup The Datalogic Skorpio™ Operating System includes a sample File Transfer Protocol (FTP) server. FTP is used for copying files to and from remote computer systems over a network using TCP/IP. You can establish a connection to your Datalogic Skorpio™ using its FTP Server through the following interfaces: WLAN using the WiFi radio LAN through the Datalogic Skorpio™ Ethernet Multi Cradle (see par. 3.7.5) Proceed as follows: 1. Create a registry file (extension .
3 NOTE 52 DATALOGIC SKORPIO™/ SKORPIO-GUN™ Datalogic Skorpio™ Wi-FI models only (without Bluetooth®) do not contain the FTP Server. If necessary you can install it from the CDROM in the Utilities folder.
USE AND FUNCTIONING 3.9 3 BACKUP DIRECTORY FILE MANAGEMENT All of the Windows CE system files reside in RAM (volatile memory) except for the Backup directory, which resides in FLASH (non-volatile memory). Therefore the contents of the Backup directory are persistent even if the mobile computer is rebooted or the battery pack is changed. You can save your more important files that you don't want to lose due to mobile computer re-boot, in the Backup directory or create a sub-directory within Backup.
DATALOGIC SKORPIO™/ SKORPIO-GUN™ 3 3.10 FIRMWARE UPDATE The Datalogic Skorpio™ is equipped with a tool that implements a firmware update service. This tool, called Datalogic Updater (DLUpdater), is compatible with all hardware versions of the following WindowsCE 5.0 models: Datalogic Skorpio™; Datalogic Jet™; Datalogic Kyman™; Datalogic Memor™. The DLUpdater, that is automatically invoked at startup, search for a potential update file (DLUpdate.bin) in the storage card.
USE AND FUNCTIONING 3 Firmware Update Procedure 1. Download the update from the web site (see previous par.). It is a zip file containing the files: • DLUpdater.exe – that starts the update; • DLUpdate.bin – binary file containing the updated firmware; 2. Copy the files DLUpdater.exe (optional) and DLUpdate.bin on a Mini SD card. 3. Insert the Mini SD card in the terminal slot (see par.1.4). 4. Open the folder “\Storage Card” on the terminal and run DLUpdater.exe (double tap the icon).
3 8. DATALOGIC SKORPIO™/ SKORPIO-GUN™ Following the operating system upgrade, the message shown in figure 3 may come up at the terminal startup. It informs the user that a flash disk formatting (folder \backup) would required for a clean update and asks whether to proceed with this operation. Select to format the flash disk. Select to preserve the current data stored in the backup folder. Sometimes the update process may force a flash format.
MAINTENANCE 4 4 MAINTENANCE Rechargeable battery packs are not initially charged. Therefore the first operation to perform is to charge them. See below. NOTE 4.1 CHARGING THE BATTERY PACK The battery pack autonomy varies according to factors, such as the frequency of barcode scanning, RF usage, etc. When the battery pack is low, the LED positioned at the right side of the display blinks red.
4 NOTE 58 DATALOGIC SKORPIO™/ SKORPIO-GUN™ Even if the storage temperature range is wider, In order to achieve the longest battery life, store the terminal and the spare batteries between 20 to 30 ºC (68 to 86 ºF). The Batteries must be charged at a temperature ranging from 0° to +45 °C (+32° to +113 °F).
MAINTENANCE 4.2 4 REPLACING THE BATTERY PACK 4.2.1 Datalogic Skorpio™ Models To correctly replace the battery pack, proceed as follows. 1. Turn off the Datalogic Skorpio™. 2. Turn the battery lock screw to the open position (horizontal), then pull the lock runner up, as indicated in the figure below. 3. Remove the battery pack.
DATALOGIC SKORPIO™/ SKORPIO-GUN™ 4 4. To correctly insert the new battery pack, first insert the bottom and then the upper part of the battery pack into the slot as indicated in the following figure: 5. Press it until the battery latch is automatically closed. 4.2.2 Datalogic Skorpio-GUN™ Models To correctly replace the battery pack, proceed as follows. 1. Turn off the Datalogic Skorpio-GUN™. 2. Remove the battery pack, by pulling the battery latch down.
MAINTENANCE 4 Battery Contacts 3. To correctly insert the new battery pack, first insert the bottom and then the upper part of the battery pack into the slot as indicated in the following figure: 4. Press it until the battery latch is automatically closed.
4 DATALOGIC SKORPIO™/ SKORPIO-GUN™ Use only a Datalogic Mobile approved power supply. Use of an alternative power supply will void the product warranty and may cause product damage. Do not apply voltages to the batteries contacts. WARNING Risk of explosion if the battery is replaced by an incorrect type. Do not use the batteries of this terminal to power devices different from this mobile computer. Do not place the battery in or near a fire or heat as they may explode.
MAINTENANCE NOTE 4 In order to guarantee an adequate operating autonomy, when replacing the battery pack the mobile computer checks the battery energy level. If the battery is not sufficiently charged, Datalogic Skorpio™ does not turn on (when pressing the ON button). In this case, either substitute the battery pack with a charged one (sufficiently charged) or insert Datalogic Skorpio™ into a powered cradle or plug it into the direct power supply.
DATALOGIC SKORPIO™/ SKORPIO-GUN™ 4 4.3 COMPACT FLASH AND SECURE STORAGE CARDS The Datalogic Skorpio™ supports both Compact Flash and Mini Secure Digital storage cards. The Mini SD storage card slot accepts storage cards only, while the Compact Flash card slot accepts either a storage card or the 802.11b/g radio card.
TECHNICAL FEATURES 5 TECHNICAL FEATURES 5.1 TECHNICAL DATA Electrical Features Power DC supply Battery pack Communication Features Bluetooth interface Serial interface Wireless Features WLAN WPAN Hardware Features FLASH RAM Microprocessor Audio LED Display Keyboard * 5 5.25 V ± 6% 2 cell Li-Ion 2100 mAh@ 3.7 V (7.8 Watt-hours) Windows CE COM Port COM5 RS232 COM1 USB 1.1 COM6 IEEE 802.11b/g (WiFi) Bluetooth® IEEE 802.15, Class 2, Version 1.
5 Environmental Features Working temperature** Storage temperature Humidity*** Protection ESD protection Drop resistance**** Mechanical Features Dimensions (LxWxH) DATALOGIC SKORPIO™/ SKORPIO-GUN™ -10° to + 50 °C / 14° to +122 °F -20° to +70 °C / -4° to +158 °F 90% non condensing for temperatures<40°C IP64 4 KV contact discharge, 8 KV air discharge 1.5 m / 5 ft Datalogic Skorpio™ only: 19.6 x 7.7 x 3.3 cm / 7.7 x 3.0 x 1.3 in Datalogic Skorpio-GUN™ only: 19.6 x 7.7 x 15.8 cm / 7.7 x 3.0 x 6.
TECHNICAL FEATURES 5.
DATALOGIC SKORPIO™/ SKORPIO-GUN™ 5 Datalogic Skorpio-GUN™ XXX-2XX only Guaranteed Reading Diagram - Reading Zones (10° skew angle) 1,00 mm (40 mils) 0,50 mm (20 mils) 400 0,38 mm (15 mils) 0,25 mm (10 mils) 300 1,4 mm (55 mils) 200 100 0 100 200 300 400 mm 0 68 200 400 600 800 1000 1200 1400 1600 1800 2000 2200 mm
TEST CODES 6 6 TEST CODES High Density Codes 0.
DATALOGIC SKORPIO™/ SKORPIO-GUN™ 6 Medium Density Codes 0.
TEST CODES 6 Low Density Codes 0.
GLOSSARY Access Point A device that provides transparent access between Ethernet wired networks and IEEE 802.11 interoperable radio-equipped mobile units. Hand-held mobile computers, PDAs or other devices equipped with radio cards, communicate with wired networks using Access Points (AP). The mobile unit (mobile computer) may roam among the APs in the same subnet while maintaining a continuous, seamless connection to the wired network.
DHCP Dynamic Host Configuration Protocol. A set of rules used by a device (such as a computer, router or networking adapter) to request and obtain an Internet address from a server which has a list of addresses available for assignment. EEPROM Electrically Erasable Programmable Read-Only Memory. An on-board non-volatile memory chip. Flash Disk Non-volatile memory for storing application and configuration files.
INDEX A Accessories; 10 Available Models; 3 B Backup Directory File Management; 53 Belt Clip; 7 Bluetooth Approval; viii ® Bluetooth Manager Device Setup; 48 Buttons; 35 C Capture; 34 Charging the Batteries; 57 Cleaning the Mobile Computer; 64 Compact Flash and Secure Storage Cards; 64 Connections; 11 Connection to USB peripherals; 12 Ethernet Connection; 14 Modem Connection; 14 RS232 Connection; 13 USB Connection; 11 WLAN Connection; 15 WPAN Connections; 17 Control Panel; 35 D Data Capture; 21 Laser Data C
SAR Compliance; xv Save Session; 37 Scan Parameters; 31 Services and Support; vii Startup; 18 Status Indicators; 27 Stylus; 9 Stylus Calibration; 42 T Taskbar; 28 Technical Data; 65 Technical Features; 65 Test Codes; 69 75 U Uploading/Downloading Files through an RS232 Connection; 46 Using the Stylus; 20 W WEEE Compliance; xvi Windows Connections; 44 Wireless Communication; 39 Wrist Strap; 9
Datalogic Mobile S.r.l. Via S.
EN 60950-1, December 2001: InFORMATION TECHNOLOGY EQUIPMENT – SAFETY – PART 1: GENERAL REQUIREMENTS Lippo di Calderara, March 9th, 2007 Paola Chientaroli Quality Assurance Manager
Datalogic Mobile S.r.l. Via S.
Skorpio™/Skorpio-GUNTM www.mobile.datalogic.com World wide Sales Network available from: www.mobile.datalogic.com/contacts Datalogic Mobile S.r.l. Via S. Vitalino, 13 40012 Lippo di Calderara di Reno Bologna - Italy Telephone: (+39) 051-3147011 Fax: (+39) 051-3147561 User’s Manual ©2008 Datalogic Mobile S.r.l. 822000686 (Rev.