
User manual


DS2100N REFERENCE MANUAL
1
Auto Learn
If you are configuring your scanner using X-PRESS™, you must start with the Auto Learn
procedure.
1. Enter the Auto Learn function by holding the X-PRESS™ push button pressed until the
LEARN LED is on.
2. Release the button to enter the Auto Learn function.
Once entered, the reader starts a procedure to automatically detect and recognize
barcodes (by type and length), which are presented to it (*). The laser turns on and the
LEARN LED blinks to indicate the ongoing process.
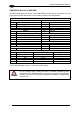
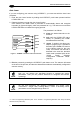
green
green
yellow
yellow
red
SETUP
LEARN
TES
T
READY
GOOD
TRIGGER
COM
STATUS
Figure 6 – X-PRESS™ Interface: Auto Learn Function
The procedure is as follows:
A) place the desired barcode on the
scanline.
B) wait until the LEARN LED stays
steady on (indicating the reader
has detected the barcode).
C) repeat, if needed, the above two
steps to program up to 10 different
barcodes (the LEARN LED returns
to the blinking state for the next
code). If more than one barcode is
detected in the scan line, the Multi
Label mode is enabled (refer to the
“2K/4K Family Software
Configuration Parameter Guide”
Help file).
3. Exit the process by pressing the X-PRESS™ push button once. The scanner will restart
at the end of the process, and then the detected barcodes are automatically configured in
scanner memory.
NOTE
If the barcode cannot be read because of low contrast or excessive ambient
light, you can perform the AutoSetup function to optimize the optical
parameters. Then you can perform AutoLearn to recognize the barcode
symbology.
NOTE
On exit from Autolearn, the following parameters are forced: Code
Combination = Single Label, Reading Mode = Linear. If necessary, these
parameters can be changed through Genius™.
* In case of Programming Barcodes (refer to the “ID-NET™: Programming Barcodes And Setup Procedure”
document in the product CD).
6