
User guide


SS-1200-S, SS-2200-S and SS-4200-S Series Link Aggregating Taps76
© 2012 Datacom Systems Inc
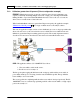
SOLUTION: The SS-2210BT-BT/SFP-S taps both links, aggregates traffic together and utilizes
factory default LINK PROTECT settings. Four ports (6 through 8) are setup to send non-
aggregated traffic to other tools for redundancy. Ports 9 and 10 are small form pluggables that allow
outputs in either fiber or copper connectivity media. Since multiple device can all be configured to
receive the same data, the SS-2210BT-BT/SFP-S is perfect for product comparisons.
CONFIGURATION: The IP address (default 192.168.1.1), Subnet Mask and Default Gateway is set
during the 'Initial Configuration' for your Local Area Network settings and will not be covered in this
section, see the 'IP Address Configuration with TELNET ' section for those steps. Use the syntax
below in the Command Line Interface (CLI) to setup Tap and Any-to-Any ports (syntax is shown
with either user > or Superuser # prompts):
For Configuration, open TELNET on your Management PC and open a hostname connection with
the SS-2210BT-BT/SFP-S MANAGEMENT RJ45 port. Settings are found in the 'Initial
Configuration', 'MANAGEMENT Port Configuration (RJ45)', 'TELNET ' section.
Enter Username (default: Administrator) and Enter key. Enter Password (default: admin) and Enter
key. Default prompt is the > symbol. Enter superuser mode, type su and Enter key. Enter
Password (default: password) and Enter key. Default prompt is the # symbol. Use the following
syntax to set the input/output for Any-to-Any ports as well as the output for Tap ports.
The factory default for all Any-to-Any ports on all aggregation taps (SS-1200-S series and
SS-2200-S series) are turned off by default - i.e. they are not set up as either inputs or
outputs and are not replicated to any other ports with the exception of the hard-wired in-
line taps.
The default configuration has Ports 1, 2, 3 and 4 hard-wired as inline taps. Ensure there are no
previous settings present, go through Ports 1-10 and set them to OFF as shown:
# SET PORT MONITOR 1 OFF
# SET PORT MONITOR 2 OFF
# SET PORT MONITOR 3 OFF
# SET PORT MONITOR 4 OFF
# SET PORT MONITOR 5 OFF
# SET PORT MONITOR 6 OFF
# SET PORT MONITOR 7 OFF
# SET PORT MONITOR 8 OFF
# SET PORT MONITOR 9 OFF
# SET PORT MONITOR 10 OFF
46
41