
Installation guide
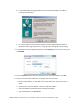
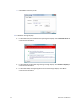
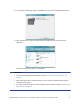

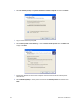
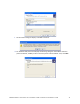
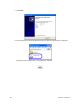
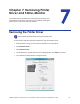
Table Of Contents
- Chapter 1: Planning the Installation
- Chapter 2: Installing the Hardware Components
- Chapter 3: Installing the Smart Card Driver
- Chapter 4: Installing the USB Printer Driver
- Chapter 5: Installing the Status Monitor
- Chapter 6: Network Installation
- Chapter 7: Removing Printer Driver and Status Monitor
- Untitled

76 Network Installation
Sharing a Printer on a Network Connection
Preparing to Share a Printer
PrintersharingisaWindows‐supportedfeaturethatenablesaprinterinstalledonahostPCtobe
usedfromanotherPConthenetwork(oftencalledtheclientPC).Forbestresults,useprinter
sharingwithPCsrunningtheWindows7,WindowsXPorWindows2000operatingsystems.
Beforeinstalling
anSR200orSR300printeronaclientPC:
LogontotheclientPCasauserwithadministratorpermissions.Thisisrequiredforinstalling
printers.TheuserinstallingattheclientPCmustalsohaveauthorizationatthehostPCto
installtheprinter.
MakesurethattheclientPChasnetworkaccesstothehostPC(wheretheprinteris
installed).
Makesurethattheprinterissetforsharing.TheiconinthePrinterswindow
includesahand(Windows2000andXP)oraphoto(WindowsVista)whensharing
isenabled.RefertoWindowshelpfor“PrinterSharing”fordetailsregarding
enablingprintersharing.
MakesurethatthenetworkprinterdriverisinstalledandworkingonthehostPC.(Referto
“InstallingtheNetworkPrinterDriver” onpage 68.)
Makesurethattheprinternamedoesnothavespacesinthename.
YoumustknowthecomputernameandworkgroupnameofthehostPCtolocateitonthe
network.RefertoWindowshelpfor“computername”forhelpfindingthenames.
UsersattheclientPCmustbeauthenticated,usuallybyloggingin,atthehostPCforprinting
tobeallowed.