
Installation guide
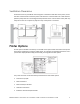
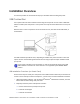
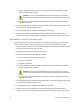
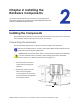
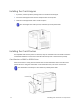
Table Of Contents
- Chapter 1: Planning the Installation
- Chapter 2: Installing the Hardware Components
- Chapter 3: Installing the Smart Card Driver
- Chapter 4: Installing the USB Printer Driver
- Chapter 5: Installing the Status Monitor
- Chapter 6: Network Installation
- Chapter 7: Removing Printer Driver and Status Monitor
- Untitled

10 Planning the Installation
c. Installthecardstacker.
d. Connectthepowercordtotheprinterandtothelaminator(ifused).Poweronboth
devicesandthenpoweroffagain.
e. Installprintingandlaminatingsupplies(inkribbon,retransfermaterial,laminatorfilm
cartridges,andcards).
3. UsetheInstallationCDtoinstalltheSR‐CPprinter
driverontothePC.(Boththenetworkand
USBcableswillbeconnectedduringthisstep.)
4. UsetheInstallationCDtoinstalltheStatusMonitorontothePC.
5. PowerontheprinterandconfiguretheconnectionbetweenthePCandtheprinter.
Ifnecessary,usethePCtoassigntheDatacard
SR‐CRretransferprinterplug‐intotheprinter,
andtosetuptheunitnumberandprintername.SetthedefaultinterfacevaluetoNetwork.
6. PowerofftheprinteranddisconnecttheUSBcable.Usethenetworkcabletoconnectthe
printertoyourlocalnetwork.
7. Reinstalltheprinter
driverusingthenetworkcable.
8. Assigntheprinter’sIPaddre ss,ifnecessary.
9. SetupIPsecurity,ifneeded,usingeitheraprintercertificateorapresharedkey .
10. Setupprintersharing,ifdesired.
Caution:DonotconnecttheUSBornetworkcabletotheprinterandPCyet.The
printerdrivermustbeinstalledfirsttoenablecommunicationbetweenthe
components.