Datacard® SR200 & SR300 Plug-in User’s Guide March 2014 Part No. 527446-001, Rev.
Notice Please do not attempt to operate or repair this equipment without adequate training. Any use, operation or repair you perform that is not in accordance with the information contained in this documentation is at your own risk. These products conform to regulatory requirements as specified in North America, Europe, and Asia. Refer to “Compliance Statements” on page iii for more information.
Compliance Statements Liability Statement The WARNING and CAUTION labels have been placed on the equipment for your safety. Please do not attempt to operate or repair this equipment without adequate training. Any use, operation or repair in contravention of this document is at your own risk. Safety All Datacard® products are built to strict safety specifications in accordance with CSA/UL60950‐1 requirements and the Low Voltage Directive 2006/95/EC.
Regulatory Compliance Notice for USA (FCC notice) This equipment has been tested and found to comply with the limits for Class A computing devices, pursuant to Part 15 of FCC rules. These limits are designed to provide reasonable protection against harmful interference when the equipment is operated in a commercial environment. This equipment generates, uses, and can radiate radio frequency energy.
Notice for Taiwan (Traditional Chinese) Notice for Japan Japanese Voluntary Control Council for Interference (VCCI) class A statement Korea Communications Commission (KCC) statement California Proposition 65 Compliance WARNING: This product contains chemicals, including lead, known to the State of California to cause cancer, and birth defects or other reproductive harm. Wash hands after handling.
Revision Log Datacard® SR200 & SR300 Plug-in User’s Guide Revision Date Description of Changes A March 2014 First release of this document vi
Table of Contents Introduction to This Guide . . . . . . . . . . . . . . . . . . . . . . . . . . . . . . . . . . . . . . . . . . . . . . . . . . . . . . . 1 Who Should Read This Guide? . . . . . . . . . . . . . . . . . . . . . . . . . . . . . . . . . . . . . . . . . . . . . . . . . 1 Related Documentation. . . . . . . . . . . . . . . . . . . . . . . . . . . . . . . . . . . . . . . . . . . . . . . . . . . . . . 2 What is a Plug-in? . . . . . . . . . . . . . . . . . . . . . . . . . . . . . . . . . . . . . . .
viii
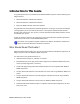
Introduction to This Guide This guide explains how to use the Datacard® SR200 & SR300 card printer with the following card design software: Datacard® ID Works® identification software Datacard® IDCentre™ identification software Datacard® WebID® identity information software The guide describes how Datacard ID software applications use plug‐ins to translate card designs into language the printer can understand and use.
Related Documentation Refer to the Datacard SR200 & SR300 Card Printers and LM200 & LM300 Laminators Installation Guide for information about installing and setting up the printer and optional laminator. Refer to the Datacard SR200 & SR300 Card Printers and LM200 & LM300 Laminators User’s Guide for information about using the printer and optional laminator to create cards.
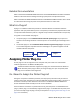
Viewing the Current Plug-in Assignments When printing a card, you can determine if the correct Datacard printer plug‐ins are being used: 1. Open a card project and select File > Print in the Datacard ID software application. The Print Card(s) dialog box displays the name of the printer plug‐in being used. If Datacard SR‐CR retransfer printer plug‐in is not displayed, you must manually assign the plug‐in to the printer. (Refer to “Assigning the Printer Plug‐ins” below.) This is the wrong plug‐in.
1 2 Tip: Select Printer to select a printer and view the plug‐ ins that are assigned to it. 3 4 5 1. Open your Datacard ID software application and access the Assign Printer Plug‐ins dialog box. 2. Click to select Plug‐in in the View By area. 3. Click the Printer Plug‐in Name drop‐down list and select Datacard SR‐CR retransfer printer plug‐in. 4. From the list of installed printers, select the box next to each SR200 or SR300 printer. (The default printer name is SR‐CP U1.
The following settings in ID Works Designer override the corresponding settings in the Printing Preferences dialog box of the SR200 & SR300 printer driver: Landscape or portrait orientation Number of copies Print on both sides (duplex printing) Rotate by 180 (degrees) Magnetic stripe or smart card encoding Other settings in the Printing Preferences dialog box for the SR200 & SR300 printer, such as Using Resin K ink, can override the settings you make using the ID software.
protective retransfer film. YMCUVK has a UV panel, which prints with translucent UV ink. Both require additional data which the plug‐in does not support. Design your card and set printing preferences to use the ribbons efficiently. For example, if your card design has color fields on the front and only black fields on the back side, when printed with a YMCK ribbon, one complete set of panels is used.
Magnetic Stripe Encoding If your SR200 or SR300 card printer contains an optional magnetic encoder, your card design can include data to be encoded onto the cards’ magnetic stripes. When designing cards with a Datacard ID software application, use the Datacard SR‐CR retransfer magnetic stripe plug‐in to communicate magnetic stripe data to the printer, as described in the sections below. Designing an ID Works Project or WebID Application to Encode Magnetic Stripes 1.
4. On the Encoding tab, select Datacard SR‐CR retransfer magnetic stripe plug‐in in the Device list. 5. Also on the Encoding tab, select a configuration from the drop‐down list. Refer to “Creating a New Magnetic Stripe Encoder Configuration” on page 9 or “Changing a Magnetic Stripe Encoder Configuration” on page 10 if you need to create or edit an encoder configuration. 6. Click OK. The Edit Field Properties [Magnetic Stripe] dialog box closes. 7.
Creating a New Magnetic Stripe Encoder Configuration To create a new configuration by copying an existing configuration, refer to “Changing a Magnetic Stripe Encoder Configuration” on page 10. 1. Open or create an ID Works project that has a card design with a magnetic stripe field. 2. Select the magnetic stripe field and open the Edit Field Properties [Magnetic Stripe] dialog box. Refer to the online help topic “Add a magnetic stripe field to a card” for step‐by‐step instructions. 3.
6. Enter a configuration name and click OK. The Datacard SR‐CR retransfer magnetic stripe plug‐ in : [name] dialog box opens. It may be helpful to give the configuration the same name as the ID Works project or WebID application that will use it. 7. (Optional) In the Designer Field Names area, change the track names from the default values (Track 1, Track 2, Track 3) to the names of the Production Form or WebID page fields that will supply data for the tracks. 8. Save and close the new configuration: a.
4. Click Edit Configurations. The Datacard SR‐CR retransfer magnetic stripe Configurations dialog box opens. 5. Select the configuration you want to change and click Edit. The Datacard SR‐CR retransfer magnetic stripe plug‐in : [name] dialog box opens. 6. Make the necessary changes to the track names. 7. Click Save to save your changes with the current configuration name. The Datacard SR‐CR retransfer magnetic stripe plug‐in : [name] dialog box closes.
Deleting a Magnetic Stripe Encoder Configuration 1. Open an ID Works project that has a card design with a magnetic stripe field. 2. Select the magnetic stripe field and open the Edit Field Properties [Magnetic Stripe] dialog box. Refer to the online help topic “Add a magnetic stripe field to a card” for step‐by‐step instructions. 3. On the Encoding tab, select Datacard SR‐CR retransfer magnetic stripe plug‐in from the Device list. 4. Click Edit Configurations.
Printing Cards Use the information in this section to specify printer settings and send cards to be printed. Printer Setup Before sending cards to your SR200 or SR300 card printer, open your PC’s Printers or Devices and Printers window following the steps for your operating system. Right‐click the printer icon and use the Printing preferences and the Printer properties dialog boxes to select options for printing cards.
Sending Cards to the Printer To print a card from your Datacard ID software application, select File > Print. Select an available SR200 or SR300 card printer, set the print options, then click OK.
Distributing Encoder Configurations The Datacard SR‐CR retransfer magnetic stripe plug‐in stores configurations in the ID Works\bin directory in a file named SR200Magstripe.ini. The default location for the ID Works\bin directory is in C:\Program Files\ Datacard\, but the ID Works installation program offers the option to install the ID Works files to a different location. Search for the file in Windows Explorer if you do not know its location.
16 SR200 & SR300 Plug-in User’s Guide