User’s Guide for Select™ Printers ImageCard® Color Printers UltraGrafix® Monochrome Printers May 2003 Part No.
ii Please note and heed the WARNING and CAUTION labels that have been placed on the equipment for your safety. Please do not attempt to operate or repair this equipment without adequate training. Liability statement This Datacard® product has been built to the high standards of DataCard Corporation. See “Safety and compliance” on page A-1 for the statement of liability. Regulatory compliance This Datacard product conforms to regulatory requirements as specified in North America and Europe.
iii Contents Section 1: Operating the Printer Chapter 1: Overview . . . . . . . . . . . . . . . . . . . . . . . . . . . . . . . . . . . . . .1-1 About this manual . . . . . . . . . . . . . . . . . . . . . . . . . . . . . . . . . . . .1-2 Audience . . . . . . . . . . . . . . . . . . . . . . . . . . . . . . . . . . . . . . . . . . . .1-2 About the Select printer . . . . . . . . . . . . . . . . . . . . . . . . . . . . . . .1-2 Printer models . . . . . . . . . . . . . . . . . . . . . . . . . . . . . . . . . .
iv Printer test card . . . . . . . . . . . . . . . . . . . . . . . . . . . . . . . . . . . .5-5 Windows test page . . . . . . . . . . . . . . . . . . . . . . . . . . . . . . . . .5-6 Magnetic stripe test card . . . . . . . . . . . . . . . . . . . . . . . . . . . . .5-7 Problems with card appearance . . . . . . . . . . . . . . . . . . . . . . . . .5-8 Print module . . . . . . . . . . . . . . . . . . . . . . . . . . . . . . . . . . . . . . .5-9 Topcoat (T panel) applied using the print module . . . . . . . .
v Safe human interface . . . . . . . . . . . . . . . . . . . . . . . . . . . . . . . A-3 Acknowledgments . . . . . . . . . . . . . . . . . . . . . . . . . . . . . . . . . . . A-3 Appendix B: Supplies and cards . . . . . . . . . . . . . . . . . . . . . . . . . . . B-1 Personalization supplies . . . . . . . . . . . . . . . . . . . . . . . . . . . . . . B-2 Print ribbons . . . . . . . . . . . . . . . . . . . . . . . . . . . . . . . . . . . . . . B-2 Supply roll storage . . . . . . . . . . . . . . . . . . . . .
vi User’s Guide for Select™ Platinum™ Series Printers
Overview 1 This chapter presents the following: • The purpose of this manual • Who should use this manual • The Datacard® Select™ Platinum™ Series photo ID printer, including a description of the printer, the models available, and their components User’s Guide for Select™ Platinum Series™ Printers
1-2 Overview About this manual This manual provides detailed information about the Datacard® Select™ Platinum™ Series photo ID printer. The first section provides operators with information about the printer and how to use it. The second section provides installers with requirements for installation and installation procedures. The third section provides reference information. This User Guide works with the online e-Guide, which you can see using the desktop icon installed with the printer driver.
1-3 Overview the card. The driver keeps track of the progress of the card in the printer and sends data for the next card as soon as the printer is ready and the data is available. See “PC and software specifications” on page 6-4 for more information about the printer driver and the PC on which it runs. The Datacard® Select™ Platinum™ Series photo ID printer uses Advanced Imaging Technology™.
1-4 Overview A printer can be ordered with the following optional modules: • Duplex module. The duplex module extends the length of the printer and flips the card to automatically print on both sides of the card. The printer label includes the number “2” if the printer has a duplex module. • Magnetic stripe module, for either 3-track (IAT) encoding or single-track NTT (J) encoding. The module is installed in-line with the print operation.
1-5 Overview Printer features Use the information in this section to identify the features and controls you use on the printer.
1-6 Overview Card cartridge lock (optional) The optional card cartridge lock allows you to lock the card cartridge into position, preventing cards from being removed without authorization. Some printers have two locks to meet the security requirements of the organization. Card output stacker The card output stacker holds the cards after they have been processed. Both completed cards and rejected cards go to the card output stacker.
1-7 Overview Swing arm The swing arm opens to give you access to the print ribbon cartridge, continuous cleaning roller, and printhead cartridge. Push down on the raised end of the swing arm to unlatch it and then open it. Ribbon tracker The ribbon tracker measures the movement of the print ribbon as it moves from the supply spool during printing.
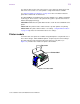
1-8 Overview Back of the printer Figure 1-5 shows the back of the Select printer: Contactless smart card port* ECP parallel data port USB data port Contactless smart card port* Contact smart card port* Power switch Power receptacle *Optional Figure 1-5: The back of the Select printer If the printer includes an optional duplex module, that module extends farther than the ports and receptacles. Find the following on the back of the printer: Data Port The printer includes two data ports.
1-9 Overview Smart card port(s) On printers equipped with the smart card option, use one or more of these connectors for the cable from the PC or contact station that carries the data to encode on the smart card chip. If the printer does not have any smart card options, the ports will not be installed in the printer. Who to call for assistance If you work with a Datacard-authorized dealer, distributor, or value-added reseller, contact them for assistance.
1-10 Overview User’s Guide for Select™ Platinum Series™ Printers
Using the printer 2 This section describes how to perform basic tasks required to operate the Datacard® Select™ Platinum™ Series photo ID printer. It describes: • Tips for success • Loading cards • Loading print ribbon • Powering on the printer and PC • The ready button and status light on the printer • Making cards • Removing cards • Responding to messages • Powering off the printer and PC Begin with the printer set up and the printer driver installed.
2-2 Using the printer Tips for success To achieve the best quality cards and to maintain optimum performance of your printer, follow these tips for success: • Use the best quality cards available. Good quality cards have a smooth, glossy PVC surface (with no debris embedded in the surface), a mylar signature panel (optional), a flush magnetic stripe (optional), are not pre-punched, and are printed only once. • Match the card design, the supplies you use, and the printer to obtain the results you want.
2-3 Using the printer Loading cards Load cards when beginning work or when the card cartridge is low on cards or empty. You can load cards when the printer power is on or off. You can also load cards while the printer is printing. To order more cards, contact your card vendor. For information on card requirements, see “Supplies and cards” on page B-1. Load cards i If the printer has a locking card cartridge, unlock the cartridge before removing it.
2-4 Using the printer For magnetic stripe cards, the magnetic stripe faces down and is positioned toward the side of the printer that opens (see Figure 2-3). (For some custom applications, you might receive instructions to place cards in a different orientation.) For smart cards, position the card so the chip is up and toward the open end of the card cartridge.
2-5 Using the printer Loading the print ribbon The printer uses print ribbon with color panels, continuous color, or color and topcoat. Full-color ribbon (such as YMCKT) must be Platinum Series ribbon, which uses blue ribbon spools. Monochrome (one color) ribbon on teal-colored ribbon spools can also be used. (Full-color ribbon on teal-colored spools cannot be used.) i The type of ribbon in the printer must match the print ribbon setting in the driver. To order new ribbon, contact your service provider.
2-6 Using the printer 3 Grasp the ribbon cartridge handle, and lift up to remove the print ribbon cartridge (see Figure 2-7). Avoid touching the printhead cartridge and ribbon tracker. Figure 2-7: Remove the print ribbon cartridge i Some users run a cleaning cycle whenever the print ribbon is changed. If your site follows this policy, see “Running a cleaning cycle” on page 4-2 for the steps to follow, and then return to this section.
2-7 Using the printer 6 Make sure print ribbon unwinds over the top of the print ribbon cartridge, not from the bottom. ♦ Replace the print ribbon cartridge 1 Place the ribbon cartridge onto the ribbon cartridge supports (see Figure 2-9). Make sure the cartridge is securely seated. Avoid touching the printhead cartridge and ribbon tracker. Figure 2-9: Replace the print ribbon cartridge 2 Close the swing arm, pressing it down until the push latch clicks into place. 3 Close the cover.
2-8 Using the printer Figure 2-10: Power on the printer 5 Press the PC Power switch to turn on the power to the PC. Turn on power to any other equipment needed. ♦ Ready button The Ready button allows you to pause the printer while printing a card, to clear an error condition, to cancel a print job and delete all data for the job, or to create a printer test card. • To pause the printer, press and hold the Ready button for three seconds or less.
2-9 Using the printer Status light The front corner of the printer has a light that provides information about the printer’s current state. Status light Figure 2-11: Status light Status Light Red Amber Green Description The printer is starting. The printer displays colors repeatedly while it initializes. The printer is ready and waiting to print cards. Steady green The printer is busy printing cards. Blinking green The printer is paused without an error.
2-10 Using the printer Making cards This section describes several ways to make cards using the Select printer. • Usually, cards are sent from a card creation application such as Datacard’s ID Works™ which captures, organizes, and formats the information on the card. A card creation application is special software that handles the types of information used on cards. See “Use a card creation application” for the steps to follow.
2-11 Using the printer 3 – Set the orientation for the card design—either portrait or landscape. – Set the magnetic stripe format and coercivity if you plan to encode magnetic stripe data. – For a shared printer, choose the Ribbon Type to match the ribbon installed in the printer. (Do not use the autodetect setting.) Using the application's page setup feature, set the following: – Set the paper size to CR80 Card 2.13" x 3.38". – Set all the margins to the same value as the driver.
2-12 Using the printer 7 • The paragraph style must be Normal. • The magnetic stripe text, along with graphics and text to print on the front of the card, must be on the first page. When the card data is captured and formatted correctly, select the application’s print function to send the card to print. The printer driver keeps cards in a queue if the printer is busy. For a directly networked printer, the print server manages jobs from any PCs that send jobs to the printer.
2-13 Using the printer 2 Dispose of partly processed cards according to your policies for handling the confidential data that might be on the cards. ♦ Responding to messages The printer provides information to the printer driver about the status of cards being processed. If the printer is not able to process and print a card, the printer driver generates a message on the PC in response to this situation. In most cases, the message is displayed on the PC.
2-14 Using the printer – The driver version and firmware version, described in “Using the Printer Toolbox” on page 3-12. For more information about obtaining service, see “Obtaining service” on page 5-16. Fix a printer problem 1 When a message is displayed on the PC, follow the suggested action. Click the Help button to identify the likely cause of the problem and the possible solution. 2 From the help topic, click the “Click for error recovery procedures” link to view a list of printers.
2-15 Using the printer Figure 2-14: Press the power switch to power off the printer 3 Follow your policy to secure unprinted card stock, supplies, and printed cards. 4 Close PC applications and power off other equipment (including the PC) following your established procedure. i If you store the printer for several months, remove supplies before storing it. Supplies to remove include cards, print ribbon, and the replaceable cleaning sleeve.
2-16 Using the printer User’s Guide for Select™ Platinum Series™ Printers
Using the printer driver 3 This chapter provides information to help you use the printer driver for the Datacard® Select™ Platinum™ Series photo ID printer effectively and efficiently.
3-2 Using the printer driver Working with Properties and other driver dialog boxes Printer driver settings and data are organized in a set of dialog boxes or pages where settings for the printer are displayed and can be changed. Printer driver settings and data are organized differently for Windows Me and 98, Windows 2000, Windows XP, and Windows NT. Use the section that applies to the operating system you use.
3-3 Using the printer driver • When the printer is installed, the default spool setting is “Spool printing so program finishes printing faster.” Use this setting, not “Print directly to printer.” • When the printer is installed, “Enable bi-directional support” is selected. This setting is required to display messages, print test cards, and for normal printerdriver communication. The printer or driver might stop operating if bi-directional communication is disabled.
3-4 Using the printer driver i If you have the Printer Toolbox open, you can click the Properties button on the Status page to open the Properties dialog box. The General, Details, Color Management and Sharing tabs are not displayed. Figure 3-1: Properties dialog box, Windows Me and 98 5 E Select the tab with the information to view or change. 6 To view help for settings, click on the What's This help button setting. and then click a If you make changes, click Apply to save the settings.
3-5 Using the printer driver Settings that control the non-printing operation of the printer are in the Properties dialog box for the printer. These settings include: • Port to which the printer is attached • Permissions for other users of the PC • Printer sharing E The SmartDriver provides help for the Printing Preferences dialog box, and Windows 2000 or XP provides help for the Properties dialog box. Help provides information about specific settings of the printer driver.
3-6 Using the printer driver 7 If you change the port, reboot the PC and power the printer off and on. ♦ Use the Printing Preferences dialog box Make sure the printer power is on and the printer is connected to the PC. 1 Select Start from the Windows 2000 or XP taskbar. 2 From the Windows Start menu, select Settings and then Printers (2000) or Printers and Faxes (XP). The Printers (and Faxes) window appears. 3 Click once on the SmartDriver icon.
3-7 Using the printer driver Figure 3-4: Advanced Options, Windows 2000 and XP E E If the selections you want to use are not available (are grayed out), make sure the feature is available in the printer. Also make sure that the printer is powered on and connected to the PC, and then resume the Printer Toolbox. See “Opening and using the Printer Toolbox” on page 3-12. For a network-connected printer, see eGuide for Select™ Platinum™ Series Printers.
3-8 Using the printer driver • Cleaning interval • Magnetic stripe encoding formats and coercivity E If you use a card creation application specifically designed to create cards, that application might include settings with cards that override driver settings. Settings that control the non-printing operation of the printer are in the Properties dialog box for the printer.
3-9 Using the printer driver 5 Select the tab that contains the information you want to view or change. 6 If you make changes, click OK to save the settings and close the dialog box. If you do not want to make changes, click Cancel to close the Properties dialog box. 7 If you change the port, restart Windows and power cycle the printer. ♦ Use the Default Document Properties dialog box Make sure the printer power is on and the printer is connected to the PC.
3-10 Using the printer driver E E If the selections you want to use are not available (are grayed out), make sure the feature is available in the printer. Also make sure that the printer is powered on and connected to the PC and resume communication using the Printer Toolbox. 6 To view help for settings, click on the What's This help button and then click any setting in the Printer Features list. A list of settings is displayed. Select the setting for which you want help.
3-11 Using the printer driver This printer icon is white with The Printer Toolbox is in advanced setup a blue magnifying glass. mode. Use advanced setup when changing printing intensity or the position of printing. The printer icon is white, includes a PC, and has a green stripe on top. The Printer Toolbox is running on a client PC using printer sharing over a network. The Printer Toolbox displays the client status and provides access to color settings.
3-12 Using the printer driver If the Printer icon is not visible, do one of the following: • Open Properties (Windows 98 and Me), select the Printer Info tab, and click the "Open Toolbox" button. • Open Printing Preferences (Windows 2000 and XP), click the Advanced button, and select "Printer Toolbox:Open". • Open Document Default Properties (Windows NT), and select "Printer Toolbox:Open".
3-13 Using the printer driver • At the bottom of the dialog box, the “Display Printer Toolbox when the PC starts” checkbox allows you to determine whether the Printer Toolbox is displayed when Windows starts. Suspending the Printer Toolbox To suspend communication, do one of the following: • Right-click on the printer icon in the lower right corner of the Windows desktop. From the pop-up menu, click Suspend. • On the Printer Toolbox, click Suspend.
3-14 Using the printer driver E For directly networked PCs, Datacard recommends that you use Advanced Setup only from an Administrative PC, and that you suspend communication at other PCs connected to the printer. Color settings The Color Settings tab is available from the Printer Toolbox at any time. Color settings (see Figure 3-9) are one of the features of Advanced Imaging Technology. For directly networked and shared PCs, color settings affect cards sent from the PC.
Maintaining the printer 4 This chapter provides information to help you maintain the Datacard® Select™ Platinum™ Series photo ID printer for optimal performance.
4-2 Maintaining the printer Running a cleaning cycle A cleaning cycle includes replacing the sleeve of the continuous cleaning roller and running a cleaning card. Replace the cleaning roller first, and then run a cleaning card. Select one of the following primary methods to make sure cleaning occurs regularly. • You can set the cleaning interval in the driver to indicate when it is time to clean. The default “Cards between cleaning” value is 250 cards.
4-3 Maintaining the printer 3 Insert the printer cleaning card on the input rollers, which you can see after removing the card cartridge (see Figure 4-2). Figure 4-2: Insert the printer cleaning card 4 Start a cleaning cycle by doing one of the following: – Click the OK button when the printer driver displays the “printer has reached the cleaning count” message. (If you do not click OK, the message appears each time you print a card, until you use the printer cleaning card.
4-4 Maintaining the printer 2 Press down on the swing arm until it clicks (step 1 in Figure 4-3). The push latch releases the swing arm. Lift the swing arm until it is fully open (step 2 in Figure 4-3). 2 1 Figure 4-3: Open the swing arm 3 Remove the print ribbon cartridge. 4 Lift the continuous cleaning roller unit out of the printer (step 1 in Figure 4-4). 2 1 Figure 4-4: Lift the roller out of the printer 5 Slide the used sleeve off the cleaning roller spindle (step 2 in Figure 4-4).
4-5 Maintaining the printer 6 Slide a new replaceable cleaning sleeve onto the spindle (step 1 in Figure 4-5). 2 3 1 3 Figure 4-5: Replace the cleaning roller sleeve 7 Hold the replaceable cleaning roller spindle by the ends and remove the protective cover from the sleeve (step 2 in Figure 4-5). Discard the protective cover. i Avoid touching the sticky surface of the replaceable sleeve. Oils from your fingers could reduce cleaning and could affect card quality.
4-6 Maintaining the printer Run the magnetic stripe cleaning card 1 Insert a magnetic stripe cleaning card into the exception card slot. Make sure the arrow is on top and pointing into the printer (see Figure 4-6). (You can also remove the card cartridge and place the cleaning card on the card input rollers.) Figure 4-6: Insert the magnetic stripe cleaning card ! Do not peel off the blue stripe on the back of the card. 2 Open the Printer Toolbox.
4-7 Maintaining the printer 2 Clean the two pick rollers: E If the printer has a locking card cartridge, unlock the cartridge before removing it. a Remove the card cartridge. b Remove the cap from the cleaning pen. Hold the end of the cleaning pen against the first pick roller (step 1 in Figure 4-7). 2 1 Figure 4-7: Clean the pick rollers 3 c Click the Clean Printer button in the Printer Toolbox. Click OK on the prompt that appears.
4-8 Maintaining the printer b Place the cleaning pen on top of the first transport roller (location 1 in Figure 4-8). 1 2 3 4 Figure 4-8: Roller locations in the card track i Do not place the pen next to the black transport base. The pen can get pinched between the roller and the transport base. c 4 Do one of the following to turn the rollers in the printer. • Click the Clean Printer button in the Printer Toolbox. Click OK on the prompt that appears.
4-9 Maintaining the printer • Click the Clean Printer button in the Printer Toolbox. Click OK on the prompt that appears. Do not insert a cleaning card! The driver sends a command to the printer to run the printer cleaning card. The printer moves rollers when it attempts to pick the card. • Turn the card advance knob to move rollers by hand. d Move the pen on the roller. e Lightly wipe any dirt from the end of the cleaning pen onto a clean cloth or paper.
4-10 Maintaining the printer 3 Insert the duplex cleaning card near the bottom of the card cartridge cavity (see Figure 4-10). Figure 4-10: Insert the duplex cleaning card 4 Open the Printer Toolbox if needed. 5 Click the Clean Duplex button in the Clean area. The printer automatically runs the duplex cleaning process and ejects the card in the output stacker when it is complete. 6 Remove the used cleaning card and discard it. 7 Replace the card cartridge.
4-11 Maintaining the printer • Some card features can require more frequent cleaning of the printer, especially if the cards are not high quality. Signature panels and magnetic stripes can deposit particles on rollers. Set the prompted cleaning cycle more often than the default of every 250 cards. • Clean printer rollers regularly, such as weekly, or every 1000 cards.
4-12 Maintaining the printer Edge of the printhead Figure 4-12: Clean the printing surface of the printhead E If the cleaning pen does not remove all contamination from the printhead, contact your service provider for additional assistance. 6 Close the swing arm by grasping the handle, lowering it into position, and pressing it down until the push latch clicks into place. 7 Close the printer cover. 8 Connect the power cable to the power source and power on the printer.
4-13 Maintaining the printer 4 Press down on the green printhead cartridge latch to release the printhead (step 1 in Figure 4-13). Figure 4-13: Printhead cartridge latch lever 5 Lift the printhead cartridge up and off the swing arm (step 2 in Figure 4-13). 6 Remove the printhead cables. – Push the black locking tabs to the side. Remove the gray connector of the printhead data cable from the printhead cartridge (see Figure 4-14).
4-14 Maintaining the printer Figure 4-15: Printhead ground cable ♦ Replace the printhead cartridge 1 Carefully align the openings on the (white) power cable plug with the wires of the power receptacle on the printhead. Push the cable’s plug all the way onto the receptacle (see Figure 4-14). 2 Push the (gray) data cable plug into the new printhead cartridge (see Figure 4-14). Make sure the locking tabs are in place. ! Do not press on the wires of the printhead cables.
4-15 Maintaining the printer A 2 1 Figure 4-17: Secure the printhead cartridge 6 Hold the printhead cartridge latch lever down (step 1 in Figure 4-17) and pivot the printhead cartridge down toward the swing arm (step 2 in Figure 4-17). Release the latch lever when the printhead cartridge is in place. 7 Clean the printhead. Move the cleaning pen back and forth along the length of the printhead edge. (See Figure 4-12 on page 4-12.) Be sure to completely clean the rounded edge of the printhead.
4-16 Maintaining the printer User’s Guide for Select™ Platinum Series™ Printers
Troubleshooting 5 This chapter explains how to troubleshoot the Datacard® Select™ Platinum™ Series photo ID printer and how to obtain service.
5-2 Troubleshooting When you experience problems using the printer, follow these guidelines: • Record the printer model and serial number. The model and configuration are displayed on a label that is visible when you open the top cover. • Keep notes on the problem, including the message number and the solutions you attempt. • Obtain information about the supplies used, including: – Card stock and type (such as composite or PVC, three-track magnetic stripe, manufacturer, and so on).
5-3 Troubleshooting If you think the printer is not working The printer, printer driver, and card creation application work together to produce cards. If the system is not working as you expect and does not display messages, follow these steps to isolate the source of the problem before contacting your service representative. 1 Make a printer test card, following the steps in “Making and evaluating test cards” on page 5-3.
5-4 Troubleshooting Make a printer test card E The Select printer does not need to be connected to a PC to print this card. 1 Power off the Select printer. 2 Confirm that all supplies are loaded. See “Using the printer” on page 2-1 if needed. E 3 If the printer has a magnetic stripe module, the cards for a printer test card must have a magnetic stripe. If it is a three-track module, be sure to use the high coercivity blank cards shipped in the supplies kit.
5-5 Troubleshooting Printer test card The printer test card is designed to perform most functions available in the printer. Red Blue Cyan Magenta Green Dark Blue Yellow Black Black Black Border Figure 5-2: ImageCard printer test card (using color ribbon) E Your service provider might ask you to use a different procedure to make a printer test card. The card printed might have additional areas printed on it. For UltraGrafix printers, the test card is printed with one color, such as black.
5-6 Troubleshooting Windows test page Follow these steps to print a Windows test page on all supported operating systems. Print the Windows test page Ei The printer must be connected to the PC with the driver installed, and both printer and PC must be running. 1 Select Start from the Windows taskbar. 2 Select Settings and then Printers (Printers and Faxes on Windows XP) from the Windows Start menu. The Printers (and Faxes) window appears. Click once on the printer icon.
5-7 Troubleshooting Microsoft Windows N T Win NT Print winNTtp Figure 5-4: Windows test page, landscape orientation The Windows test page can have a different appearance, depending on the operating system and how the printer is connected to the PC. E The Windows test page is generated by Microsoft Windows. The small size of the card, compared to printer paper, means that some of the text is not printed on the card.
5-8 Troubleshooting – Three-track: IAT formatted data (IATA data on track 1, ABA data on track 2, and TTS data on track 3). See “Magnetic stripe encoding” on page D-1 for more magnetic stripe information. – NTT track: NTT formatted data on the track. 4 Remove the card from the card output stacker. 5 Test the card by passing it through a card reader that will display the data encoded on the card. The encoded data should match the data printed on the test card.
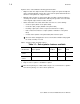
5-9 Troubleshooting This section describes possible problems you might observe with the quality of cards you produce with the Select printer. To diagnose and fix card quality problems, find the symptom in the tables that follow. For each possible cause, attempt the solutions listed. Problem Troubleshooting Print quality Table 5-1 on page 5-9 Topcoat quality—print ribbon Table 5-2 on page 5-15 Print module Table 5-1 describes problems that can originate in the print module.
5-10 Troubleshooting Table 5-1: Print quality problems What you see Possible causes Solutions The leading or trailing edge of the printed card is not the expected color. Cards might be slipping in the card track. Run a printer cleaning cycle, then clean the rollers. See Chapter 4. Two cards might have been picked. The print ribbon might not be DatacardPlatinum Series ribbon. ic4tcpnl The ribbon registration might be incorrect. No image is printed on the card or the printing is very light.
5-11 Troubleshooting Table 5-1: Print quality problems What you see Possible causes Solutions Printed card images (photos) are blurry. The image capture system needs adjustment. See the information for the image capture system. Printed cards, including text, are blurry. The rollers may be dirty. Run a printer cleaning cycle, then clean the rollers. See Chapter 4. The cards may not meet specifications. Obtain and use a different supply of cards. See Appendix B. The printhead may be dirty.
5-12 Troubleshooting Table 5-1: Print quality problems What you see Possible causes Solutions Printed card images (photos) look faded. The image capture system needs adjustment. See the information for the image capture system. Printed cards, including text, look faded. Print ribbon may have been stored improperly or damaged. Change the print ribbon and then print a test card. See Chapter 2. Color settings might not be set for the card design. Change color settings. See the e-Guide.
5-13 Troubleshooting Table 5-1: Print quality problems What you see Possible causes Solutions The printed card shows small unprinted spots. The card is scratched, the card surface is uneven, or the card edge has burrs. If the problem occurs frequently, obtain and use a different supply of cards. See Appendix B. The replaceable cleaning sleeve might be dirty. Run a printer cleaning card and then change the cleaning sleeve. See Chapter 4 The printer rollers might be dirty.
5-14 Troubleshooting Table 5-1: Print quality problems What you see Possible causes Solutions Part or all of the printed image is expanded. The printhead is not installed properly. Remove and reinstall the printhead cartridge. See Chapter 4. If the problem persists, contact your service representative. Part or all of the printed image is compressed. The card path may be obstructed. Check the card transport track for jams. Check the duplex module (if present) for jams. Clear any card jams.
5-15 Troubleshooting Topcoat (T panel) applied using the print module You apply topcoat to the card using a T panel as part of the print ribbon. When you apply topcoat, you might see problems. Use this table to address problems you see with topcoat (T panel) applied using the print ribbon. Table 5-2: Topcoat (T panel) quality problems—print ribbon What you see Random scratches appear in the topcoat of the printed card. The topcoat shows bands across the width of the card.
5-16 Troubleshooting Table 5-2: Topcoat (T panel) quality problems—print ribbon What you see The card shows irregular lighter or darker spots. Possible causes Solutions The topcoat panel of print ribbon is wrinkling because the intensity setting is too high. Lower the printhead intensity setting for topcoat. See the e-Guide.# The printhead is not aligned correctly. Contact your service representative. Obtaining service For repair assistance, contact your service provider.
5-17 Troubleshooting – If you are shipping the printer to use at another location, pack the power cord, data cable, and any other cables in the accessories bag. – If you are shipping the printer for service, do not ship cables with the printer unless asked to do so. 3 Remove all cards from the card cartridge, card output stacker, and printer. Do not ship cards unless asked to do so. 4 Remove the continuous cleaning roller from the printer unless asked to return it.
5-18 Troubleshooting 12 Place the “Top Front” and “Top Rear” shipping supports in place (step 2 in Figure 5-5). i Service might ask you to ship cards or additional samples of your current supplies. If service requests cards or supply samples, place them in an envelope, plastic bag, or in the accessory bag to prevent damage to the printer.
Before you install 6 This chapter presents the following: • Skills that installers need • Physical, electrical, and other requirements for the site • Requirements for the PC used with the Datacard® Select™ Platinum™ Series photo ID printer • The preferred sequence for installing this printer as part of an identification system User’s Guide for Select™ Platinum Series™ Printers
6-2 Before you install Installation audience To perform the procedures in the installation section of this guide, you need the following skills: • Ability to read and understand written and graphical instructions • Experience and comfort installing hardware (such as a printer, scanner, expansion card, etc.
6-3 Before you install Selecting the site After meeting general requirements, the site for the Select printer should meet the electrical, physical, and environmental requirements of the printer.
6-4 Before you install The clearance required is: • 3 inches (7.5 cm) at the back of the printer, for access to the power switch and for ventilation. • 2 inches (5.1 cm) on the right side of the printer to remove the card output tray. • 6 inches (15.3 cm) on the left side of the printer to remove and replace the card cartridge. • 3 inches (7.5 cm) in back of the printer for ventilation and for clearance for cables. • 13.25 inches (33.
6-5 Before you install separate parallel port so you have a compatible-mode port for the security key and an ECP port for the printer. • – Some parallel communication devices use a cable with a plug that allows another device to be attached, so that two parallel devices are attached to one PC parallel port, known as a pass-through or piggy-back plug. The printer and printer driver cannot communicate reliably through such a plug. Install a second parallel port in the PC if needed.
6-6 Before you install User’s Guide for Select™ Platinum Series™ Printers
Install the printer 7 This section describes how to install and set up the Datacard® Select™ Platinum™ Series photo ID printer.
7-2 Install the printer Unpacking the printer Select a site that meets the requirements described in “Before you install” on page 6-1. Unpack the printer, following these steps. You need scissors or another cutting device to unpack the printer. i Make sure you have one or more people to assist with unpacking the printer. Unpack the printer 1 Place the shipping carton on a firm level surface. 2 Use a scissors to open the taped area of the shipping carton.
7-3 Install the printer 8 9 Open the accessories bag and remove the contents.
7-4 Install the printer Care Center directly at 952.988.2316. Make sure you have the serial number, located on the inside of the printer, when you call. Connecting cables The printer requires a data cable and a power cable. The printer also uses one or more smart card cable(s) if a smart card module is installed. This section explains how to connect the printer cables.
7-5 Install the printer Figure 7-4: Connect the parallel port cable 2 Attach the other end of the cable to the parallel port on the PC (see Figure 7-4). Press the cable connector all the way onto the port, and then turn the posts to secure the cable to the PC. i Some parallel communication devices use a cable with a plug that allows another device to be attached, so that two parallel devices are attached to one PC parallel port, known as a pass-through or piggy-back plug.
7-6 Install the printer PC Printer Figure 7-5: Connect the USB cable – WAIT to attach the other end of the USB cable to the printer: Connect the printer to the PC after the printer is powered on and ready. (Using this method, Windows will keep track of the printer if you move the cable to another physical USB port on the PC.) i USB devices can be connected to the PC through another USB device (daisychained). USB hubs allow multiple USB devices (including other hubs) to be connected (cascaded).
7-7 Install the printer i If the smart card module uses a USB cable, wait until the driver is installed and a sample card has been printed before setting up the smart card module. If your printer has a smart card USB port, see the e-Guide for Select™ Platinum™ Series Printers for information about the files you need before connecting the smart card USB port and the steps to follow. Use the following procedure if your printer has one or more serial ports.
7-8 Install the printer Connect the power cord 1 Attach the power cord to the power receptacle on the back of the printer (step 1 in Figure 7-7). 2 1 Figure 7-7: Connect the power cord 2 Plug the other end of the power cord into a single-phase, 3-wire grounded receptacle with 90-130V AC or 195-254V AC at 50 or 60 Hz (step 2 in Figure 7-7). i The printer power supply automatically adjusts to the voltage of the input power. 3 Do not power on the printer until supplies are loaded.
7-9 Install the printer • Windows 2000, with Service Pack 3 • Windows 98 Second Edition (SE) • Windows NT 4.0, with Service Pack 5 or 6 See “PC and software specifications” on page 6-4 for details on operating system support and limitations. Installation choices • If the PC does not have a CD-ROM drive, request diskettes from your service provider. (Service providers can obtain the driver as diskette images from the partner page.
7-10 Install the printer 6 If the operating system detects the printer and displays the Found/Detected New Hardware Wizard, go to step 12. Figure 7-7: Datacard Group program 7 Click “To Install Driver.” The License Agreement page appears. 8 Click “Agree” to accept the license agreement. The “Connect the Printer and PC” page appears. 9 Click “Parallel Cable (LPT).” The “To use a Parallel Cable (LPT)” page appears. 10 Click “Add Printer” to start the Add Printer Wizard.
7-11 Install the printer – For Windows XP, the Windows Logo Signing message appears. Click “Continue Anyway” to continue with installation. Security on the PC might be set to prevent installation without a digital signature. See Windows help for “Logo signing” to change the security setting. – If installation is cancelled or cannot continue, see the e-Guide for Select™ Platinum™ Series Printers for steps to follow. 18 The installation program copies files to the PC and updates entries for the printer.
7-12 Install the printer The SmartDriver supports the Magna Platinum series printer, the SP35 card printer, Magna Class printer with AIT, the Select Class printer with AIT, the Select Platinum series printer, and the ImageCard IV printer. 30 Click Exit to close the Datacard Group program, and then remove the CD-ROM from the PC’s drive. 31 Driver installation is complete. Go to “Changing required printer settings” on page 7-18, and then print a sample card to verify driver installation.
7-13 Install the printer Figure 7-9: SmartDriver installation dialog box 6 Click Next on the first Printer Driver Setup dialog box. E 7 The installation program automatically detects the operating system on your PC and selects the driver for that operating system. Review the License Agreement and click Yes to continue. E 8 9 If you used a different sequence to start installation, you might have a slightly different sequence of prompts.
7-14 Install the printer Acrobat Reader. If you see this prompt, make sure Yes is chosen and then click Next to install it. 15 Follow the prompts to install Acrobat Reader. 16 The Restart Windows dialog box appears after a moment. 17 Click Finish to close the installation. The installation program will restart Windows when you click Finish. 18 Driver installation is complete. Go to “Changing required printer settings” on page 7-18, and then print a sample card to verify installation.
7-15 Install the printer 8 9 A Windows message appears. – On Windows 2000, the Digital Signature Not Found message appears. Click Yes to continue with installation. Security on the PC might be set to prevent installation without a digital signature. See Windows help for “digital signature” to change the security setting. – On Windows XP, the Windows Logo Signing message appears. Click Continue Anyway to continue with installation.
7-16 Install the printer 20 If a message appeared as described in step 18, click “Acrobat Reader” on the User Information page. Follow the prompts to install Acrobat Reader. 21 If you will be using more than one type of printer on this PC, install e-Guides for each printer type, following steps 15 through 19.
7-17 Install the printer 9 Click Yes to accept the software license. 10 The installation program displays a question asking whether you would like to view the Release Notes. Do one of the following: – Click Next to continue. – Click Yes and then Next to open the Release Notes in WordPad. Close the Release Notes when you have viewed the information. 11 Choose the e-Guides to install. You can choose the Magna Class e-Guide, the Select Class e-Guide, ImageCard IV e-Guide, or the SP35 e-Guide.
7-18 Install the printer Changing required printer settings After installing the printer driver, there are several other tasks you might need to perform. The required tasks are: • For Windows 2000, XP, and NT, set permissions to the printer for other users of the PC. See “Setting printer permissions” on page 7-21 for the steps to follow. • For Windows 2000, XP, and NT, make sure that users of the printer have permission to write files to the temp file location specified in the PC configuration.
7-19 Install the printer Printing sample cards The printer is shipped with cards that are printed in the factory. You can also print a sample card, which looks like one of the factory-printed cards, using the Printer Toolbox. Print sample cards 1 Begin with the printer powered on and connected to the PC, supplies loaded, the printer driver installed, and Windows running. 2 By default, the Printer Toolbox is open when Windows starts. If needed, doubleclick the icon for the Printer Toolbox.
7-20 Install the printer • The settings for the USB port (if used) are correct. See “PC port settings” on page C-1 for more information. • Supplies are installed and cartridges are loaded correctly. “Using the printer” on page 2-1 for more information. • The printer is ready to print. The status light on the printer should be steady green before you send a sample card. “Status light” on page 2-7 for more information.
7-21 Install the printer • Make all features of the printer and driver available to users, including messages. (Messages inform users when they need to change the ribbon, load cards, and fix problems.) • Prevent any access to the printer by unauthorized users. Set printer permissions for Windows 2000 and XP 1 From the Windows taskbar select Start, then Settings, and then Printer. The Printers window appears. 2 Highlight the SmartDriver icon by clicking on it once.
7-22 Install the printer 8 Select Apply to save the change. Save changes for each name. 9 Repeat steps 5 through 8 to add other users or groups. 10 Select OK to close the Properties dialog box. ♦ Set printer permissions for Windows NT 1 From the Windows taskbar select Start, Settings, and then Printers. The Printers window appears. 2 Highlight the SmartDriver icon by clicking on it once. 3 From the menu bar, select File and then Properties. The Properties window for the SmartDriver appears.
Safety and compliance A This appendix presents: • Regulatory compliance information • Safety information • Trademark acknowledgments Regulatory compliance Notice for USA (FCC notice) This equipment generates, uses, and can radiate radio frequency energy. If it is not installed and used in accordance with this instruction manual, it may interfere with radio communications.
A-2 Notice for Taiwan and China 警告使用者: 這是甲類的資訊產品,在居住的 環境中使用時,可能會造成射頻 干扰,在這种情況下,使用者會 被要求采用某些适當的對策。 Notice for Japan This equipment is in the Class A category of information technology equipment based on the rules of the Voluntary Control Council for Interference by Information Technology Equipment (VCCI). When used in a residential area, radio interference may be caused. In this case, the user may be required to take appropriate corrective actions.
A-3 73/23/EEC. Therefore, safety issues pertaining to operation and repair of Datacard® equipment are primarily environmental and human interface. The following basic safety tips are given to ensure safe installation, operation and maintenance of Datacard® equipment and are not to be considered as comprehensive on all matters of safety. Safe environment • Connect equipment to a grounded facility power source. Do not defeat or bypass the ground lead.
A-4 User’s Guide for Select™ Platinum Series™ Printers
Supplies and cards A This appendix describes specifications, part numbers, and handling for supplies and components used with the Datacard® Select™ Platinum™ Series photo ID printer.
B-2 Personalization supplies Print ribbon is used to personalize cards. This section describes Datacard®-certified personalization supplies for the Datacard® Select™ Platinum™ Series photo ID printer with Advanced Imaging Technology™ and how to store them. i Use Datacard-certified supplies in the Select printer.
B-3 i If you change the type of ribbon you use, be sure to make the appropriate changes to the printer driver. See “Changing the type of print ribbon” in the e-Guide for Select™ Platinum™ Series Printers. i When you use a monochrome-only print ribbon, use a printhead cartridge designed for monochrome printing for optimum results. When you use a color ribbon that includes a K (monochrome or black) panel, use a color printhead cartridge. See “Printhead cartridge” on page B-11.
B-4 i Actual card thickness can vary by up to ten percent from the sizes listed. Smart card chips can be raised slightly from the printing surface. Card bow must be less than the thickness of the card. Figure B-1: Excessive card bow Card material Use cards made of the following types of material: • Glossy PVC surface, either 100% PVC cards or composite cards with a PVC surface. • Cards with a magnetic stripe on one side of the card. • Cards with a smart card chip on the top of the card.
B-5 0.2 in (0.51 cm) Magnetic stripe on back 0.45 in (1.14 cm) Figure B-2: Pre-punched card block-out areas The dimensions show how far from the edge any punched areas must be (dimensions include any tolerance): • The cards cannot have a punched area closer than 0.2 in (0.51 cm) from the lefthand edge (as loaded in the card cartridge). • The cards cannot have a punched area closer than 0.45 in (1.14 cm) from the right edge (as loaded in the card cartridge).
B-6 Card handling These guidelines apply to unprinted cards. Any debris or particles on an unprinted card’s surface can reduce print quality and damage the printhead. Grease or oils, such as oils from your fingers, also reduce print quality. • Keep cards completely clean. • Do not touch the print surface of a card with your fingers or hands. • Do not use a rubber band to bind blank cards together. • If you drop a card on the floor, do not insert it into the Select printer.
B-7 Printer cleaning cards are sold in packages of 10. The package part number is 557297-001. Printer cleaning cards are also sold as part of cleaning kits, described below. Figure B-3: Printer cleaning card i If the printer does not have a magnetic strip module, you can use cleaning card part number 548714-001. Replaceable cleaning sleeve Use a replaceable cleaning sleeve on the continuous cleaning roller. Change the replaceable cleaning sleeve before you run a printer cleaning card.
B-8 Cleaning kits (optional) Cleaning kits include 5 printer cleaning cards and 5 replaceable cleaning sleeves. The following cleaning kits are an available option: Printer features Part number For printers with magnetic stripe modules# 549718-001 For printers without magnetic stripe modules 549717-001 #.
B-9 Cleaning pen To maintain print quality and prolong the life of the printhead and other parts, use a cleaning pen. The cleaning pen is part number 557492-001. Each pen can be used up to eight times. Printer driver CD-ROM The Select printer drivers are delivered on a CD-ROM. The CD-ROM also contains associated files and utilities you might need.
B-10 Path Purpose D:\e-Guide\ Select Class with AIT\DS-e-Guide.pdf# and other files with names in the S_xxx.pdf format Select e-Guide files, which contains error recovery procedures linked to help. D:\e-Guide\ ImageCard IV -e-Guide.pdf# and other files with names in the 4_xxx.pdf format ImageCard IV e-Guide, which contains error recovery procedures linked to help. D:\e-Guide\SP Series\ SP_Info_Central.chm and other files with names in the SP_xxxxx.chm format.
B-11 Datacard Web site at www.datacard.com. You also can request the newest release of the printer driver on CD-ROM. The part number changes with each release. The e-Guides are also updated from time to time and can be downloaded from the Datacard Web site at www.datacard.com. Printer components The Select printer has a replaceable printhead cartridge. You can also order additional or replacement parts. This section describes the printer parts you can order.
B-12 Print ribbon cartridge The print ribbon cartridge is part number 555545-998. Figure B-10: Print ribbon cartridge Card cartridge The card cartridge is part number 549311-999. If you have a locking card cartridge, the part number is 549311-998. Figure B-11: Card cartridge Cleaning roller spindle The cleaning roller spindle holds the replaceable cleaning sleeve. The part number is 549130-001.
B-13 Parallel port cable The parallel port cable must be a shielded, Type C, IEEE 1284 parallel port cable, up to 2 meters long, maximum. The part number is 550093-001. Figure B-13: Parallel port cable USB cable The USB cable must be a Type CM 30V, up to a maximum of 2 meters long. The part number is 807614-001. Figure B-14: USB cable Power cable The Select printer uses one of the following power cords: • U.S. power cable (part number 804517-001) Figure B-15: U.S.
B-14 Smart card cable If the Select printer has one or more smart card modules, it uses a smart card cable to connect the smart card port and the PC. Use a cable that matches the port installed in the printer. See “Connecting cables” on page 7-3 for information on ports. Serial cable The smart card serial cable must be a DB9 serial cable, up to 2 feet (1.8 meters) long maximum. The smart card serial cable is part number 805815-004.
B-15 Datacard printers, including the Select printer. This manual is available only as part of the kit, which is available on the Datacard Web site. • ImageCard Select with Advanced Imaging Technology™ Service Manual, Part Number 539142-001 This manual is delivered on CD-ROM and provides information to service providers who maintain or repair the Select printer.
B-16 User’s Guide for Select™ Platinum Series™ Printers
PC port settings A This appendix provides information about the PC on which the printer driver for the Datacard® Select™ Platinum™ Series photo ID printer is installed. It describes: • Configuring the ECP parallel port • Setting port values • Configuring the optional smart card serial port This appendix includes a section for settings that are handled the same way in all operating systems and also includes sections for each PC operating system supported by the printer driver.
C-2 PC port settings for all operating systems This section describes how to configure ports. i See the information that accompanies your PC for details about changing the BIOS settings. Configuree the ECP parallel port For most PCs, the parallel port is configured as an ECP parallel port in the PC's BIOS. The following applies to some PCs and to the Windows 2000, Windows XP, Windows Me, Windows 98, and Windows NT operating systems. 1 Close all open applications. 2 Reboot the PC.
C-3 5 Click the + next to Ports (COM and LPT) to display the port entries. Usually the second installed port is LPT2. 6 Click Printer Port (LPT2), or other entry for the installed port, and then choose the Properties button. The Printer Port (LPT2) Properties dialog box appears (see Figure C-1). 7 Click the Resources tab. – Make sure that “Use automatic settings” is not chosen. – The “Conflicting device list” should show No conflicts.
C-4 Set up a Universal Serial Bus (USB) port These steps apply to the USB data port and to an optional smart card USB port. If the printer includes two USB ports, follow these steps for each port. The ports are not connected inside the printer, which preserves the data security of the smart card port. 1 Right-click on the My Computer icon on the desktop and then choose Properties from the popup menu. The System Properties dialog box appears. 2 Choose the Device Manager tab to view a list of devices.
C-5 Figure C-2: USB Root Hub Properties dialog box If the Resources tab shows conflicts, choose another configuration or change the settings for the port, following port instructions. 9 Click OK on the Properties dialog box and on the System Properties dialog box to save settings and close the dialog boxes. ♦ PC settings for Windows 2000, XP & NT 4.0 This section describes the following for PCs running Windows 2000, XP, or NT 4.0.
C-6 4 Choose the Ports tab. 5 Make sure the correct port (usually LPT1) is chosen in the Port list. “SmartDriver“ should appear in the Printer column for the checked port. 6 Make sure that "Enable Bidirectional Support" is checked. i Do not choose "Enable Printer Pooling." To set up a printer pool on Windows 2000 or XP, see "Advanced Information" in the e-Guide for Select™ Platinum™ Series Printers. 7 Choose OK to save the settings and close the Properties window. 8 Close the Printers window.
C-7 Figure C-3: Ports dialog box 3 Choose the Settings button to display the port settings. i If the PC has more than one serial port, make sure you view the settings for the serial port to which the smart card module is attached. Figure C-4: Settings dialog box 4 5 Choose the following settings: Setting Value Baud rate 9600 Data bits 8 Parity None Stop bits 1 Flow control None When the settings are correct, click OK to save settings and close the dialog box.
C-8 Set the serial port on Windows XP 1 From the Start menu, choose Settings and then Control Panel. 2 From the Control Panel, choose the System icon. 3 Choose the Hardware tab, and then choose the Device Manager button. 4 Press the "+" next to Ports and double click the Communications Port to open the Communications Port Properties dialog box (Figure C-5). Figure C-5: Communications Port Properties dialog box 5 Choose the Port Settings tab.
C-9 PC settings for Windows Me and 98 This section describes the following for PCs running Windows Me and 98. • Setting parallel port values • Setting USB port values • Setting serial port values Setting parallel port values—Windows Me and 98 Parallel port values include the port to which the printer is assigned, the communication mode for the port, and printer spooling. Verify port assignment and settings 1 From the Windows taskbar choose Start, Settings, and then Printers.
C-10 6 Click the entry for the port to which the printer is assigned (such as LPT1 or LPT2). 7 Choose the Properties button to display the Properties dialog box. 8 Choose the Driver tab, and then Choose the Update Driver button to display the Select Device dialog box. 9 Make sure "Show all devices" is chosen. 10 In the Manufacturers list, choose (Standard port types). In the Models list, choose ECP Printer Port, if available.
C-11 Figure C-6: Device Manager tab of System Properties dialog box 4 Click the Plus sign + next to Ports (COM & LPT) to display a list of ports. 5 From the Ports list, choose the port, such as COM1 or COM2 (Figure C-6). 6 Choose the Properties button to display the port settings. i If the PC has more than one serial port, make sure you view the settings for the serial port to which the smart card module is attached.
C-12 Figure C-7: Settings dialog box 7 Choose the Port Settings tab. 8 Choose the following settings: 9 Setting Value Bits per second 9600 Data bits 8 Parity None Stop bits 1 Flow control None When the settings are correct, click OK to save settings and close the dialog box.
Magnetic stripe encoding A This appendix describes the specifications and characters you can encode on a magnetic stripe in the Datacard® Select™ Platinum™ Series photo ID printer, including: • IATA, ABA, and TTS character sets • NTT character sets This appendix also describes basic steps required to set up for magnetic stripe encoding. i To use custom magnetic stripe formats (frequently sent as binary data), contact your service provider for more information.
D-2 • The following table lists formatting choices available and provides information about setup: Format IAT NTT Triple IATA Proprietary Custom Printer Magnetic stripe Module IAT Data can be formatted by: Data is verified by: Use Diagnostics ? ID Works Driver IAT No Magnetic Stripe Fonts (includes Preface) Printer IAT No Escape Codes Printer IAT No ID Works Driver NTT Coercivity Magnetic Stripe Fonts (includes Preface) Printer NTT Coercivity Driver Use printer settings Yes
D-3 • Proprietary formats, used for applications such as driver’s licenses or hotels, can be used with the printer. Obtain the guidance of your service provider or VAR when using proprietary formats. • See the Release Notes file for the operating system you use to identify any limitations that might apply to magnetic stripe encoding. • On Windows 98 and Me, data formatted with magnetic stripe fonts or escape codes cannot be located in rotated fields.
D-4 6 – For Windows 2000 and XP, select Printing Preferences. On the Printing Preferences dialog box, click Advanced to display Advanced settings. – For Windows NT, click Document Default Settings. Click the Advanced tab to display Advanced settings. – If you have the Printer Toolbox open, you can click the Properties (9x), Printing Preferences (2000 and XP), or Default Document Properties (NT) button on the Status page to open the Properties or Advanced dialog box.
D-5 • The driver does not check the data you send. (The printer checks the data.) This is the same behavior as magnetic stripe fonts. On Windows 98, 98 SE, and Me, data formatted with escape codes cannot be located in rotated fields.
D-6 IATA, ABA, and TTS character sets The IAT encoding format selection for the Select printer encodes IATA data on track 1, ABA data on track 2, and TTS data on track 3. IATA (International Air Transport Association) The maximum field length for IATA format is 76 characters. IATA allows spaces, upper case alphabetic characters, numeric characters, and the following special characters: !#$%'()*+,-./;:<@>=^]\["&_ ABA (American Bankers Association) The maximum field length for ABA format is 37 characters.
D-7 NTT character set The maximum field length for NTT (Nippon Telephone & Telegraph) format is 69 characters. NTT allows spaces, numeric characters, upper case alphabetic characters, lower case alphabetic characters, and special characters. From a PC running a Japanese edition of a supported Windows operating system, NTT also supports 55 Katakana characters. The special characters include: !"#$%&'()*+,-.
D-8 Magnetic Stripe settings used by the Select printer The following table presents technical details that apply to encoding magnetic stripe data.
Index A AC power 1-8 AC power cord B-13 accessories bag 7-3 administrator settings 3-2 Windows 2000 and XP 7-9 Windows 2000, XP and NT 7-21, C-5 Windows NT 7-12 Adobe Acrobat Reader B-10 Advanced Imaging Technology about 1-3 card appearance 5-8 color settings 3-13 advanced setup 3-11, 3-13 anti-static wrist strap B-11 application cards 2-10, 6-5 application programming interface (API) 2-10, D-1 B bar code quality 2-2 black panel printing test 2-11 blocking print 3-2, 3-4, 3-7 box opening 7-2 button on mess
2 cleaning (continued) kit B-8 magnetic stripe module 4-5 more often 4-2 pen 4-10, B-9 printer 4-2 printer cleaning card 4-2 printer rollers 4-11 printhead 4-11 prompt 4-2 replaceable cleaning sleeve 1-7, 4-3, B-7 rollers 4-6 run cleaning cycle 3-11, 4-2 spindle part number B-12 StickiCards 4-11, B-4 tips 4-10 using pen 4-6 when changing print ribbon 2-6, 4-2 clearance 6-4 codes, magnetic stripe escape D-3 color printer icon 3-10 ribbon, see print ribbon B-2 settings 3-11 communication bi-directional 3-2 EC
3 Index image quality bar code 2-2 blank card 5-10 blank spots 5-9 blurry image 5-11 blurry text 5-11 card design 2-2 card stock 2-2 data unevenly positioned 5-11 discolored image 5-12 faded image 5-12 image not printed 5-10 image upside down 5-11 misaligned colors 5-10 spots 5-13 unexpected colors 5-10 unprinted lines 5-9 unprinted spots 5-13 wavy lines 5-13 woodgrain 5-13 ImageCard model 1-3 installation Adobe Acrobat Reader B-10 audience 6-2 printer driver 7-8 problems 5-2 report 7-19 sequence 6-5 set
4 Platinum Series print ribbon 1-2 printer 1-1 Platinum series print ribbon B-2 port data 1-8, 6-4 ECP capable parallel port 6-4, 7-5, C-2 PC requirement 6-4 smart card serial 7-6, C-6, C-10 USB 6-5, 7-5 USB settings C-4 power cord 7-8, B-13 PC 2-8 printer on 2-7 receptacle 1-8, 6-3 switch 1-8, 2-7, 5-4 print blocking 3-2, 3-4, 3-7 edges and quality B-4 print quality blank card 2-2, 5-9, 5-10 See also image quality 5-9 setup tips 7-19 text missing 5-9 troubleshooting 5-9 print ribbon cartridge 1-7, 2-5, B-1
5 Index printer parts (continued) locking card cartridge 1-6 parallel port 1-8 power cord 7-8, B-13 power receptacle 1-8, 7-8 power switch 1-8, 2-7 print ribbon cartridge 1-7, B-12 printhead cartridge 1-7, 4-12, B-11 ready button 1-6 replaceable cleaning sleeve 4-3 ribbon tracker 4-10 smart card module 1-5 smart card port 1-9 smart card serial port 7-7 status light 1-5, 2-9 supply cartridges B-12 swing arm 1-7, 2-5 top cover 1-5, 2-5 USB cable 7-5 USB port 1-8 Printer Toolbox 3-11 about 3-9 advanced setup
6 S safety A-2 sample cards 5-3 security data on print ribbon 2-6 incomplete cards 2-12, 2-13 key 6-4 print ribbon 2-12 supplies 2-15 serial cable smart card 7-7, B-14 serial number 1-3, 1-7 serial port 1-9, 7-6 service obtaining 5-16 who to call 1-9, 5-1, 7-3 Service Pack Windows 2000 7-9 Windows NT 4.
7 Index type style 2-11 U UltraGrafix models 1-3 Universal Serial Bus (USB) port 1-8 USB cable B-13 connect cable 7-5 maximum number of hubs 7-6 port 1-8 port settings C-4 utilities Cleanup B-10 SmartDriver Diagnostics B-10 W weight 6-3 who to call for assistance 1-9, 7-3 Windows User’s Guide for Select™ Platinum Series™ Printers supported operating systems 6-5 test page 5-6, 5-7 Windows 2000 and XP PC settings C-2, C-5 permissions 7-18, 7-21 printer pooling 7-9 Printing Preferences 3-5 Properties 3-4