
User manual


Installation and Setup
ProMaster 2500 User Manual 2-25
The label calibration value can also be changed while the 2500 is
processing devices using the STOP command. Press
STOP
on the 2500’s
keyboard and then
LOWER CASE
+
C
. The 2500 displays:
where X represents the current setting. Enter a new value (between 0 and
255) on the 2500’s keyboard. Press
ENTER
to save the value.
Press
CAL
to run the ADC optic’s label calibration. When the calibration
has completed, press
START
to continue running the Task.
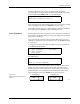
Label Placement
The label placement value controls the position of the label on the device.
Using the factory default setting (autocenter), the 2500 positions the label
in the center of the device.
You can change this parameter either from the 2500’s front panel or in
TaskLink. To change the value in TaskLink, refer to the
ProMaster
dialog
box on page 3-9.
To change the label placement from the 2500’s front panel, press
2
from
the LABELER SETUP MENU.
The 2500 displays:
where X represents the current setting. Enter a number from 0 to 254 to
change the setting. Entering 0 places the left end of the label on the
leading edge of the device. Each increase in this value moves the label
0.010 inch further away (delayed) from the leading edge of the device.
After entering the value, press
ENTER
to save the new setting.
PROGRAM/TEST LABEL
ENTER LABEL CALIBRATION VALUE (X):_
* * * LABELER SETUP MENU * * *
1 - LABEL CALIBRATION 4 - SETUP MENU
2 - LABEL PLACEMENT
3 - LABEL ADJUST
ENTER LABEL PLACEMENT VALUE (X):_
ENTER “A” FOR AUTO CENTERING
Figure 2-16
Changing the Label Placement
Value
PLACEMENT = 0
PLACEMENT = A
1363-2
LABELLABEL