
User manual


Installation and Setup
ProMaster 2500 User Manual 2-15
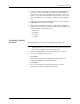
Installing a New Ribbon
Each new ribbon roll has a long leader to thread through the labeler.
Follow the procedure below to install the new ribbon (refer to Figure
2-12).
1. Prepare the ribbon threading path by pushing the ribbon pinch roller
to the right.
2. Install the ribbon take-up core (one empty core is supplied with the
printer) on the ribbon take-up hub. After threading the ribbon, you
will tape the ribbon’s leader to this cardboard core.
3. Thread the ribbon leader over ribbon alignment roller 1, over the
print head, and over ribbon alignment roller 2.
4. Thread the ribbon leader under the ribbon drive roller, over the
ribbon pinch roller, and down to the ribbon take-up roll (see Figure
2-12).
Figure 2-12
Threading a Ribbon in the Thermal Printer
2304-2
PRINT HEAD (Retracted position)
RIBBON ALIGNMENT ROLLER 2
RIBBON ALIGNMENT
ROLLER 1
RIBBON DETECT OPTIC
RIBBON ROLL
RIBBON PINCH
ROLLER
RIBBON DRIVE ROLLER
PLATEN
RIBBON TAKE-UP ROLL
APPLICATION AREA
123
4
56
8