
User manual


Installation and Setup
ProMaster 2500 User Manual 2-11
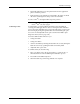
8. Thread the label liner across the platen and lower the application
plate to hold it in position.
9. Route the liner to the left side of roller
E
and to the right of roller
F
.
Allow the remaining liner to drape to the left of knob
G
.
10. Move roller
F
to the right until it snaps into position.
Note: To ensure correct label printing and application, make sure both pinch
rollers (
B
and
F
) are fully engaged.
Calibrating Labels
At certain times, you must calibrate the labels so that the 2500 can
correctly print and apply them to devices. During the label calibration
process, the ADC (label detection) optic reads and assigns a value to the
amount of light passing through the label when it is blocking the optic.
You can view and adjust this ADC optic value from the 2500’s optics
diagnostics menu (refer to page 5-34).
You must calibrate labels whenever you:
• Change the labels
• Change the ribbon
• Advance the labels by running the label drive motor test, turning the
label advance knob, or pulling the labels forward by hand
• Adjust the ADC optic value
To calibrate labels, do the following:
1. Place your finger next to the press bearings to “catch” the two or
three labels that are advanced during the calibration process.
2. Press
CAL
on the 2500’s keyboard.
3. When the labels stop advancing, calibration is complete.