
User manual


Installation and Setup
2-10 ProMaster 2500 User Manual
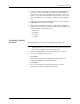
Refer to Figure 2-9 and follow these steps to install a roll of labels:
1. Raise the application plate, and release rollers
B
and
F
by sliding
them in the direction shown by the arrows in Figure 2-9. This
prepares the path of the labels to be threaded through the labeler.
2. Remove the label reel cover (see Figure 2-9).
3. If labels are already installed, unthread the liner, and remove the
label roll by putting your thumbs into the cut-outs in the supply reel
and rocking the roll back and forth as you pull it off.
4. Install the labels on the supply reel so that the label liner passes to the
left of optic
A
(see Figure 2-9).
Note: Do not tighten the label roll on its core. The roll is intentionally wrapped
loosely so that high temperature and humidity do not cause the labels to
peel incorrectly.
5. Replace the label reel cover over the label reel.
6. Unroll approximately two feet of liner, and thread it around the left
of roller
B
, between
C
and
D
, and then between the platen and press
bearings.
7. Move roller
B
to the left so it pinches the label liner and holds it in
position. Ensure that the labels are fully aligned between the
underside of the platen and above
C
and
D
.
Figure 2-9
Loading Labels in the Dot Matrix
Printer
1851-2
D
PRESS BEARINGS
PLATEN
APPLICATION PLATE
E
LABEL REEL COVER
F
B
C
A
G