
User manual


Installation and Setup
ProMaster 2500 User Manual 2-9
Setting Up the Dot
Matrix Printer
The following sections describe the setup procedures that need to be
checked and performed on the dot matrix printer before labels can be
printed properly.
Checking the Application
Plate Height
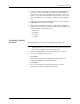
Make sure the dot matrix printer’s application plate is aligned correctly
by holding a device in your fingers in the “dead bug” position, with the
leads pointing up, and sliding it across the application plate, over the
press bearings, and onto the bearing plate (see Figure 2-8). The device
should move smoothly across the press bearings.
If device travel is not smooth, use a 7/64-inch hex wrench to loosen
(raise) or tighten (lower) the screw on the left side of the plate (near the
bearings) until a smooth transition is achieved (see Figure 2-8).
Loading Labels
Labels are positioned on a non-adhesive liner material so they will peel
easily as they advance around the label platen’s point. The label part
number is written on a label attached to the inside of the label roll.
Note: The label part number is marked on the inner cardboard reel. You can
identify a roll of ProMaster 2500 labels by the “QF” prefix in the part
number. Labels for other Data I/O products will look the same but cannot
be used on the 2500.
Figure 2-8
Adjusting Plate Height
1853-1
PLATEN
APPLICATION PLATE
PRESS BEARINGS
BEARING PLATE
SCREW (1 of 4)
DEVICE
TOP VIEW OF BEARING PLATE