
User manual


Repair and Replacement Procedures
ProMaster 2500 User Manual 7-13
Replacing the Print
Drive Motor
Follow the steps below to replace the print drive motor.
1. Turn off the 2500 and remove the power cord.
2. Unplug the motor cable from the motor power supply.
3. Push down on the belt tension wheel and remove the drive belt.
4. Loosen the 5/64-labeler knob set screw (two screws are used on the
thermal printer) and pull the knob off the motor shaft.
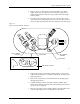
5. Remove the four 3/32-inch hex screws that hold the motor to the
labeler plate and remove the motor. See Figure 7-11.
6. Install the new motor and reinstall all the components you removed.
Replacing the Dot
Matrix Print Head
Follow the steps below to replace the print head. If you need to adjust the
gap between the platen and the print head, refer to the “Adjusting the
Print Head Gap” procedure on page 5-24.
The impact print head is mounted on a small printed circuit board(PCB).
Do not attempt to remove the print head from the PCB. The new print
head is mounted on a new board, which should be installed as one
assembly.
1. Turn off the 2500 and remove the power cord.
2. Use a 3/32-inch hex wrench to remove the two hex screws that hold
the print head to the print head mounting blocks.
3. Remove the two cables (J-22 and J-23) from the cable connectors on
the print head PCB.
Note: Identify and mark the polarity of the cables before you remove them.
4. Install the new print head assembly.
Figure 7-11
Removing the Print Drive Motor
(Dot Matrix Printer shown;
Thermal Printer similar)
2310-1
PRINT DRIVE
MOTOR
SCREW (1 of 4)